
Operation Manual

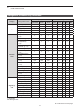
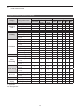

Table Of Contents
- IMPORTANT
- Section 1 ACCESSORIES
- Section 2 PREPARATION
- Section 3 BASIC OPERATION
- Section 4 ADVANCED OPERATION
- Section 5 SCAN OPERATION
- Section 6 MENU SCREEN
- Section 7 NXDN™ OPERATION
- NXDN™ system operation
- Transmitting a call
- Receiving a call
- Roaming function (For Multi-site Trunking operation)
- Site Lock function (For Multi-site Trunking operation)
- Site Select function (For Multi-site Trunking operation)
- Incoming list
- Outgoing list
- Encryption function
- Over The Air Programming (OTAP) function
- Section 8 MDC 1200 SYSTEM OPERATION
- Section 9 BIIS 1200 SYSTEM OPERATION
- Section 10 VOICE RECORDER FUNCTIONS
- Section 11 Bluetooth® OPERATION
- Bluetooth® Wireless Technology operation
- Turning ON the Bluetooth® function
- Pairing with a headset or a data device
- Headset settings
- Accepting a pairing request from a Bluetooth® device
- Disconnecting from a Bluetooth® device
- Deleting a Bluetooth® device from the pairing list
- Resetting the installed Bluetooth® unit
- The maximum number of paired devices
- Section 12 OTHERS
- Section 13 OPTIONS
2
PANEL DESCRIPTION
2-9
Disable
Set to disable the key�
NOTE: This key function is assignable to only
[Ext� Emer]�
Null
No function�
Menu
Push to display the “Menu” screen�
L Depending on the presetting, you may be able to make
various calls, select various functions and adjust the
transceiver settings in the Menu screen�
L In the Menu screen, you cannot use the assigned key
functions�
Home
In the Analog mode
Push to reset the destination station code to the
default, if it has been manually changed�
While in the Audible mode, push to return to the
Inaudible mode and automatically send a reset code
or Clear Down signal�
In the Digital mode
z Push to reset the destination Unit ID and call type to
the default, if they have been manually changed�
z Push to cancel the Talk Back function, if it is
activated�
z While in the Selection mode (Message, Status
Message, and so on), hold down for 1 second to
return to the Standby mode�
z While in the Multi-site Trunk channel, push to reset
the Site Select setting�
Shift
1� Push to enter the Shift mode�
• icon is displayed�
L A user can use a Software key’s secondary function
in the Shift mode�
2� Push this key again to return to the Normal mode�
Category: Channel/Scan
CH Up, CH Down
z Push to select an operating channel�
z After pushing specic keys, push to select an
option, setting, and so on�
Priority A, Priority B
Push to select the Priority A or Priority B channel�
Priority A (Rewrite), Priority B (Rewrite)
z Push to select the Priority A or Priority B channel�
z Hold down for 1 second to assign the operating
channel to the Priority A or Priority B channel�
Zone Up, Zone Down
Push to select an operating zone�
Zone Select
Push to display the “Zone Select” screen� Then, push
[Up] or [Down] to select a zone�
TIP: What is a “Zone”?
Certain channels are grouped together and assigned
to a Zone according to their intended use�
For example, ‘Staff A’ and ‘Staff B’ are assigned
to a “Business” Zone, and ‘John’ and ‘Cindy’ are
assigned to a “Private” Zone�
Scan Start/Stop
z Push to start or cancel a Scan�
L When a scan started with the Power ON Scan or Auto
Scan function, pushing this key pauses the scan� The
paused scan resumes after the preset time period has
passed�
z Hold down for 1 second to display the “Scan List”
screen� Then push [Up] or [Down] to select a list�
NOTE: When Mode Dependent Scan is ON, a
user may not be able to display the Scan list,
depending on the presetting�
Assignable Software key functions (Continued)