DANTE BRIDGE Operation Manual
Important Safety Instructions Important safety instructions Please carefully read following instructions and safety information and retain for future reference. Heed all warnings and follow all instructions. • Do not remove covers. There are no user-serviceable parts inside. Please refer servicing to qualified service personnel. • Only use attachments/accessories specified by the manufacturer. • Servicing is required when the apparatus has been damaged in any way.
Table of Contents Table of Contents 1. Thank you 4 2. Unpacking 4 3. Introduction / key features 4 4. Computer system requirements 5 5. Installation 5 6. External power supply 5 7. Connecting a computer 6 8. PodWare setup 6 9. Connecting devices 7 10. Audio routing 8 11. Rack mounting 8 12. Operation 9 13. Trouble shooting 10 14. Technical Specifications 11 Dante Bridge Operation Manual rev 2.1.
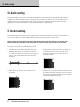
1. Thank you 1. Thank you Thank you for choosing the Dante Bridge for your professional audio application. Please study the contents of this guide to obtain the best possible performance from this unit. 2. Unpacking After unpacking the unit, please check carefully for damage. If damage is found, please notify the shipping carrier concerned at once. As the consignee, you must initiate any claims. Please retain all packaging in case re-shipment is necesssary. 3.
4. Computer system requirements 4. Computer system requirements Minimum requirements: • PC with >1 GHz processor • > 512 kb RAM • 32-bit Windows™ operating system (NT, 2000, XP, Vista, Windows 7) • CD-ROM drive or Internet access • Ethernet connection 5. Installation Because the Dante Bridge uses Ethernet, no drivers need to be installed. However, you will need to install Audinate’s Dante Controller PC software to control the audio routing and the PodWare application to control and monitor VNET devices.
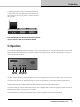
7. Connecting a computer 7.
9. Connecting devices 9. Connecting devices • For analogue audio applications, simply connect one or both audio output XLRs to the analogue input(s) of the device. • For VNET devices, connect the VNET Link socket on the Dante Bridge to the VNET In socket of the first device you wish to control; then connect the VNET Link socket of this device to the VNET In socket of the next device, continuing as required. The order in which the devices are connected is not important.
10. Audio routing 10. Audio routing The Dante Bridge can use one or two audio channels from the Dante stream. Normally the unit would be configured to route channels to Input 1 and Input 2. You may see an option to route to channels 3 and 4; however, these are not used in the product. Audio routing is accomplished using the Dante Controller application. You may find it helpful to name all Dante devices to clarify routing. 11.
12. Operation 5. Offer the Accessory with its mounting brackets up to the reverse side of the Mounting Panel, and fix it in place using the two sets of screws, washers and nuts removed in 1. POWER EXT POE NET DATA DANTE SYNC DATA Dante BRIDGE Note that the holes at the rear ends of the brackets may be used as cable tie-off points if desired. 12.
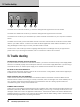
13. Trouble shooting DANTE BvNET EXT 2 1 AUDIO OUT 1 2 3 4 5 The Audio Out 2 male XLR connector (1) carries the analogue audio signal for the second channel. The Audio Out 1 Male XLR connector (2) carries the analogue audio signal for the first channel. The Dante RJ45 connector (3) is the Ethernet port, which should be connected from your computer or Ethernet Switch.
14. Technical Specifications 14. Technical Specifications Ethernet Compliance 100 base T or 1000 base T VNET Cable type Max. total cable length Max. Network span Connector Category 5 UTP (or better) 1 km 1 km Standard RJ45 Ext Power Only to be provided by a Linea Research Accessory Power Supply via a 3.5 mm Jack-to-Jack lead (Linea Research part no. LD1047) Power Consumption 3 W max. Analog Audio Connector Frequency Response THD Dynamic range Max.
tannoypro.com REVISION DATE: 23 November 2015 Tannoy operates a policy of continuous research and development. The introduction of new materials or manufacturing methods will always equal or exceed the published specifications. All specifications are subject to change without notice. VNET and VNET2 are trademark of Tannoy Limited. Dante is a trademark of Audinate Pty Ltd. All other trademarks remain the property of their respective owners. Copyright (c) 2015 Music Group Innovation SC Ltd.