
User's Manual


K J B S e c u r i t y P r o d u c t s | w w w . m y s l e u t h g e a r . c o m | 8 0 0 . 5 9 0 . 4 2 7 2
Page 6
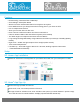
Adding your Camera to your Device
Power on the camera
Open the SG Home
®
App on your device and then press the ‘+’ button.
In the next screen, will direct you to choose the 2.4Ghz WiFi network you want your camera connected
to. Go to the settings ensure that your device is connected to the WiFi network that you want your
camera to be on. Then go back into the SG Home
®
App and click on the “Next” button.
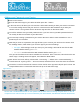
You will be asked to enter your WiFi password now. If you have not set your WiFi password before, it
can usually be found on the back of your WiFi router.
The next step is setting a password for your camera. Be sure to write it down somewhere or use a
password you can remember.
Now that you have set a password, the App will direct you to connect your device to the camera. Click
the “Settings” button; it will redirect you out of the App to your Device Settings.
o For Apple: Click Settings, Scroll up to the top of your settings, Select Wi-Fi and click the WiFi
network labelled “Device_KJ********”.
o Scroll and click the WiFi network labelled “Device_KJ********”.
For Android:
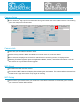
Give your device about 10 seconds to establish the connection. Once connected, return back to the SG
Home
®
App. A Loading Screen will appear, then select the ‘Next’ button.
Next Screen few screen will say “Please Wait…Connecting…”, “Please wait…Camera Rebooting…”,
and “Please wait…Syncing cloud…”. Once Connected, select the ‘Finish’ under the Green Check Mark.
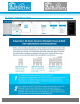
The device is now connected to the camera. Click on the link in the app and it will pull up a live view. The
example below shows a camera that has been set up on the SG Home
®
App.
Please Note: The Bluetooth function on the Speaker will not work while connecting. Plug the device in, but do
not power on the switch on the top. Once connected to your WiFi network, the Bluetooth function will work fine.
Apple Device
Android Device