
User's Manual


K J B S e c u r i t y P r o d u c t s | w w w . m y s l e u t h g e a r . c o m | 8 0 0 . 5 9 0 . 4 2 7 2
Page 3
Quick Setup Guide
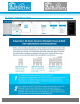
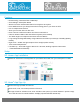
Step 1. Download the SG Home
®
App from Apple Store or Google Play store to your smart phone or tablet.
Press SIGN UP on the login screen to create a secure account. Connect the power supply, and power on the
camera. Battery models: charge the battery pack first for approximately 10 hours for a full charge.
Step 2. After logging into the SG Home
®
App, press '+' at the top right of the screen to add a camera to your
account.
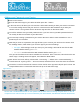
Step 3. Follow the on-screen instructions to select your 2.4 GHz Wi-Fi network and enter your Wi-Fi
password. Please note: Cameras DO NOT work on 5 GHz networks.
o Apple devices: The App chooses the network your device is currently connected to. If necessary,
temporarily leave the App to switch to your preferred network. Then return to the App and press 'Next' to
enter the network password.
o Android devices: Select the preferred network from the dropdown list in the app, then press 'Next' to enter
the network password. If necessary, press SCAN to search for available networks.
Step 4. Follow the on-screen instructions and select your camera’s I.D. (ex. Device_KJxxxxxxxx) to set up
your camera on Wi-Fi and create a unique camera password: Note: This is the password for the camera only,
not the password for your wireless network or the app login.
o Apple devices: Create a unique camera password and press 'Next'. Temporarily leave the App and go to
settings on your phone or tablet, access the Wi-Fi. Under Choose Networks find the cameras I.D. (ex.
Device_KJxxxxxxxx) from the list of available networks. Select cameras I.D. It will move from list to become
the Wi-Fi ID. Once you see this then return to App and continue setup in the App. Wait for the Wi-Fi icon to
show in the status bar before starting step 5.
o Android devices: Select the camera’s network from the dropdown list in the app, then press NEXT to create
a unique camera password. If necessary, press SCAN to search for available networks. Note: You will enter
a password for access to the camera. This is the password for the camera only, not the password for your
wireless network or the App login. You will have two new passwords: one for the app login and one for the
camera. Please make note of these passwords for future reference as they are unique only to you.
o Step 5. Wi-Fi setup is complete when you see the green checkmark. Press FINISH to return to SG Home
®
Cameras list and begin viewing real time video. Note: If you type in the wrong Wi-Fi Password, you can still
get the green check mark. The App cannot verify your password. Your device will not be connected to the
Wi-Fi network and will not be online. You will have to do a hard reset on the device so you can see the
camera ID in your WiFi Settings. To find the reset button look for your device under the Product Line in the
back of your manual. You will have to reset up your camera by following Steps 2-5.
All devices: There may be a few seconds delay while your device reconnects to your network and the App
logs back in to the servers to retrieve your camera list.
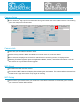
Step 6. Sign up for your desired SG Home
®
Subscription Plan. (See page 4.)