
Owner's Manual


9
5. Every time you install a new filter, run the
coffee maker through a complete brewing
cycle without coffee. Use a full carafe
of clean, cool water. See “Coffee Maker
Care” for information on when to change
the water filter.
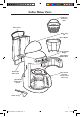
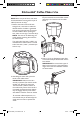
4. Place the filter cartridge in the well at
the bottom of the water tank. Push the
cartridge slightly to make sure it fits snugly.
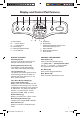
To Set the Time-of-Day Clock for the
First Time or After Power Outage
3. Press the “+” (plus) or “-” (minus)
buttons to increase or decrease the
hours.
4. Press the SET button. The minutes digits
will flash for the minutes adjustment.
5. Press the “+” (plus) or “-” (minus)
buttons to increase or decrease the
minutes.
6. Press the SET button again The AM or
PM indicator will flash for the AM/PM
adjustment.
7. Press the “+” (plus) or “-” (minus)
buttons to select AM or PM.
8. Press SET button to choose the selected
time. Two short beeps will sound
indicating programming is complete.
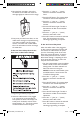
1. Plug into a grounded 3-prong outlet.
2. When the coffee maker is first plugged
in or when power is restored after an
interruption, the brew timer display will
initially show 12:00 AM, with the hours
section flashing “12”. The Clock indicator
will flash while the time is being set.
When the coffee maker is first plugged in,
or after a power interruption of more than
one minute, the coffee maker will power
up in the clock setting mode. In this case,
follow the previous directions “To Set the
Time-of-Day Clock for the First Time or
After Power Outage”. If adjusting the time
of the clock after initial set up, follow the
complete instructions below.
1. For glass carafe models, press the MENU
button 6 times to enter the Time/Clock
Setting mode. The Clock indicator will
flash while the time is being set.
NOTE: For thermal carafe models, press
the MENU button 5 times to enter the
Time/Clock Setting mode.
2. Press the “+” (plus) or “-” (minus)
buttons to increase or decrease the
hours.
3. Press the SET button. The minutes digits
will flash for the minutes adjustment.
4. Press the “+” (plus) or “-” (minus)
buttons to increase or decrease the
minutes.
5. Press the SET button again The AM or
PM indicator will flash for the AM/PM
adjustment.
6. Press the “+” (plus) or “-” (minus)
buttons to select AM or PM.
7. Press SET button to choose the selected
time. Two short beeps will sound
indicating programming is complete.
To Set the Time-of-Day Clock
W10474602B_Coffee Maker.indd 9 6/8/12 1:18 PM