
Product Guide
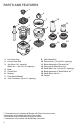

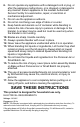
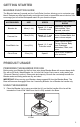
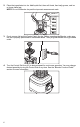
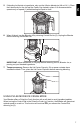

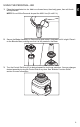
Table Of Contents
- PARTS AND FEATURES_SB_PG_W11669064A
- PRODUCT SAFETY_SB_OM/PG_W11669061A/W11669064A
- GETTING STARTED_SB_OM_W11669061A
- PRODUCT USAGE_SB_PG_W11669064A
- CARE AND CLEANING_SB_PG_W11669064A
- TROUBLESHOOTING_SB_PG_W11669064A
- Cord_Warranty and Service_NAR_Common_One Year
- PARTS AND FEATURES_SB_PG_W11669064A
- PRODUCT SAFETY_SB_OM/PG_W11669061A/W11669064A
- GETTING STARTED_SB_OM_W11669061A
- PRODUCT USAGE_SB_PG_W11669064A
- CARE AND CLEANING_SB_PG_W11669064A
- TROUBLESHOOTING_SB_PG_W11669064A
- Cord_Warranty and Service_NAR_Common_One Year
- PARTS AND FEATURES_SB_PG_W11669064A
- PRODUCT SAFETY_SB_OM/PG_W11669061A/W11669064A
- GETTING STARTED_SB_OM_W11669061A
- PRODUCT USAGE_SB_PG_W11669064A
- CARE AND CLEANING_SB_PG_W11669064A
- TROUBLESHOOTING_SB_PG_W11669064A
- Cord_Warranty and Service_NAR_Common_One Year

6
2.
Place the ingredients into Jar. Add liquids first, then soft foods, then leafy greens, and ice
or frozen items last.
NOTE: Do not fill Blender Jar past the top-most measurement mark.
3. Firmly, secure Lid and Lid Center Cap in the Jar. Before operating the Blender, make sure
the Jar is properly positioned on the Blender Base. Then, plug the Blender into a grounded
outlet.
4. Turn the Control Dial from (O) to desired speed for continuous operation. You may change
desired speed by turning the Control Dial at any time. See the “Blender Function Guide”
section for more information.