
Owner's Manual
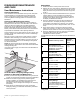
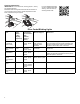
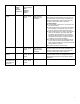
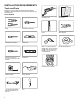

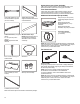
Table Of Contents
- DISHWASHER SAFETY
- Dishwasher Safety
- DISHWASHER MAINTENANCE AND CARE
- User-Maintenance Instructions
- INSTALLATION REQUIREMENTS
- Tools and Parts
- Location Requirements
- Cabinet Opening Dimensions
- Drain Requirements
- Water Supply Requirements
- Electrical Requirements
- INSTALLATION INSTRUCTIONS
- Before You Begin
- Prepare Cabinet Opening – New Utilities
- Install Moisture Barrier (Recommended for Wood Countertops)
- Prepare Dishwasher
- Remove Access and Toe Panels
- Connect Water Line to Fill Valve
- If a Drain Hose Extension is Required
- Install Door Handle (on some models)
- Place Dishwasher in Cabinet
- Custom Panel Installation (on some models)
- Electrical Connection
- Direct Wire Connection
- Power Cord Connection
- Junction Box Assembly
- Final Installation Check
- Secure Dishwasher in Cabinet Opening
- Choose Anchor Attachment Method
- Connect Water Line to House Shutoff Valve
- Connect Drain Hose
- Complete Installation
- Install Access Panel
- T-Gasket Installation (on some models)
- Check Operation
- If Dishwasher Does Not Operate
- Additional Tips
- SÉCURITÉ DU LAVE-VAISSELLE
- Sécurité du lave-vaisselle
- ENTRETIEN ET RÉPARATION DU LAVE-VAISSELLE
- Instructions d’entretien par l’utilisateur
- EXIGENCES D’INSTALLATION
- Outils et pièces
- Exigences d’emplacement
- Dimensions de l’ouverture de l’armoire
- Exigences d’évacuation
- Spécifications de l’alimentation en eau
- Spécifications électriques
- INSTRUCTIONS D’INSTALLATION
- Avant de commencer
- Préparation de l’emplacement – nouveaux appareils
- Installation de la barrière anti-humidité (recommandée pour les comptoirs en bois)
- Préparation du lave-vaisselle
- Retrait du panneau d’accès et de la plinthe
- Branchement de l’arrivée d’eau à la valve de distribution
- Si une rallonge de tuyau de vidange est nécessaire
- Installation de la poignée de porte (sur certains modèles)
- Placer le lave-vaisselle dans l’armoire
- Installation du panneau personnalisé (sur certains modèles)
- Raccordement électrique
- Méthode de raccordement direct
- Branchement du câble d’alimentation
- Boîtier de raccordement électrique
- Vérification finale de l’installation
- Fixation du lave-vaisselle dans l’ouverture d’encastrement de l’armoire
- Choix de l’option de fixation
- Branchement de l’arrivée d’eau au robinet d’arrêt de la maison
- Raccordement du tuyau de vidange
- Achever l’installation
- Installation du panneau d’accès
- Installation du joint en T (sur certains modèles)
- Vérification du fonctionnement
- Si le lave-vaisselle ne fonctionne pas
- Conseils supplémentaires

5
Water Softening System
IMPORTANT: If you have hard water (above 15 grains) and do not
have a whole house water softener, the water softener and the
heating element may be damaged as a result of limescale
accumulation. In such instances of hard water, the water softener
in the dishwasher should be used.
The water softener reduces water hardness thereby reducing
calcium buildup on the heater, inside the dishwasher, and on your
dishes. Soft water also allows your detergent to operate more
efficiently. This system regenerates using salt, so it is necessary
to keep the salt reservoir filled. The regeneration process occurs
as needed during a cycle to keep the water softener operating
properly. The frequency of regeneration depends on the water
hardness level setting. The water softener system is “OFF” by
default from the factory, so if the water softener is to be used, the
system must be set to “ON” by selecting a water hardness level
using setting menu. See water hardness setting table.
Water Hardness Setting
Determine your water hardness by obtaining information from a
water quality report from your water supplier or purchase a water
hardness test kit at a hardware store.
The water softening system is turned off from the factory
(hardness setting “0”). To turn on your water softener, you must
set the water hardness level in the “SETTING MENU” using the
hardness setting value from the following “WATER HARDNESS
TABLE”. Once the system is turned on, the salt reservoir must be
filled with special dishwasher softener salt and water.
Water Hardness Table
Level Grains per gallon
(gpg)
Parts per million
(ppm)
0
Water softener off (factory setting)
1
0-6 0-100
2
6-12 100-200
3
12-18 200-300
4
18-36 300-600
5
>36 >600
Filling The Salt Reservoir
The salt reservoir is located in the lower part of the dishwasher
(under the lower rack on the left side). Once your water softener
system is turned on, you must fill the reservoir with dishwasher
softener salt and water. As the salt supply is used up with
successive system regenerations, a low-salt indicator will light on
the control panel indicating it’s time to refill the salt. Once salt is
refilled, the light will turn off.
1. Remove the lower rack and unscrew the reservoir cap (by
turning the cap counter-clockwise).
2. Position a funnel (comes along with your dishwasher) and fill
the salt reservoir right up to its edge (approximately 0.5 kg); it
is not unusual for a little water to leak out.
3. If filling the reservoir for the first time, it is also necessary to fill
the reservoir with water after filling with salt. When refilling
salt, there is no need to add more water.
4. Remove the funnel and wipe any salt residue away from the
opening. Make sure the cap is screwed on tightly so that no
detergent or food can get into the reservoir during the
dishwasher use (this could damage the water softener beyond
repair).
IMPORTANT: Run a cycle every time as soon as you completed
refilling the salt reservoir to avoid corrosion.
Cleaning the Filters
It is very easy to remove and maintain the filters. The chart below
shows the recommended cleaning frequency.
Recommended Time Interval to Clean Your Filter
Number of
loads per
week
If you only
scrape
before
loading*
If you scrape
and rinse
before
loading
If you wash
before
loading
8–12 Every two
months
Every four
months
Once per
year
4–7 Every two
months
Once per
year
Once per
year
1–3 Twice per
year
Once per
year
Once per
year
*Manufacturer’s recommendation: This practice will conserve the
water and energy that you would have used to prepare your
dishes. This will also save you time and effort.
Very Hard Water
If you have hard water (above 15 grains) and you do not have a
whole house water softener system, be sure to turn on and use
the water softener in the dishwasher. Also clean your filter at least
once per month. Building up of white residue on your dishwasher
indicates hard water. For tips on removing spots and stains, see
the online “Troubleshooting” section.
NOTE: Online references can be found in the Quick Start Guide.
Filter Removal Instructions
1. Turn the upper filter assembly 1/4 turn counterclockwise and
lift out.
2. Separate the upper filter assembly by gently pulling apart.
3. Clean the filters as shown.