
Owner's Manual
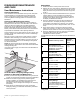
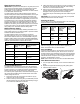
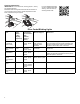

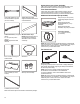
Table Of Contents
- DISHWASHER SAFETY
- Dishwasher Safety
- DISHWASHER MAINTENANCE AND CARE
- User-Maintenance Instructions
- INSTALLATION REQUIREMENTS
- Tools and Parts
- Location Requirements
- Cabinet Opening Dimensions
- Drain Requirements
- Water Supply Requirements
- Electrical Requirements
- INSTALLATION INSTRUCTIONS
- Before You Begin
- Prepare Cabinet Opening – New Utilities
- Install Moisture Barrier (Recommended for Wood Countertops)
- Prepare Dishwasher
- Remove Access and Toe Panels
- Connect Water Line to Fill Valve
- If a Drain Hose Extension is Required
- Install Door Handle (on some models)
- Place Dishwasher in Cabinet
- Custom Panel Installation (on some models)
- Electrical Connection
- Direct Wire Connection
- Power Cord Connection
- Junction Box Assembly
- Final Installation Check
- Secure Dishwasher in Cabinet Opening
- Choose Anchor Attachment Method
- Connect Water Line to House Shutoff Valve
- Connect Drain Hose
- Complete Installation
- Install Access Panel
- T-Gasket Installation (on some models)
- Check Operation
- If Dishwasher Does Not Operate
- Additional Tips
- SÉCURITÉ DU LAVE-VAISSELLE
- Sécurité du lave-vaisselle
- ENTRETIEN ET RÉPARATION DU LAVE-VAISSELLE
- Instructions d’entretien par l’utilisateur
- EXIGENCES D’INSTALLATION
- Outils et pièces
- Exigences d’emplacement
- Dimensions de l’ouverture de l’armoire
- Exigences d’évacuation
- Spécifications de l’alimentation en eau
- Spécifications électriques
- INSTRUCTIONS D’INSTALLATION
- Avant de commencer
- Préparation de l’emplacement – nouveaux appareils
- Installation de la barrière anti-humidité (recommandée pour les comptoirs en bois)
- Préparation du lave-vaisselle
- Retrait du panneau d’accès et de la plinthe
- Branchement de l’arrivée d’eau à la valve de distribution
- Si une rallonge de tuyau de vidange est nécessaire
- Installation de la poignée de porte (sur certains modèles)
- Placer le lave-vaisselle dans l’armoire
- Installation du panneau personnalisé (sur certains modèles)
- Raccordement électrique
- Méthode de raccordement direct
- Branchement du câble d’alimentation
- Boîtier de raccordement électrique
- Vérification finale de l’installation
- Fixation du lave-vaisselle dans l’ouverture d’encastrement de l’armoire
- Choix de l’option de fixation
- Branchement de l’arrivée d’eau au robinet d’arrêt de la maison
- Raccordement du tuyau de vidange
- Achever l’installation
- Installation du panneau d’accès
- Installation du joint en T (sur certains modèles)
- Vérification du fonctionnement
- Si le lave-vaisselle ne fonctionne pas
- Conseils supplémentaires

4
DISHWASHER MAINTENANCE
AND CARE
User-Maintenance Instructions
Cleaning the Exterior
Clean the exterior of the dishwasher with only a soft, damp cloth
and mild detergent. If your dishwasher has a stainless steel
exterior, it may have a coating that is resistant to fingerprints.
Avoid using abrasive cleaning products on the exterior of the
dishwasher.
Cleaning and Maintaining the Interior
Many detergents may leave white spots or a white residue on
dishwasher and on the interior of the dishwasher. Over time this
residue can become unsightly and could affect dishwasher
performance. Use of a dishwasher cleaning product such as
affresh
®
✝
Dishwasher Cleaner can help to remove the residue.
Monthly use of affresh
®
Dishwasher Cleaner is recommended to
help maintain the dishwasher. Follow package directions.
Another method to remove white residue is to use a vinegar rinse.
However, vinegar is an acid and using it too often could damage
your dishwasher.
Place (do not pour) 2 cups (500 mL) white vinegar in a glass or
dishwasher-safe measuring cup on the bottom rack. Run the
dishwasher through a complete washing cycle using an air-dry or
an energy-saving dry option. Do not use detergent. Vinegar will
mix with the wash water.
NOTE: We recommend the use of high-quality, premeasured
detergent tablets or packs and the use of rinse aid for dishwasher
cleaning and daily care.
If you have a drain air gap, check and clean it if the dishwasher is
not draining well.
To Reduce Risk of Property Damage During
Vacation or Extended Time Without Use
� When you will not be using the dishwasher during the summer
months, turn off the water and power supply to the dishwasher.
� Make sure the water supply lines are protected against
freezing conditions. Ice formations in the supply lines can
increase water pressure and cause damage to your
dishwasher or home. Damage from freezing is not covered by
the warranty.
� When storing your dishwasher in the winter, avoid water
damage by having your dishwasher winterized by authorized
service personnel.
Setting Menu
1. Press and hold the “Hi Temp” button for 5 seconds.
2. Release “Hi Temp” and press the “Start/Resume” button within
2 seconds. If you do not press Start within 2 seconds, then the
display will turn off and you will need to start over and go back
to step 1.
3. To go to a feature other than Water Hardness Level, press the
“Normal” button to move to the feature you would like to
change (Rinse Aid Level, Sound Level, Light in Tub, Kosher
Friendly, Factory Reset). See the table for what is shown on
the display to indicate these features.
4. Press the “Start/Resume” button to select the feature and
enter the sub-menu. The display will change to show the
current setting of the feature. (For example, if you selected
Sound Level and you haven’t changed it before, then “S1” will
show).
5. Press “Normal” button to change the value of the feature
setting. (For example, if you want to turn the sound off, then
press the “Normal” button and “S0” shows on display models).
6. Press the “Start/Resume” button to confirm the new selection.
The feature setting will not be changed until the
“Start/Resume” button is pressed.
The dishwasher will return to the Off state when the Start button is
pressed.
LETTER SETTING
(Features varies by model)
VALUES
(Default - in
bold)
Water Hardness Level
(see “SETTING THE WATER
HARDNESS” and “WATER
HARDNESS TABLE”)
0 │1 │ 2 │ 3 │
4 │ 5
Rinse Aid Level
(see “ADJUSTING THE
DOSAGE OF RINSE AID”)
0 │ 1 │ 2 │ 3 │
4 │ 5 │ 6
Sound
“1” = On, “0” = Off
1 │ 0
Light in the Tub
(on some models)
“1” = On, “0” = Off
1 │ 0
Kosher Friendly mode
“1” = On, “0” = Off
1 │ 0
Display on the floor
(on some models)
“1” = On, “0” = Off
1 │ 0
Factory Settings
Press START/Pause to restore
to the factory default all the
values of the settings included in
the settings menu.
-
NOTE: Refer to the online Cycle Guide for complete cycle and
setting details.
✝affresh
®
is a registered trademark of Whirlpool, U.S.A.