
Owner's Manual
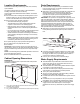
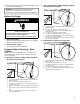
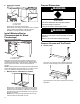
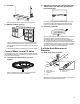

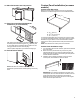
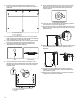
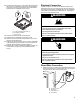

Table Of Contents
- DISHWASHER SAFETY
- Dishwasher Safety
- DISHWASHER MAINTENANCE AND CARE
- User-Maintenance Instructions
- INSTALLATION REQUIREMENTS
- Tools and Parts
- Location Requirements
- Cabinet Opening Dimensions
- Drain Requirements
- Water Supply Requirements
- Electrical Requirements
- INSTALLATION INSTRUCTIONS
- Before You Begin
- Prepare Cabinet Opening – New Utilities
- Install Moisture Barrier (Recommended for Wood Countertops)
- Prepare Dishwasher
- Remove Access and Toe Panels
- Connect Water Line to Fill Valve
- If a Drain Hose Extension is Required
- Install Door Handle (on some models)
- Place Dishwasher in Cabinet
- Custom Panel Installation (on some models)
- Electrical Connection
- Direct Wire Connection
- Power Cord Connection
- Junction Box Assembly
- Final Installation Check
- Secure Dishwasher in Cabinet Opening
- Choose Anchor Attachment Method
- Connect Water Line to House Shutoff Valve
- Connect Drain Hose
- Complete Installation
- Install Access Panel
- T-Gasket Installation (on some models)
- Check Operation
- If Dishwasher Does Not Operate
- Additional Tips
- SÉCURITÉ DU LAVE-VAISSELLE
- Sécurité du lave-vaisselle
- ENTRETIEN ET RÉPARATION DU LAVE-VAISSELLE
- Instructions d’entretien par l’utilisateur
- EXIGENCES D’INSTALLATION
- Outils et pièces
- Exigences d’emplacement
- Dimensions de l’ouverture de l’armoire
- Exigences d’évacuation
- Spécifications de l’alimentation en eau
- Spécifications électriques
- INSTRUCTIONS D’INSTALLATION
- Avant de commencer
- Préparation de l’emplacement – nouveaux appareils
- Installation de la barrière anti-humidité (recommandée pour les comptoirs en bois)
- Préparation du lave-vaisselle
- Retrait du panneau d’accès et de la plinthe
- Branchement de l’arrivée d’eau à la valve de distribution
- Si une rallonge de tuyau de vidange est nécessaire
- Installation de la poignée de porte (sur certains modèles)
- Placer le lave-vaisselle dans l’armoire
- Installation du panneau personnalisé (sur certains modèles)
- Raccordement électrique
- Méthode de raccordement direct
- Branchement du câble d’alimentation
- Boîtier de raccordement électrique
- Vérification finale de l’installation
- Fixation du lave-vaisselle dans l’ouverture d’encastrement de l’armoire
- Choix de l’option de fixation
- Branchement de l’arrivée d’eau au robinet d’arrêt de la maison
- Raccordement du tuyau de vidange
- Achever l’installation
- Installation du panneau d’accès
- Installation du joint en T (sur certains modèles)
- Vérification du fonctionnement
- Si le lave-vaisselle ne fonctionne pas
- Conseils supplémentaires

18
4. Place the custom panel with the face side down on the
blanket, and note the planned top and bottom of the panel if
applicable.
A
B
C
A. 23
5
/
8
" (600 mm)
B. 22
1
/
16
" (560 mm)
C. 2
9
/
16
" (65 mm)
5. Using a tape measure, measure the top, center and bottom
width of the panel, and mark the center location with either the
edge of a tape piece or with a fine point pencil.
6. Using the straight edge draw a line connecting all the marked
center lines so that the center of the panel is identified.
7. Using the provided template, align the centerline of the
template with the center line of the door.
Awl Center punch
8. Using a center punch or awl, mark the 2 locations on the
template to be used for attaching the door studs. Remove the
template. Attach the 2 door studs to custom panel using the
included screws.
B
A
C
A. 3.5 mm x 18 mm Phillips head screw (2)
B. #2 Phillips screwdriver
C. Studs
9. Attach double sided adhesive to the door panel in the lower
half, to temporarily aid in door alignment. These pieces of
adhesive can be removed later after getting all the holes
perfectly aligned.
Double sided adhesive
10. Insert one of the wood blocks from the packaging across the
door opening to prop the door slightly open.
11. Align the two door studs to the referenced tracks on the door,
lifting up the door until the top panel is flush with the top of the
dishwasher door.
12. While holding the alignment, press on the lower section of the
door, to allow the double sided tape to grab and hold your
alignment.
13. If this process needs adjusting, Use a plastic putty knife
between the panel and the door to relieve the double sided
tape and free the panel.
14. Open the door and panel together to the fully open position,
making sure the panel has not shifted.