
Owner's Manual
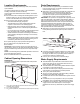
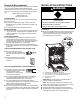
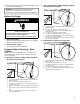
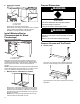
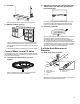

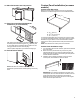
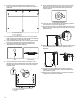
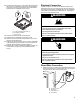

Table Of Contents
- DISHWASHER SAFETY
- Dishwasher Safety
- DISHWASHER MAINTENANCE AND CARE
- User-Maintenance Instructions
- INSTALLATION REQUIREMENTS
- Tools and Parts
- Location Requirements
- Cabinet Opening Dimensions
- Drain Requirements
- Water Supply Requirements
- Electrical Requirements
- INSTALLATION INSTRUCTIONS
- Before You Begin
- Prepare Cabinet Opening – New Utilities
- Install Moisture Barrier (Recommended for Wood Countertops)
- Prepare Dishwasher
- Remove Access and Toe Panels
- Connect Water Line to Fill Valve
- If a Drain Hose Extension is Required
- Install Door Handle (on some models)
- Place Dishwasher in Cabinet
- Custom Panel Installation (on some models)
- Electrical Connection
- Direct Wire Connection
- Power Cord Connection
- Junction Box Assembly
- Final Installation Check
- Secure Dishwasher in Cabinet Opening
- Choose Anchor Attachment Method
- Connect Water Line to House Shutoff Valve
- Connect Drain Hose
- Complete Installation
- Install Access Panel
- T-Gasket Installation (on some models)
- Check Operation
- If Dishwasher Does Not Operate
- Additional Tips
- SÉCURITÉ DU LAVE-VAISSELLE
- Sécurité du lave-vaisselle
- ENTRETIEN ET RÉPARATION DU LAVE-VAISSELLE
- Instructions d’entretien par l’utilisateur
- EXIGENCES D’INSTALLATION
- Outils et pièces
- Exigences d’emplacement
- Dimensions de l’ouverture de l’armoire
- Exigences d’évacuation
- Spécifications de l’alimentation en eau
- Spécifications électriques
- INSTRUCTIONS D’INSTALLATION
- Avant de commencer
- Préparation de l’emplacement – nouveaux appareils
- Installation de la barrière anti-humidité (recommandée pour les comptoirs en bois)
- Préparation du lave-vaisselle
- Retrait du panneau d’accès et de la plinthe
- Branchement de l’arrivée d’eau à la valve de distribution
- Si une rallonge de tuyau de vidange est nécessaire
- Installation de la poignée de porte (sur certains modèles)
- Placer le lave-vaisselle dans l’armoire
- Installation du panneau personnalisé (sur certains modèles)
- Raccordement électrique
- Méthode de raccordement direct
- Branchement du câble d’alimentation
- Boîtier de raccordement électrique
- Vérification finale de l’installation
- Fixation du lave-vaisselle dans l’ouverture d’encastrement de l’armoire
- Choix de l’option de fixation
- Branchement de l’arrivée d’eau au robinet d’arrêt de la maison
- Raccordement du tuyau de vidange
- Achever l’installation
- Installation du panneau d’accès
- Installation du joint en T (sur certains modèles)
- Vérification du fonctionnement
- Si le lave-vaisselle ne fonctionne pas
- Conseils supplémentaires

16
Install Door Handle (on some
models)
15. Install Door Handle
B
A
A. Cardboard box containing the Accessories
B. Cardboard tube containing the Door Handle (on some models)
A
D
B
C
A. Setscrew (in the bottom of the handle)
B. Hex key
C. Handle
D. Mounting stud
IMPORTANT: Do not scratch the front panel during this
procedure. If door panel has a protective film, peel film back
past the point of the handle studs before installing handle.
Handle is easiest to install while unit is on its back.
Remove the door handle and hex key from the packaging.
Setscrews are already installed in the handle. Place handle
on mounting studs with the setscrews facing towards the
bottom of dishwasher. Push the door handle tightly against
the door. Insert the short end of the hex key into the
setscrews. Tighten the setscrews 1/4 turn past snug.
Retain hex key with Owner’s Manual.
Place Dishwasher in Cabinet
Refer to the section “Electrical Connection” in this Owner’s
Manual for connecting to the power supply before placing the
dishwasher in the cabinet.
WARNING
Excessive Weight Hazard
Use two or more people to move and install or uninstall
appliance.
Failure to do so can result in back or other injury.
NOTE: Route water supply, drain hose, and power cord out the
rear of the dishwasher.
16. Move dishwasher close to cabinet opening
B
C
A
A. Water line
B. Junction box cable
C. Drain hose
Route the utilities through the holes in the cabinet and pull
the slack out at the same time as the dishwasher is pushed
into the cabinet.
NOTE: Route electrical lines only through the electrical
conduit hole that was previously sanded or protected by a
grommet.
17. Adjust side spacers
Measure the top and bottom width of opening of the frame
less cabinet. Remove and adjust the 4 included dishwasher
spacers, by turning 90 degrees, and removing with a slotted
screwdriver. Each spacer has 3 positions.
NOTE: If the cabinets are not frame less, additional spacers
will be required (included) and need to be applied by the
installer.
Types of Cabinets Types of Attachment
Frame less cabinets Plastic spacers
Face frame cabinets Metal brackets
See section “Secure Dishwasher in Cabinet Opening” in this
Owner’s Manual for Securing dishwasher with different types
of cabinets.