
Owner's Manual
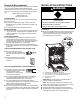
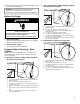
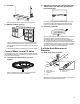

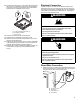

Table Of Contents
- DISHWASHER SAFETY
- Dishwasher Safety
- DISHWASHER MAINTENANCE AND CARE
- User-Maintenance Instructions
- INSTALLATION REQUIREMENTS
- Tools and Parts
- Location Requirements
- Cabinet Opening Dimensions
- Drain Requirements
- Water Supply Requirements
- Electrical Requirements
- INSTALLATION INSTRUCTIONS
- Before You Begin
- Prepare Cabinet Opening – New Utilities
- Install Moisture Barrier (Recommended for Wood Countertops)
- Prepare Dishwasher
- Remove Access and Toe Panels
- Connect Water Line to Fill Valve
- If a Drain Hose Extension is Required
- Install Door Handle (on some models)
- Place Dishwasher in Cabinet
- Custom Panel Installation (on some models)
- Electrical Connection
- Direct Wire Connection
- Power Cord Connection
- Junction Box Assembly
- Final Installation Check
- Secure Dishwasher in Cabinet Opening
- Choose Anchor Attachment Method
- Connect Water Line to House Shutoff Valve
- Connect Drain Hose
- Complete Installation
- Install Access Panel
- T-Gasket Installation (on some models)
- Check Operation
- If Dishwasher Does Not Operate
- Additional Tips
- SÉCURITÉ DU LAVE-VAISSELLE
- Sécurité du lave-vaisselle
- ENTRETIEN ET RÉPARATION DU LAVE-VAISSELLE
- Instructions d’entretien par l’utilisateur
- EXIGENCES D’INSTALLATION
- Outils et pièces
- Exigences d’emplacement
- Dimensions de l’ouverture de l’armoire
- Exigences d’évacuation
- Spécifications de l’alimentation en eau
- Spécifications électriques
- INSTRUCTIONS D’INSTALLATION
- Avant de commencer
- Préparation de l’emplacement – nouveaux appareils
- Installation de la barrière anti-humidité (recommandée pour les comptoirs en bois)
- Préparation du lave-vaisselle
- Retrait du panneau d’accès et de la plinthe
- Branchement de l’arrivée d’eau à la valve de distribution
- Si une rallonge de tuyau de vidange est nécessaire
- Installation de la poignée de porte (sur certains modèles)
- Placer le lave-vaisselle dans l’armoire
- Installation du panneau personnalisé (sur certains modèles)
- Raccordement électrique
- Méthode de raccordement direct
- Branchement du câble d’alimentation
- Boîtier de raccordement électrique
- Vérification finale de l’installation
- Fixation du lave-vaisselle dans l’ouverture d’encastrement de l’armoire
- Choix de l’option de fixation
- Branchement de l’arrivée d’eau au robinet d’arrêt de la maison
- Raccordement du tuyau de vidange
- Achever l’installation
- Installation du panneau d’accès
- Installation du joint en T (sur certains modèles)
- Vérification du fonctionnement
- Si le lave-vaisselle ne fonctionne pas
- Conseils supplémentaires

12
Electrical Requirements
Be sure that the electrical connection and wire size are adequate
and in conformance with the National Electrical Code,
ANSI/NFPA 70 - latest edition, and all local codes and ordinances.
For a fee, a copy of the above code standards can be obtained
from:
National Fire Protection Association
1 Batterymarch Park
Quincy, MA 02169-7471
You Must Have:
� 120 V, 60 Hz, AC-only, 15 A or 20 A, fused electrical supply.
� Copper wire only.
� A maximum of 2 field wiring supply conductors (12 AWG
largest size) plus 1 grounding conductor are permitted in the
terminal box.
� An included junction box for electrical connection.
We Recommend:
� Install the dishwasher on a circuit with appropriate interrupter
per your local code. The dishwasher is compatible with time
delay fuses, standard circuit breakers, and GFCI and AFCI
circuit breakers.
Circuit Requirement:
� The dishwasher may be installed on the same circuit as a
garbage disposal providing that the branch circuit cannot
exceed rated circuit load and must comply with all governing
codes and regulations such as but not limited to National
Electrical Code, ANSI/NFPA 70 - latest edition.
� No electrical connections other than the dishwasher power
and ground connections can be made inside of the dishwasher
junction box.
If Connecting Dishwasher with a Power Cord:
� Use a UL-listed power cord kit
marked for use with dishwasher. See
the “Tools and Parts” section for part
details.
� Plug into a grounded 3-prong outlet.
Outlet must meet all local codes and
ordinances.
If Connecting Dishwasher with Direct Wiring:
� Use flexible, armored, or nonmetallic
sheathed copper wire with grounding
wire that meets the wiring
requirements for your home and
local codes and ordinances.
� Use only the supplied plastic cable fittings for flexible and
non-metallic sheathed wiring (Romex, etc.). Do not use
metallic strain reliefs for these wire constructions.
� Use a UL-listed/CSA-approved metallic strain relief for
armored cable installations (21 mm diameter) if using armored
cable. Install the strain relief per the strain relief
manufacturer’s installation instructions.
� Use a UL-listed/CSA-approved metallic strain relief for flexible
metal conduit installations if using flexible metal conduit. Install
the strain relief per the strain relief manufacturer’s installation
instructions.
INSTALLATION INSTRUCTIONS
WARNING
Tip Over Hazard
Do not use dishwasher until completely installed.
Do not push down on open door.
Doing so can result in serious injury or cuts.
You Need To:
� Slowly open the dishwasher door while someone grasps the
rear of the dishwasher. Remove shipping materials. Place
included parts and literature aside in a safe place for later.
Close dishwasher door until latched.
B
A
C
D
E
A. Cardboard box containing the Accessories
B. Cardboard tube containing the Handle (on some models)
C. 3/8" to 3/4" (9.5 mm to 19 mm) Water Inlet Adapter
D. Assembly accessories
E. Junction box
IMPORTANT: Do not throw away the Cardboard box. It
contains installation materials inside.
NOTE: Each dishwasher is tested at the factory and may
contain some residual water in the tub as a result of the test.
� Observe all governing codes and ordinances.
� Install this dishwasher as specified in these instructions.
� The dishwasher must be installed to meet all electrical and
plumbing national and local codes and ordinances.