
Owner's Manual
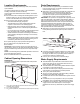
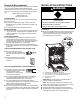
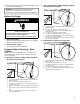
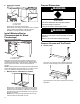

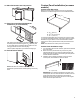
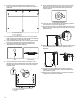

Table Of Contents
- DISHWASHER SAFETY
- Dishwasher Safety
- DISHWASHER MAINTENANCE AND CARE
- User-Maintenance Instructions
- INSTALLATION REQUIREMENTS
- Tools and Parts
- Location Requirements
- Cabinet Opening Dimensions
- Drain Requirements
- Water Supply Requirements
- Electrical Requirements
- INSTALLATION INSTRUCTIONS
- Before You Begin
- Prepare Cabinet Opening – New Utilities
- Install Moisture Barrier (Recommended for Wood Countertops)
- Prepare Dishwasher
- Remove Access and Toe Panels
- Connect Water Line to Fill Valve
- If a Drain Hose Extension is Required
- Install Door Handle (on some models)
- Place Dishwasher in Cabinet
- Custom Panel Installation (on some models)
- Electrical Connection
- Direct Wire Connection
- Power Cord Connection
- Junction Box Assembly
- Final Installation Check
- Secure Dishwasher in Cabinet Opening
- Choose Anchor Attachment Method
- Connect Water Line to House Shutoff Valve
- Connect Drain Hose
- Complete Installation
- Install Access Panel
- T-Gasket Installation (on some models)
- Check Operation
- If Dishwasher Does Not Operate
- Additional Tips
- SÉCURITÉ DU LAVE-VAISSELLE
- Sécurité du lave-vaisselle
- ENTRETIEN ET RÉPARATION DU LAVE-VAISSELLE
- Instructions d’entretien par l’utilisateur
- EXIGENCES D’INSTALLATION
- Outils et pièces
- Exigences d’emplacement
- Dimensions de l’ouverture de l’armoire
- Exigences d’évacuation
- Spécifications de l’alimentation en eau
- Spécifications électriques
- INSTRUCTIONS D’INSTALLATION
- Avant de commencer
- Préparation de l’emplacement – nouveaux appareils
- Installation de la barrière anti-humidité (recommandée pour les comptoirs en bois)
- Préparation du lave-vaisselle
- Retrait du panneau d’accès et de la plinthe
- Branchement de l’arrivée d’eau à la valve de distribution
- Si une rallonge de tuyau de vidange est nécessaire
- Installation de la poignée de porte (sur certains modèles)
- Placer le lave-vaisselle dans l’armoire
- Installation du panneau personnalisé (sur certains modèles)
- Raccordement électrique
- Méthode de raccordement direct
- Branchement du câble d’alimentation
- Boîtier de raccordement électrique
- Vérification finale de l’installation
- Fixation du lave-vaisselle dans l’ouverture d’encastrement de l’armoire
- Choix de l’option de fixation
- Branchement de l’arrivée d’eau au robinet d’arrêt de la maison
- Raccordement du tuyau de vidange
- Achever l’installation
- Installation du panneau d’accès
- Installation du joint en T (sur certains modèles)
- Vérification du fonctionnement
- Si le lave-vaisselle ne fonctionne pas
- Conseils supplémentaires

11
Location Requirements
Dishwasher must be fully enclosed (top, sides, back, and floor)
upon installation.
An optional moisture barrier accessory is also available for
installing underneath a wooden countertop.
Check location where dishwasher will be installed. The location
must provide:
� Convenient access for loading and unloading dishes. Corner
locations require a 2" (51 mm) minimum clearance between
the side of the dishwasher door and the wall or cabinet.
� Easy access to water, electricity, and drain:
• Grounded electrical supply is required.
• This dishwasher has a water-heating feature and also
requires a connection to a hot water supply line.
• Make sure pipes, wires, and drain hose are within the
shaded area shown in the “Cabinet Opening Dimensions”
section.
• Do not run drain lines, water lines, or electrical wiring where
they can interfere with or contact dishwasher legs.
• Shelter dishwasher and water lines leading to dishwasher
against freezing. Damage from freezing is not covered by
the warranty.
NOTE: If dishwasher will be left unused for a period of time
or in a location where it may be subject to freezing, have it
winterized by authorized service personnel.
� A square opening for proper operation and appearance.
� The cabinet front to be perpendicular to floor.
� A level floor.
Helpful Hint: If floor at front of opening is not level with floor at
rear of opening, shims may be used to level dishwasher. Optional
alignment method using a laser square; review the product help
videos.
NOTE: To avoid shifting during dishwasher operation, shims must
be securely attached to the floor.
� Do not install dishwasher over carpeted flooring.
Cabinet Opening Dimensions
Clearances
Check that all surfaces have no protrusions that would prohibit
dishwasher installation.
C
A
B
A. 32
5
/
16
"-35
5
/
16
" (820-900 mm) measured from the lowest point on the
underside of the countertop.
B. 22
1
/
16
" (560 mm) Minimum
C. 23
5
/
8
" (600 mm) Minimum, measured from narrowest point of opening.
Drain Requirements
� A new drain hose is supplied with your dishwasher. If drain
hose is not long enough, use a drain hose extension with a
maximum length of 12 ft (3.7 m).
� Make sure to connect drain hose to waste tee or disposer inlet
above drain trap in house plumbing and 20" (508 mm)
minimum above the floor. It is recommended that the drain
hose either be looped up and securely fastened to the
underside of the counter or be connected to an air gap.
IMPORTANT: This product is not equipped with a high loop on the
side of the dishwasher. The installer is responsible for adding a
high loop in the adjacent cabinet. A high loop is required if the
dishwasher will drain into a floor drain. This prevents water draw
off from the dishwasher during operation. When the drain is
connected to a sink drain, counter-top air-gap or disposer, the
high loop is generally not required. An check valve internal to the
drain prevents back-flow into the dishwasher.
� Make sure to use an air gap if the drain hose is connected to
house plumbing lower than 20" (508 mm) above subfloor or
floor.
A
A. Air gap
� If required, the air gap should be installed in accordance with
the air gap installation instructions. When you are connecting
the air gap, a rubber hose (not provided) will be needed to
connect to the waste tee or disposer inlet.
� Use 1/2" (12.7 mm) minimum I.D. drain line fittings.
Water Supply Requirements
� This dishwasher maybe fitted with a smart inlet hose with a
water cut off valve. Do not cut the water inlet hose for any
reason, to install, adapt or shorten.
� This dishwasher has a water heating feature and also requires
a connection to a hot water supply line.
� A hot water line with 20 psi to 120 psi (138 kPa to 827 kPa)
water pressure can be verified by a licensed plumber.
� 120°F (49°C) water at dishwasher
� 3/8" (9.5 mm) O.D. tubing with compression fitting or flexible
braided or non braided water supply line.
� Included water inlet hose with Leak Detection System for some
models.
� Included 3/8" (9.5 mm) Compression x 3/4" (19 mm) Water
inlet adapter (only for models with Leak Detection System).
� If installed in new construction, make sure the house water
supply lines have been flushed prior to connecting the
dishwasher to remove any debris that may exist in the supply
line.