
Use and Care Manual


Page 24
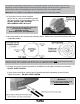
3. If the rubber feet have been installed,
lay the unit on a soft, non-scratching surface
and remove them from the bottom of the unit.
DO NOT INSTALL UNIT ON ROOF
WITH RUBBER FEET IN PLACE.
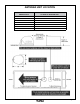
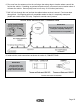
4. Mount the antenna unit using the (4) mounting holes. Make sure to seal mounting holes with roof
compatible sealant.
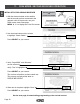
5. Connect one end of 50 foot coax cable to the MAIN port and tighten connection (see below).
DO NOT OVER TIGHTEN.
If using a second receiver, connect end of second coax (sold separately) to the AUX port.
Tighten connection. DO NOT OVER TIGHTEN.
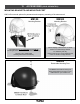
The installer is responsible for determining the most appropriate fastener to secure the antenna unit to the roof.
Depending on the roof material, fasteners such as lag screws, well nuts, sheet metal screws, toggle bolts and T
anchors may be used, and should always be used in combination with a roof compatible sealant.
IMPORTANT! The installer is responsible for weatherproong all roof holes with sealant.
For roof mounting, do not apply the rubber feet.
If present, remove rubber feet.
MOUNTING TO ROOF
WITH RUBBER FEET VOIDS WARRANTY.
IMPORTANT!
Coax connections should be snug.
DO NOT OVER TIGHTEN!
There are two coax ports on the back of the antenna unit. The one labeled “MAIN” MUST be connected to the main
receiver in vehicle. The one labeled “AUX” can be used for an additional receiver if desired.