PREVAIL CYCLER Pool Care System for Above Ground Pools Instruction Manual Customer Service 800-222-0169
TABLE OF CONTENTS Introduction 3 Swimming Pool Tips 4 Start-up and Operation 5 Replacing Chlorine Pac 6 Pool Maintenance and Winterizing 8 Cycler Maintenance 9 Parts List 10 Filter Installation 11 Base Installation 12 Warranty 13
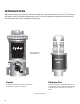
INTRODUCTION Welcome to easier pool care that ensures crystal clear, sparkling water in your pool. This manual will explain how to install and operate the cycler for a more enjoyable experience with less work and worry and more time relaxing and having fun. See label for your Model Number Chlorine PAC Cycler Chlorine Pac Automatically dispenses chlorine with precise metering for continuous sanitation. The replacement Pac is prefilled with chlorine and fits inside the Cycler.
Swimming Pool Tips Start-up and Yearly Maintenance • Make sure the pool has adequate circulation. The pool water must completely circulate through the pump and filter at least 1 to 2 times per day. Check with your dealer for the proper circulation time for your pool. 1. 2. 3. • If your fill water is high in metals, use a sequestering agent or metal out at pool opening only before inserting a Pac. Follow manufacturer’s directions. 4.
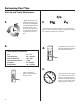
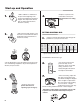
Start-up and Operation 1. • Add a stabilizer or conditioner to the pool at the beginning of the season if the stabilizer level is below 20 ppm. This will prevent chlorine burn off. Follow manufacturer’s directions carefully. 2. • Shock the pool with chlorine to rid the water of all contaminants before beginning. Follow manufacturer's directions carefully. • Replace cap and set the control dial on the Cycler. (Follow directions for setting below.) 4. SETTING CONTROL DIAL 5.
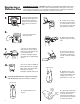
Replacing a Chlorine Pac CAUTION Read Carefully – USE ONLY the factory recommended replacement Pac. (See label.) DO NOT USE any other Pac or bulk chemical tablets in the Cycler. Use of any other product could result in over chlorination, bleached liners, unsafe pool conditions, fire or explosion. Warranty will be void if the correct Pac is not used. • Turn off pump. Turn dial to Minimum. This reduces the flow of water into the unit when the cap is open so isolation valves are unnecessary. 1. B.
6. 9. • Replace cap by hand only. DO NOT OVER TIGHTEN. • Turn Pac over and shake slightly until tablets fall into tower areas. Pac towers Pac towers • DO NOT USE CAP TOOL TO TIGHTEN CAP. FOR REMOVAL ONLY. 7. Opening in Pac Key in Cycler 8. 7 • Insert Pac into Cycler, lining up the openings in Pac with keys in Cycler. NOTE: Openings are a different shape than keys. • Insert Pac into Cycler. Avoid sparks, open flame or smoking when handling the Pac. 10. • Replace side knob on the Cycler.
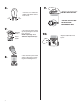
Pool Maintenance Winterizing Test Strips 1. • Test water for free chlorine, pH and total alkalinity once a week. Pool and Spa Test Strips • Turn dial to Minimum. Turn pump off. Unscrew side knob to relieve pressure. 2. • Remove cap. • Shock pool once a week. Follow manufacturer’s directions. • Replace Chlorine Pac when empty, approximately once a month. 3. • Unscrew knob from the front of Cycler. Allow all water to drain. 4.
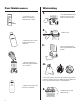
Cycler Maintenance Replacing the Control Dial O-Rings 1. 1. Hold cap in front of you upside down with the o-ring groove facing up. Place one end of o-ring into cap groove at the point closest to you. Hold o-ring down with the thumb and forefinger of one hand. • In the back of the Cycler depress tab at end of locking pin with a pen or screwdriver and pull pin out of dial. 2. 3. Replacing Cap O-Ring • Turn control dial back and forth as you pull it out of the housing.
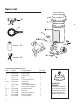
Parts List 10 11 OTHER COPY? SILICONE LUBRICANT 12 COPY COPY COPY COPY 13 CYCLER DIAGRAM/PARTS LIST REF.
TOOLS NEEDED: Filter Installation Screwdriver Pipe Wrench 2. INCLUDED WITH CYCLER: 1.Apply teflon tape to each threaded end of nipple. One Hose Adapter 1 1/2" X 1 1/2" X 1 1/4" Screw one end of nipple into the filter return. Tighten turning 1 to 2 revolutions with wrench. DO NOT OVER TIGHTEN. either side of 3. Screw Cycler on to open nipple end until upright and secure. 5. Teflon Tape MATERIALS NEEDED: One 6" X 1 1/2" TBE PVC Nipple 4. Apply teflon tape to threaded end of hose adapter.
TOOLS NEEDED: Screwdriver Base Installation PUMP FILTER Pipe Wrench INCLUDED WITH CYCLER: Two Hose Adapters 1 1/2" X 1 1/2" X 1 1/4" TO POOL The Cycler should always be installed between the filter and pool (or between heater and pool if applicable). Teflon Tape MATERIALS NEEDED: Two Sections of of 1 1/2" Flex Hose (one provided with filter) teflon tape to the 2. 1. Apply threaded end of both hose adapters. Screw adapters into each end of Cycler. Tighten turning 1 to 2 revolutions with wrench.
Limited One-Year Warranty King Technology, Inc. warrants to the original purchaser this unit will be free from any defects in workmanship and/or material, for a period of one (1) year from the date of original purchase. This warranty covers body, cap and control dial, but specifically excludes o-rings. King Technology at its option may replace any defective parts or the entire unit without charge after it is determined what is needed to correct any deficiency.