PERFORM-MAX TM POOL SANITIZER Models 920, 940 & 980 (In-line) Model 960 (Off-line) DESINFECTANTE PARA PISCINAS PERFORM-MAX TM Modelos 920, 940 y 980 (dependientes) Modelo 960 (autónomos) PO S OL SM R GE S OL L AR PO SP AS AL L E T RI C H L O R R Model 940 • Modelo 940 Model 920 • Modelo 920 Instruction Manual • MANUAL DE INSTRUCCIONES
English TABLE OF CONTENTS Español ÍNDICE DE CONTENIDOS Núm. de página Page No.
Benefits MA • La unidad de la enlínea para en molió las piscinas (Modelos 940 y 980) T RICHLO R SP AS 2 9 1 LS 8 GE ER O PO L AR LA RG 4 5 6 7 3 R SM B R O M I NE S OL S OL A LL E PO R O MIN MAX • Off-line unit for in ground and above ground pools (Model 960) MA • La unidad desconectada para en el suelo y encima de molió las piscinas (Modelo 960) T R IC H L O R B ROM INE S SM SP A 2 ER R GE 8 R 1 9 LAR G LA 4 5 6 7 S OL PO 3 S OL A LL E S OL PO R O P Grac
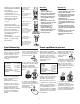
Perform-MaxTM Installation The Perform-Max comes in several different models. Please review this list, determine which model you have and follow the appropriate installation instructions for that model only. Installation Tips • Do not plumb into copper pipe as corrosion will occur. • By installing a flow indicating device on the inlet line, you can monitor the gallons per minute. ABOVE GROUND POOLS • PISCINAS SOBRE EL SUELO Model #920 In-line for above ground pools.
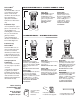
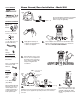
Parts List • Above Ground Model 920 1 Lista de partes • Modele sobre la tierra 920 2 8&9 3 4 10 7 6 OTHER COPY? SILICONE LUBRICANT 13 11 COPY COPY COPY COPY 5 9 Included with Above Ground Model 920 Incluido con Modela sobre la tierra 920 REF. # DESCRIPTION • DESCRIPCIÓN QTY. INC.
Parts List • In Ground Models 940, 960, 980 Lista de partes • En Molió los Modelos 940, 960, 980 Included with Models 940, 960, 980 • Incluido con Ciclista 940, 960, 980 REF. # DESCRIPTION • DESCRIPCIÓN QTY. INC.
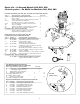
TOOLS NEEDED Screwdriver Above Ground, Base Installation – Model 920 PUMP FILTER The Perform-Max should always be installed between the filter and pool (or between heater and pool if applicable). Pipe Wrench TO POOL MATERIALS NEEDED Pipe Thread Tape or Sealant Two Hose Adapters 1 1/2" x 1 1/2" x 1 1/4" Two Sections of of 1 1/2" Flex Hose (one provided with filter) pipe thread tape or 2. 1. Apply sealant to the threaded end of both hose adapters. Screw adapters into each end of Perform-Max.
HERRAMIENTAS NECESARIAS Destornillador Instalación básica sobre el suelo – Modelo 920 Bomba Filtro Llave inglesa Hacia la piscina MATERIALES NECESARIOS El Perform-Max siempre debe estar instalado entre el filtro y la piscina (o entre el calentador y la piscina si ese es el caso). Conduzca por tubería el hilo cinta o sellador Dos adaptadores de manguera de 1 1/2” x 1 1/2” x 1 1/4” Dos tramos de manguera flexible de 1 1/2” (uno con filtro) conduzca por tuberia el hilo cinta o sellador al 1.
TOOLS NEEDED Screwdriver Above Ground, Filter Installation - Model 920 Pipe Wrench 2. MATERIALS NEEDED Pipe Thread Tape or Sealant Screw one end of nipple into the filter return. 1. Apply pipe thread tape or sealant to each threaded end of nipple. Tighten turning 1 to 2 revolutions with wrench. DO NOT OVER TIGHTEN. One 6" x 1 1/2" TBE PVC Nipple One Hose Adapter 1 1/2" x 1 1/2" x 1 1/4" either side of 3. Screw Perform-Max on to open nipple end until upright and secure. adapter into open end 5.
HERRAMIENTAS NECESARIAS Instalación del filtro sobre el suelo – Modelo 920 Destornillador 2. Llave inglesa MATERIALES NECESARIOS Conduzca por tubería el hilo cinta o sellador conduzca por tuberia 1. Aplique el hilo cinta o sellador a cada extremo enroscado de la boquilla. Atornille un extremo de la boquilla al retorno del filtro. Apriete girando de 1 a 2 vueltas con llave inglesa. NO APRIETE DEMASIADO. cualquier lado del 3.
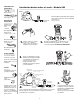
In Ground, In-line Installation – Model 940 TOOLS NEEDED Pipe Wrench MA TRI CHL O R R GE R 5 6 7 8 LS O 9 1 2 4 3 PO LA R GE LA S OL LS O SM AL PO RS P AS R PO L E B RO M INE MIN MAX Do NOT install in copper pipe as chemical corrosion occurs. Hacksaw Install after all equipment and as far as possible from heater.
HERRAMIENTAS NECESARIAS Válvula de control Llave inglesa MA T RICH LOR LS P LA R GE R S 9 1 2 5 6 7 8 Sierra de arco Filtro 3 OL PO Bomba 4 AS O S OL SM PO LA R GE RS R PO AL LE M BRO IN E MIN MAX Calentador (si está instalado) NO lo instale en un tubo de cobre ya que se produce corrosión química. Instálelo después de todo el equipo y lo más lejos posible del calentador.
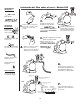
Off-line Installation – Model 960 TOOLS NEEDED Pipe Wrench SCOOPS 2” - 36” APART MA Screwdriver T RI CHL OR BROMIN E SP AS SM AL L 8 2 GE R S OL PO LA R GE R 5 6 7 LS 4 3 1 9 MIN Battery Operated Drill with 5/8" or 19/32" Bit.
7. 8. POOL SANITIZER 9. Cut tubing to size for each PerformMax connection and attach one to each elbow with clamps. POOL SANITIZER POOL SANITIZER Attach a gasket to each scoop. When pipe is totally dry, drill two 19/32" or 5/8" holes between 2” - 36” apart on the return line. Be careful not to go through other side of pipe. Tighten clamps with a screwdriver. Screw elbow into reducer bushings on both sides. 11. 10. 12. 2" - 36" apart on straight pipe 13.
Instalación autónoma – Modelo 960 HERRAMIENTAS NECESARIAS Llave inglesa válvula de control cucharas con 2" - 36" de separación bomba filtro Destornillador MA T RI CHL OR B ROMIN E AL L SM SP AS LA R GE R 2 4 3 5 6 7 8 GE R 9 1 L AR LS S OL PO MIN LS Taladro a baterías con broca de 5/8” o 19/32” OO P E O PO R MAX calentador (si está instalado) MATERIALES NECESARIOS MA MA MA TRIC HL O R AL LE o OL S 8 LA R 5 6 7 PO GE R SP A S S M 4 3 S OL O 2 RG ER P 9 1
7. 8. 9. Corte la tubería a medida para cada conexión del Perform-Max y fíjela a cada codo con abrazaderas. POOL SANITIZER 10. POOL SANITIZER POOL SANITIZER Cuando el tubo esté totalmente seco, haga dos perforaciones de 19/32” o 5/8” a 2" 36" de separación en la línea de retorno. Tenga cuidado de no pasar del otro lado del tubo. Ajuste las abrazaderas con un destornillador. Atornille el codo en los cojinetes reductores en ambos lados. 11. 12. 13.
For Proper Performance • Para un rendimiento adecuado Bomba 3-WAY MANUAL VALVE OR 3-WAY MOTOR VALVE CONTROL La VALVULA O 3-WAY MANUALES de 3 MANERAS el CONTROL MOTRIZ de VALVULA § § § A. El flujo de agua es mayor a 80 galones por minuto (302 litros por minuto) B. El limpiafondo está incluido en la piscina. C. La piscina y el spa tienen un equipo en común.
Refilling Chemicals CAUTION Read Carefully USE ONLY ... Slow dissolving trichloro-s-triazinetrione (trichlor) tablets or pucks or bromine tablets or sticks in the Perform-Max. R PO OL S 3 4 5 6 GE LA R 1 2 R SP AS SM A LL E NEVER MIX CHEMICALS DO NOT USE ... CALCIUM HYPOCHLORITE, FAST DISSOLVING TRICHLOR OR ANY GRANULAR OR LIQUID MATERIAL IN THE PERFORM-MAX. USE OF THESE PRODUCTS COULD RESULT IN FIRE OR EXPLOSION minimum Models 940, 960, 980 Model 920 1. 2. 3. Turn pump off.
Changing Chemicals continued. Always wear protection for eyes, skin & clothing. Avoid sparks, open flame or smoking when handling chemicals. 5. Make sure all OO Setting Control Dial To start... RG ER DO NOT OVER TIGHTEN. Do not use cap tool to tighten cap. For removal only. 9 stand back to avoid inhaling fumes. LA 8 R MINE 4 5 6 7 1 2 3 S OL PO L AR GE B RO LS S OL O SM AL LE P SP AS R MAX Model 920 7. Replace knob. 8. For proper initial setting 6. Replace cap by hand only.
Cómo rellenar los productos químicos PRECAUCIÓN lea detenidamente R PO OL NO UTILICE... Hipoclorito de calcio, tricloro de rápida disolución o cualquier material líquido o en gránulos. en el perform-max. El uso de estos productos podría provocar un incendio o explosión. S 3 4 5 6 GE LA R 1 2 R SP AS SM A LL E UTILICE SOLAMENTE... Tabletas o discos de tricloro-s-triazinetrione (tricloro) de lenta disolución o tabletas o varas de bromo en el Perform-Max. NUNCA MEZCLE LOS PRODUCTOS QUÍMICOS.
Cómo cambiar los productos químicos (continuación) Siempre lleve la protección para ojos, la piel y la ropa. Evite las chispas, abra la llama o fumando al manejar sustancias químicas. 5. Cerciórese todas partículas pequeñas se han disuelto y fueron limpiado Para aflojar el golpe de la fuera de tapa el asidero con el plano Ningún alimentador. Llene de sus a la izquierda-modela instrumento necesitó para la unidad con nueva de mano 940, 960 & 980. el Modelo 920. sustancia química. 4.
Perform-Max Maintenance • Mantenimiento del Perform-Max Replacing the Control Dial O-Rings for Above Ground Perform-Max-Model 920 Cómo cambiar los anillos de cierre del comando de control para los Perform-Max sobre el suelo-Modelo 920 ERF ORMMA Center of locking pin • El centro de cerrar alfiler POOL SANITIZER OTHER COPY? SILICONE LUBRICANT COPY COPY COPY COPY 1. In the back of the PerformMax, depress center of locking pin with a finger and pull pin out of dial. 1.
Replacing Cap O-Ring • Cómo cambiar el anillo de cierre de la tapa OTHER COPY? SILICONE LUBRICANT Model 920 Models 940, 960, 980 1. Hold cap in front of you upside down with the o-ring groove facing up. Place one end of o-ring into cap groove at the point closest to you. Hold o-ring down with the thumb and forefinger of one hand. 1. Sostenga la tapa al revés frente a usted con la ranura del anillo de cierre mirando hacia arriba.
Limited One-Year Warranty Garantía limitada de un año King Technology, Inc. will warrant this unit with a complete replacement for the original purchaser, should it prove defective by reason of improper workmanship and/or material, for a period of one (1) year from the date of original purchase. King Technology holds the option of replacing any defective part without charge if it is determined to be all that is needed to correct any situation that may arise.