
Instructions / Assembly

11
Rev 4.14.22
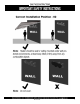
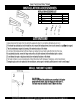
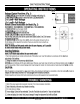
Step 1: Mark hole locaons on the mounng surface
with spacing as shown.
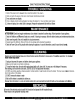
Step 2: Select fasteners and anchors of appropriate type su-
cient for your specic wall type (Not provided). Drill holes on
your indicator marks.
Step 3: Insert wall anchors into holes.
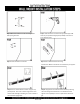
Step 4: Secure wall brackets to wall using
2 screws each. Make sure fasteners are suitable for your applica-
on.
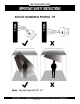
Step 5: Secure small brackets to heater using the sup-
plied Eye Nuts. Then insert a bolt through hole in each
small bracket and begin threading a nut onto end with a
few threads of engagement.
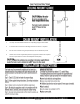
Step 6: Hang heater onto wall mounted brackets by inserng
the bolts through the vercal slot in the bracket and then
ghten nuts completely to secure in place at the desired an-
gle.