
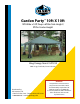
Installation Guide
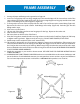

FRAME ASSEMBLY
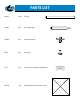
1. Arrange all pipes and ttings on the ground as in Figure #1.
2. Insert one swaged pipe into one long straight pipe. This extended pipe will be inserted into each of the
corner ttings to form the length of the sides. Insert short swaged pipe into long pipe and then into each
of the corner ttings to form roof supports. (Figure #3)
3. To form peak, insert two of the roof pipe into the ends of one of the two-piece center tting (Figure #4).
Repeat for the other cross peak sections. Peak ttings will overlap. (Figure #4) Push the pipe into the
ttings until it stops.
4. Place cover over the frame.
5. Lift one side of the frame and insert two long pipes for the legs. Repeat on the other side.
6. Slide one foot on each leg.
7. Pull cover down on all four sides of the frame.
8. Place the D ring that is attached to the cover leg valance over the hook of each foot. (Figure #4) Pull strap
to tighten each leg valance. Tighten evenly at every leg. DO NOT OVER TIGHTEN, IT WILL TEAR.
9. Attach straps on the underside of the cover around frame.
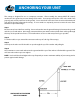
10. This canopy is designed for use of a temporary structure. Canopies may excellent kites. If the canopy is not
anchored, winds could cause the canopy to take ight. We suggest screw in anchor and rope to attach to
the D ring on the cover at the top of each leg. When using D rings to anchor the unit, make sure the straps
that are attached to the inside of the cover at the D ring are tied to the frame. WEATHER RELATED DAMAGE
IS NOT COVERED UNDER WARRANTY.
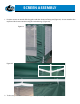
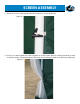
11. Attach the screening as you would a shower curtain. SEE NEXT PAGE FOR FURTHER INSTRUCTION ON
SCREEN ASSEMBLY.
12. ANCHORING UNITS ARE STRONGLY ADVISED! Anchors are not included due to the various landscapes and
personal choices of each individual customer. You may purchase screw in anchors at your local hardware
store or home improvement center or call toll free 1-800-800-6296 to purchase one of our kit.
Figure #4
Figure #1
Figure #2
Figure #3