WARNING BEFORE USING THIS FIREARM, READ AND FOLLOW THE WARNINGS AND INSTRUCTIONS CONTAINED IN THIS MANUAL.
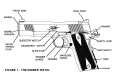
FIGURE 1 - THE KIMBER PISTOL
TABLE OF CONTENTS Warning............................................................4 Main Features and Tech Info ........................5 Rules of Safety................................................6 Lead Warning ..................................................9 Safety Features ..............................................9 Chamber Indicators ......................................10 Series II Models ............................................14 Ammunition ..........................................
WARNING: This product is classified as a lethal weapon. Failure to read and properly execute the instructions and warnings in this manual could result in serious injury, death or damage to property. Do not attempt to practice loading or unloading with live ammunition without a thorough understanding of the safe operation of this pistol. Always treat a firearm as if it were fully loaded. Always store and carry this product empty, with the hammer forward on an empty chamber.
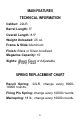
MAIN FEATURES TECHNICAL INFORMATION Caliber: .22LR Barrel Length: 5" Overall Length: 8.5" Weight Unloaded: 25 oz. Frame & Slide:Aluminium Finish: Black or Silver Anodized Magazine Capacity: 10 Sights: (Rear) Fixed or Adjustable (Front) Fixed SPRING REPLACEMENT CHART Recoil Spring: .22LR, change every 800010000 rounds. Firing Pin Spring: change every 10000 rounds. Mainspring: 18 lb., change every 10000 rounds.
RULES OF SAFETY NOTICE: Kimber Mfg., Inc. shall not be responsible for any death, physical injury or property damage that is the result of the proper or improper use of this product. 1. Always treat this and any other firearm as if it were loaded. 2. Never point this or any other firearm at anything you do not intend to shoot. Keep muzzle pointed in a safe direction. 3. Never take anyone’s word that a firearm is unloaded.
6. Always make sure that this firearm is in top working condition and that no internal parts have been damaged as a result of corrosion, improper maintenance or dropping. If evidence of these conditions exist, have them inspected by a competent gunsmith prior to use. 7. Never leave a loaded pistol unattended. 8. Make sure that your backstop is adequate to stop your bullets prior to shooting. 9. Make sure all other shooters and bystanders are well away from the ejection port.
15. Seek a doctor’s advice if you are taking medicine prior to engaging in any shooting activity. 16. Keep safety on when pistol is loaded and cocked until ready to fire. Immediately unload and clear this pistol when shooting sequence has been completed. 17. Never shoot at any hard or flat surface, such as rock or water. The resulting ricochets could result in physical injury, death or property damage. 18. Never put your finger in the trigger guard until you are ready to fire. 19.
rounds, assume a faulty round, separate from other cartridges, reload and continue shooting. 22. Never use this pistol in any manner other than that for which it was specifically intended. 23. Never indulge in "horseplay" while holding any firearm. LEAD WARNING Discharging firearms in poorly ventilated areas, cleaning firearms, or handling ammunition may result in exposure to lead and other chemicals known to cause birth defects, reproductive harm, cancer, and other serious physical injury.
SAFETY LOCK OR THUMB SAFETY The thumb safety is located on the left side of the frame immediately forward of the hammer. To operate, pull slide to its most rearward position and release. Then push the thumb safety upward until it fully engages the slide lock notch. The slide lock safety cannot be engaged unless the hammer is fully cocked and the slide is fully forward (in battery). To disengage the safety, point in a safe direction and move safety lever downward completely.
prevents the rearward movement of the trigger. To disengage, grip the pistol grip firmly. This will allow grip safety to move out of contact with rear of trigger, allowing the gun to fire. DISCONNECTOR The disconnector prevents the pistol from firing when the slide and barrel are not fully closed (in battery). If the slide is not fully forward, the disconnector is depressed and disengages the sear so that the hammer cannot drop if the trigger is pulled.
stop position is an automatically engaging safety feature and should never be engaged by hand! AMMUNITION 1. Use only high quality .22 ammunition. We do not suggest using sub-soonic ammunition. Don’t oil cartridges. Don’t spray aerosol type lubricants, preservatives, or cleaners directly onto cartridges or where excess spray may flow into contactwith cartridges. Lubricant or other foreign matter on cartridges can cause potentially dangerous ammunition malfunctions.
Excessive pressure can be caused by obstruction in the barrel, propellant powder overloads, or by the use of incorrect or defectively assembled cartridges. In addition, the use of a dirty, corroded or damaged cartridge can lead to a burst cartridge case and consequent damage to the firearm and personal injury from the sudden escape of high-pressure propellant gas within the firearm’s mechanism. 4.
5. Bullets can become lodged in the barrel: - If the cartridge has been improperly loaded without propellant powder, or if the powder fails to ignite. (Ignition of the cartridge primer alone will push the bullet out of the cartridge case, but usually does not generate sufficient energy to expel the bullet completely from the barrel), or - If the bullet is not properly seated tightly in the cartridge case.
If the bullet can be easily removed with a wood or brass dowel, (using hand pressure only, never "hammer" a bullet lodged in the bore) clean any unburned powder grains from the bore, chamber and mechanism before resuming shooting. If the bullet can not be dislodged by using hand pressure, take the firearm to a gunsmith. 7. Dirt, corrosion, or other foreign matter on a cartridge can impede complete chambering and may cause the cartridge case to burst upon firing.
deterioration of the propellant powder; on firing, the powder may not ignite. If only the primer ignites, there is a danger that the bullet may become lodged in the barrel. LOADING Keep muzzle pointed in safe direction and follow all safety procedures at all times. Practice these steps with an unloaded pistol or dummy ammo until you are completely familiar and comfortable with the procedures. Use live ammo only when you are prepared to shoot.
RETAINING LIP MAGAZINE FOLLOWER FIGURE 3-LOADING MAGAZINE 3. Place the magazine in the magazine well in the frame, with the rounds facing forward, and push up until magazine is fully seated. A click will be heard when this is done properly as the magazine catch engages. 4. To chamber a round, hold the pistol in the shooting hand without touching the trigger. Make sure it is pointed in a safe direction.
Do not "ride" the slide down to the forward position. Fully release the slide allowing the recoil spring to move the slide unhindered. Keeping your hand on the slide may cause a misfeed, or stop the slide from fully closing. Racking the slide will cock the hammer, strip off the top round from the magazine and chamber it. The pistol is now fully loaded and ready to fire. Keep muzzle pointed in a safe direction and engage thumb safety until ready to shoot.
UNLOADING 1. To unload, first remove magazine as in step 1 of previous section. 2. If all of the rounds from the magazine have been fired, slide will not automatically lock in the open position. Alway visually check to see that the chamber is clear. If magazine is not removed prior to this procedure, any rounds left in it will be chambered, which could lead to an unintentional discharge. The pistol will fire with a round chambered and the magazine removed. 3.
5. Pull the trigger allowing the hammer to free fall forward on the empty chamber. Do not "ease" the hammer down by holding or blocking it. Doing so can mar the sear tip which will result in a substandard trigger pull. 6. To remove any remaining rounds from the magazine, push the cartridges forward until they clear the retaining lips. BREAK-IN PERIOD Before firing the pistol for the first time, Field Strip and clean the firearm following proper procedures.
4. With your finger well clear of the trigger, rotate Thumb safety downward. 5. Place index finger on trigger, take aim and gently squeeze rearward until hammer is released and falls forward striking the firing pin. Be prepared for loud noise and recoil. Note: This is a semi-automatic pistol and will eject the empty cartridge, recock the ham mer, and chamber a new round. It will con tinue to fire with each subsequent pull of the trigger until all rounds in the magazine have been fired. 6.
or your thumb and turn the barrel bushing clockwise, towards the right side of the pistol until the recoil spring plug and recoil spring are free. Be careful, the recoil spring and plug are under tension and can fly out with sustantial force. 2. Ease out recoil spring and plug. If recoil spring does not come out easily, remove plug and leave the spring for step 6. 3.
5. Remove the slide assembly forward off the frame. 6. Remove the recoil spring through the opening at the front of the slide. 7. Remove the recoil spring guide from the bottom of the slide . 8. Turn the barrel bushing counterclockwise until the lug aligns with the opening and remove the bushing from the front of the slide. RECOIL SPRING RECOIL SPRING GUIDE BARREL LINKAGE BLOCK SLIDE FIGURE 7-GUIDE ROD POSITION FOR ASSEMBLY AND DISASSEMBLY 9. Pull the barrel forward clear of the slide.
ASSEMBLY To reassemble, follow steps in reverse order. Align the barrel linkage block with the slide latch hole in the frame. The alignment can be seen through the hole and hole in the block can be aligned by moving the slide very carefully back and forth until it drops into place. Align the linkblock hole first, insert the slide stop shaft and then rotate the slide stop upward until it aligns with the disassembly notch. Then push the slide stop inward until it is properly seated.
7. Lightly oil the barrel. NOTE: Run a dry patch through the barrel before firing to remove oil. 8. Wipe off all dirt on all bearing surfaces on slide and frame. 9. Clean breech face and all parts (an old toothbrush or similar nylon brush works well). 10. Follow lubrication directions before reassembling. LUBRICATION 1. Use a High Tech Gun Oil such as Shooters Choice FP-10 or similar quality oil (grease is not recommended).
h. Cock Hammer - one drop in between the hammer and frame. i. Assemble gun. Rack the Slide 5-6 times, dry fire, wipe off excess oil from gun. j. Make sure, if you have stored the gun with oil in the barrel and chamber, that you run a dry patch through the barrel to clear it of the oil before you fire the gun. 3. Reassemble as previously described. The key is moderation. Not enough oil and your gun may not function properly and lead to undo wear.
WARRANTY INFORMATION This "Limited Warranty" has been drafted to comply with the Magnuson-Moss Warranty Federal Trade Commission Improvement Act which is effective for goods manufactured on or after December 31, 1995. Kimber Mfg., Inc.
This warranty does not cover repairs related to unreasonable use, corrosion, failure to provide proper maintenance, damaged or shopworn display guns, gun barrels damaged by an obstructed bore or guns damaged in return shipment due to improper packing and handling. Kimber Mfg., Inc. reserves the right to inspect any product before making any adjustment covered by this warranty. Under no circumstances shall Kimber Mfg., Inc.
INSTRUCTIONS FOR WARRANTY REPAIRS Return handguns to KMI, 1 Lawton St., Yonkers, NY, 10705, Attn: Warranty Repairs via UPS Next Day Saver or FedEx. Securely attach complete letter to handgun inside of package. The contents of the letter must include: your name, complete return mailing address (not a P.O. address), telephone number (daytime), serial number of gun sent and a complete description of the problem. There must be a person over 18 years of age to sign for the package.
PARTS ILLUSTRATION .
PARTS LIST 1. 2. 3. 4. 5. 6. 7. 8. 9. 10. 11. 12. 13. 14. 15. 16. 17. 18. 19. 20. 21. 22. 23. 24. 25. 26. 27. 28. 29. 30. 31.
BASIC NRA RULES FOR SAFE GUN HANDLING 1. ALWAYS KEEP THE GUN POINTED IN A SAFE DIRECTION. 2. ALWAYS KEEP YOUR FINGERS OFF THE TRIGGER UNTIL READY TO SHOOT. 3. ALWAYS KEEP THE GUN UNLOADED UNTIL READY TO USE. 4. ALWAYS TREAT YOUR GUN AS IF IT IS LOADED AND READY TO DISCHARGE. Kimber Mfg., Inc. 1 Lawton Street Yonkers, NY 10705 Sales — 888-243-4522 Customer Service — 914-964-0771 Fax — 914-964-9340 Web Address — www.kimberamerica.