
Instructions / Assembly
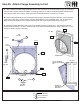
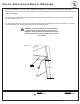

Step 31: Attach TNR 4 Slide to Fort
Hardware
1 x #12 x 1” Pan Screw
1 x 1/4 x 1” Pan Bolt
(1/4”atwasher&1/4”locknut-previouslyremoved)
PB6
Other Parts
1 x TNR4 Tube Support
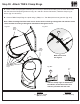
A: On the fourth attached Elbow Assembly remove the pan bolt and nut which is facing the fort (installed in Step
25). (g. 31.1) The bolt will no longer be needed, but keep the lock nut.
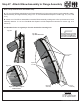
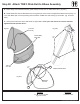
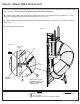
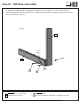
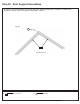
B: Loosely attach TNR4 Tube Support (at the slightly bent end) to the slide seam using 1 (PB6) 1/4 x 1” Pan
Bolt (with at washer and the previously removed lock nut). (g. 31.2)
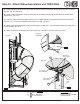
C: Rotate TNR4 Tube Support and attach to (040) Slide End Panel using 1 (S6) #12 x 1” Pan Screw as shown
in g. 31.2.
D: Fully tighten screw and bolt.
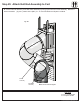
Remove PB1 (1/4 x 3/4”
PanBolt)rsttheninstall
PB6 (1/4 x 1” Pan Bolt
withatwasher)
S6
040
S6
A
A
Fig. 31.1
Fig. 31.2
TNR 4 Tube
Support
Lock
Nut
Flat
Washer
PB6
Note: Flat
end down
76 europecustomerservice@kidkraft.com