
Instructions / Assembly

Hardware
12 x 5/16 x 6-1/8” Hex Bolt
(5/16”atwasherx2,5/16”locknut&plasticformedwasher)
1 x 5/16 x 3” Wafer Bolt
(5/16”atwasher,5/16”t-nut)
4 x #7 x 1-1/8” Pan Screw
Other Parts
6 x Heavy Duty Swing Hangers
6 x Spring Loaded Quick Link
1 x Cedar Summit Plaque
Wood Parts
1 x Engineered SW Beam 4 x 6 x 92”
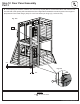
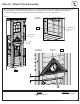
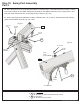
Step 15: Swing Beam Assembly
Part 1
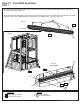
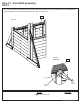
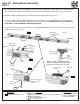
A: Attach 6 Heavy Duty Swing Hangers to (150) Engineered SW Beam using 2 (G13) 5/16 x 6-1/8” Hex Bolt
(with 2 at washers, plastic formed washer and lock nut) per swing hanger, as shown in g. 15.1 and 15.2.
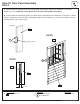
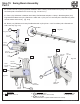
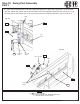
B: Attach 1 Spring Loaded Quick Link to each Heavy Duty Swing Hanger. (g. 15.3)
C: Install 1 (WB7) 5/16 x 3” Wafer Bolt (with at washer and t-nut) in the middle bolt hole, from the bottom
up, in (150) Engineered SW Beam as shown in g. 15.1 and 15.4. IT IS IMPORTANT THAT THIS BOLT IS
ATTACHED. IT WILL MINIMIZE CHECKING OF WOOD.
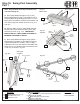
D: Attach Cedar Summit Plaque to centre of (150) Engineered SW Beam (over top of t-nut) using 4 (S38) #7 x
1-1/8” Pan Screws. (g. 15.5)
150
Fig. 15.3
150
Fig. 15.1
Fig. 15.2
Fig. 15.5
5/16” Flat
Washer
Heavy Duty
Swing Hanger x 6
5/16” Flat
Washer
5/16”
T-Nut
Swing End
Fort End
S38
x 4
5/16”
Lock Nut
Cedar Summit
Plaque
150
150
5/16” Flat
Washer
Plastic
Formed
Washer
Heavy Duty
Swing Hanger
Heavy Duty
Swing Hanger
G13
G13
WB7
Spring
Loaded
Quick Link
150
Fig. 15.4
WB7
Caution: The Spring Loaded Quick Link
must be attached to the Heavy Duty Swing
Hanger in the closed position. (g. 15.4)
Spring Loaded Quick
Link in the closed
position
S38
46 europecustomerservice@kidkraft.com