
Instructions / Assembly

1x 5/16x2-1/8”WaferBolt(5/16”atwasher,5/16”t-nut)
1x 1/4x2-1/2”WaferLag(5/16”atwasher)
1 x #8 x 3” Wood Screw
2 x #8 x 2” Wood Screw
Hardware
Wood Parts
1 x SW Ground 5/4 x 4 x 14-1/4”
1 x Diagonal 1-1/4 x 3 x 22”
090
091
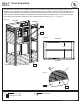
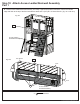
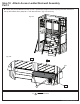
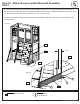
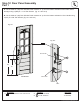
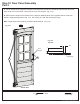
A: Loosely attach (090) SW Ground to (091) Diagonal with 1 (WB9) 5/16 x 2-1/8” Wafer Bolt (with at washer
and t-nut) then place (091) Diagonal tight and ush to the front of (050) SW Wall Panel. (090) SW Ground to be
ush to the bottom of (050) SW Wall Panel. (g. 9.1 and 9.2)
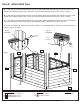
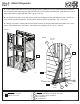
B: Pre-drill pilot hole with a 3/16” drill bit then attach (091) Diagonal to (050) SW Wall Panel with 1 (WL5) 1/4 x
2-1/2” Wafer Lag (with at washer), checking that it remains ush to outside edge. (g. 9.1 and 9.2)
C: Making sure bottom of (090) SW Ground is ush to bottom of (050) SW Wall Panel then attach with 2 (S11)
#8 x 2” Wood Screws and 1 (S4) #8 x 3” Wood Screw then tighten the bolt. (g. 9.1 and 9.2)
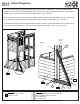
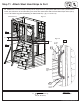
Fig. 9.1
Fig. 9.2
WL5
S11
S4
WB9
050
5/16”
T-Nut
5/16” Flat
Washer
5/16” Flat
Washer
Flush
Flush
S11
S4
WB9
WL5
050
090
091
Step 9: Attach Diagonals
Part 1
33 europecustomerservice@kidkraft.com