
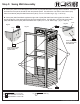
Instructions / Assembly
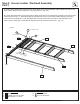
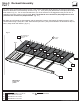
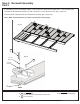
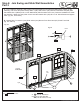
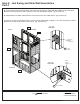

C: From inside the assembly, tight to both (040) Panel Slide End and (050) SW Wall Panel, halfway up the
assembly, 5/8” below the panel, loosely attach 1 (061) Side Joist to (041) Narrow Panel Back and (052) Wall
Panel Back with 3 (WB10) 5/16 x 2-5/8” Wafer Bolts (with at washer and t-nut). Bolts are installed from inside
the assembly. Make sure (061) Side Joist is level then attach with 2 (S3) #8 x 2-1/2” Wood Screws and tighten
bolts. (g. 6.3, 6.4 and 6.5)
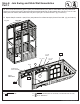
D: Repeat Step C to attach 1 (061) Side Joist to (042) Narrow Front Panel and (051) Panel Front Wall.
(g. 6.3, and 6.4)
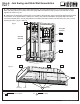
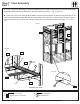
4 x #8 x 2-1/2” Wood Screw
6 x 5/16 x 2-5/8” Wafer Bolt
(5/16”atwasher,5/16”t-nut)
Fig. 6.3
Hardware
Inside View
Step 6: Join Swing and Slide Wall Assemblies
Part 2
S3
2 x Side Joist 2 x 2 x 63”
Wood Parts
061
Fig. 6.4
5/16” Flat
Washer
WB10
5/16”
T-Nut
Fig. 6.5
061
Panel
5/8”
A
A
Tight
Tight
WB10
S3
S3
052
041
061
050
040
27 europecustomerservice@kidkraft.com