20 V AC and Self-recharging Battery Backup CARBON MONOXIDE ALARM with Digital Display, Test, and Peak Level Memory Alarm Manual SINGLE STATION CARBON MONOXIDE ALARM P/N 820-1028 Rev. A ATTENTION: Please take a few minutes to thoroughly read this manual, which should be saved for future reference and passed on to any subsequent owner. If you have any questions about the operation or installation of your alarm, please call our toll-free hotline at 1-800-880-6788.
Contents Introduction . . . . . . . . . . . . . . . . . . . . . . . . 1 Quick Set-up . . . . . . . . . . . . . . . . . . . . . . . . . 2–3 Illustration . . . . . . . . . . . . . . . . . . . . . . . . . 4 Features . . . . . . . . . . . . . . . . . . . . . . . . . . . . 5–6 Installation . . . . . . . . . . . . . . . . . . . . . . . . . . 7–14 Operation . . . . . . . . . . . . . . . . . . . . . . . . . . . 15–19 Maintenance. . . . . . . . . . . . . . . . . . . . . . . . . 20 Carbon Monoxide Safety . . . . . .
Introduction This Kidde carbon monoxide (CO) alarm is an important part of your family’s home safety plan. Because CO alarms for the home haven’t been available until recently, most people haven’t had much experience using them. As a new owner of a CO alarm, there are some basic facts you should know for your protection and convenience. Many people think that CO alarms operate like smoke alarms. And in some basic ways, this is true.
Quick Set-Up We urge you to read this entire manual in the sequence it is presented. But, if you only read one part of this guide initially, read this page! Listed below are seven easy steps for setting up your unit. Please read the entire guide for complete information. Step 1 Determine the best location for your CO alarm(s). Refer to Page 7 for complete information. Step 2 Your CO alarm is equipped to be mounted as a corded unit, a direct plug unit, or a tabletop unit.
Quick Set-Up Step 4 Plug the alarm into a standard, unswitched 120 volt AC electric outlet in one of the configurations listed in step 2. Step 5 If the battery pack has a full charge when first powered up, you will see three eights in the digital display indicating the alarm is warming up. After approximately 20 seconds, the first reading will be displayed. The number on the display should be “0”.
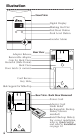
Illustration Front View Digital Display Blinking Red Dot Test/Reset Button Peak Level Button Sounder Alarm Adaptor Release Removable Adaptor Grip for Back Door Removal (Slide Down) Back Door Door Latch (4 corners) Rear View Cord Recess Key Hole Slide Support for Table-Top Rear View - Back Door Removed Power Cord Adaptor Cord Strain Relief Rechargeable Backup Battery (shown installed) Install Backup Battery For correct installation, refer to Quick Set-Up and refer to Installation on page 12.
Features Digital Display The continuous digital display shows you the level of carbon monoxide (if any) the unit is sensing. The unit updates this reading every 15 seconds so you can watch levels rise or fall. Test/Reset Button This button has three functions. First, this is the button you press when you test the unit weekly. Secondly, you press this button if the unit alarms and you want to silence the alarm. This will reset the unit and it will then again start monitoring for CO.
Features What This Alarm Can and Cannot Do CO alarms designed to sense unacceptable levels of CO from malfunctioning furnaces, appliances, gasoline engines or other sources. CO alarms provide early warning of the presence of carbon monoxide, usually before a healthy adult would experience symptoms. This early warning is possible, however, only if your alarm is located, installed and maintained as described in this alarm manual. When on AC power, this unit is designed to act as a monitor.
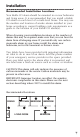
Installation Recommended Installation Locations Your Kidde CO alarm should be mounted in or near bedrooms and living areas. It is recommended that you install a Kidde CO alarm on each level of a multi-level home. You may use the number and location of smoke alarms installed in your home according to current building code requirements as a guide to the location of your Kidde CO alarm(s).
Installation Locations To Avoid To avoid causing damage to the unit, to provide optimum protection, and to prevent unnecessary alarms, follow the directions below where NOT to install this alarm: It is recommended that you DO NOT install this CO alarm in garages, kitchens or furnace rooms.
Installation Do not install in turbulent air from ceiling fans. Do not install near doors and windows that open to the outside, near fresh air vents, or anywhere that is drafty. Rapid air circulation from fans or fresh air from outside may cause the sensors to display an inaccurate reading in the presence of CO. Do not install this alarm in a switch or dimmer-controlled outlet. Do not install in areas where the temperature is colder than 4.4˚C (40˚F) or hotter than 37.8˚C (100˚F).
Installation This alarm has an adaptor that allows you to install the alarm as a wall mounted unit, as a direct plug unit, or as a tabletop unit. Back of unit when used as direct plug. Back of unit when used as direct plug for sideways outlet. Back of unit when used as a wall mount. Direct Plug In its “as shipped” configuration, the unit is ready to be plugged directly into a wall socket. To install: • Choose a standard, unswitched 120 V outlet to plug alarm into.
Installation • Place your index finger into the small opening along the bottom of the adaptor. Catch the edge of the door with your finger or finger nail and lift the door out. • Next, place your thumbs on the adaptor thumb releases. • Spread adaptor thumb releases out and carefully turn alarm over. This will allow adaptor to slide out. • Rotate the adaptor 90˚ to the right (clockwise), and snap firmly back into place. • Carefully replace the door.
Installation • If you are mounting the alarm in plaster board or drywall, drill a 5 mm (3/16") hole into the wall and insert the plastic anchors provided into the wall or wall anchors until the screw head is approximately 3 mm (1/8") from the wall. • Hook the unit over the screw head and into the keyhole in back of the unit. • Plug the cord into an electrical outlet. Tabletop You can also use your alarm as a tabletop unit.
Installation Upon initial power up or after the alarm has operated on battery backup and depending on the charge state of the battery, it could take up to 20 hours to FULLY charge the battery. During the first 10-hour initial charge period or, until the battery has charged, “Lb” will be displayed along with the CO level (usually “0”) and without an audible “chirp”. When the initial charge is complete, the “Lb” will disappear.
Installation Caution: If the unit detects CO and enters an alarm state while in battery back-up condition, the CO level will be displayed and the audible alarm pattern of four quick beeps will sound once every 60 seconds. Battery Back-up Operation in Low Battery “Lb” Condition: When the battery pack is not fully charged, the unit will begin displaying “Lb” and “chirp” once every 15 seconds. This will last approximately 7 hours to warn you the battery is losing capacity.
Operation Normal Operating Characteristics When you first power up the unit, the alarm will sound briefly to let you know the unit is receiving power and that the alarm circuit is functioning. You should see three eights on the digital display, indicating the alarm is in the start-up mode. The three eights will remain for approximately 20 seconds. You should see a blinking red dot to the lower right of the digital display. The blinking dot shows that the alarm is operating.
Operation Observe the alarm weekly to make sure the red dot is blinking, indicating normal operation. If the dot is not blinking, unplug the alarm, then plug in again. This will clear the alarm for restart. If the dot does not resume blinking, your alarm may be malfunctioning. Blinking Dot To test the alarm, press and release the Test / Reset button. If the unit is operating properly, you should notice the following: The display shows three eights , then shows a number (usually around 200).
Operation How to Know If Your Alarm is Malfunctioning Your alarm performs an internal self-diagnosis every 15 seconds to make sure that it is functioning properly. The alarm is designed to alert you in the unusual event of a malfunction.
Operation Peak Level Memory Although the peak level feature will display levels below 30 PPM, these levels will not result in an alarm no matter how long the device is exposed to these levels. The peak level feature is helpful in identifying low level CO occurrences below 30 PPM. Although the unit will not automatically display levels below 30 PPM, it will detect and store these readings in memory. By pressing the peak level button, concentration levels as low as 11 and up to 999 PPM will be displayed.
Operation Once the source is located, correcting the problem may be as easy as opening a window, venting an appliance, backing a car out of the garage a safe distance from living quarters, closing the garage door, and letting the car warm up outside. It could be possible that a weather condition caused the low-level reading and the condition may or may not happen again. Some CO conditions may start out as low level leaks but could develop into CO concentrations that could become harmful.
Maintenance To keep your alarm in good working order, you must follow these simple steps: • Test the alarm once a week by pressing the Test / Reset button (see page 4). • Vacuum the alarm cover once a month to remove accumulated dust. Use the soft brush attachment of your vacuum cleaner, and unplug the alarm from the electrical outlet before vacuuming. • Instruct children never to touch, unplug or otherwise interfere with the alarm. Warn children of the dangers of CO poisoning.
Carbon Monoxide Safety Carbon Monoxide Carbon monoxide (CO) is an odorless, colorless, poisonous gas created when any fuel is burned – gasoline, propane, natural gas, oil, wood, coal, and even tobacco. When combustion air is limited, more CO is produced. Serious problems can develop when combustion byproducts are not properly vented outside the house. You’ve probably heard about carbon monoxide poisoning in the news recently.
Carbon Monoxide Safety Sources of Carbon Monoxide Inside your home malfunctioning and improperly vented appliances used for heating and cooking are the most likely sources of carbon monoxide. Vehicles running in attached garages can also produce dangerous levels of carbon monoxide.
Carbon Monoxide Safety Home Safety Tips What You Can Do: • Buy only appliances approved by a nationally recognized testing laboratory. • Choose fuel-burning appliances that can be vented to the outdoors, whenever possible. • Make sure appliances are installed according to manufacturer’s instructions and local building codes. Most appliances should be installed by professionals and should be inspected by the proper authority after installation.
Carbon Monoxide Safety What You Should Not Do: • Never burn charcoal inside a home, garage, cabin, RV or camper. • Never install, service, or convert fuel-burning appliances from one type to another without proper knowledge, skills and tools. • Never use a gas range, oven, or clothes dryer for heating. • Never operate unvented gas-burning appliances, such as kerosene or natural gas space heaters, in a closed room.
Carbon Monoxide Safety • The absence of a draft in your chimney (indicating blockage). • Fallen soot from the fireplace chimney. • Loose, damaged or discolored bricks on your chimney. Clues You Cannot See: • Internal appliance damage or malfunctioning components. • Improper burner adjustment. • Hidden blockage or damage in chimneys.
Carbon Monoxide Safety What To Do If The Alarm Sounds Determine if anyone in the household is experiencing symptoms of CO poisoning. Many cases of reported CO poisoning indicate that while victims are aware they are not well, they become so disoriented they are unable to save themselves by either exiting the building or calling for assistance. Also young children, older family members, and household pets may be the first affected.
Carbon Monoxide Safety When the CO alarm senses a dangerous level of CO, the unit will emit a loud alarm pattern. The alarm pattern is 4 short “chirps” – followed by 5 seconds of silence – followed by 4 short “chirps”. (Note: When the unit is disconnected from the 120 V power supply and is on battery backup, the alarm pattern will continue for the first 5 minutes after detecting CO and then the cycle will repeat every one minute). Know how to respond to a CO emergency.
Specifications Power: 120 V AC units: 60 Hz, Current 60 mA max. Sensor: Sensor calibrated at 150 ppm (±25 ppm). Temperature: Operating range: 4.4˚C (40˚F) to 37.8˚C (100˚F). Humidity: Operating range: 5–95% non-condensing. Mounting: Accessories supplied for wall mount, direct plug and tabletop applications. Alarm: 85+ dB at 3 m (10') @ 3.4 ± 0.5 KHz pulsing alarm. CO Alarm Time: At 70 PPM, the unit must alarm within 60–240 minutes. At 150 PPM, the unit must alarm within 10–50 minutes.
Specifications How the Unit Determines When to Alarm Your Kidde CO alarm uses advanced technology to monitor the environment in your home and warn you of unacceptable levels of carbon monoxide. An internal microcomputer works together with the sensor inside the alarm to determine the levels of carbon monoxide in the air and to calculate the rate that CO would be absorbed into the human body.
Display Readings Your new Kidde carbon monoxide alarm is a sophisticated electronic device – yet very simple to understand. Basically, the unit will display a “0” if it senses 30 PPM of CO or less and if you have a good backup battery pack installed. If it senses carbon monoxide, it will display a reading so you can see if you have a non-threatening or emergency situation.
Display Readings AC Powered in Normal Stand-by Operation LED Display Shows Alarm Sound Unit Status Unit Condition Recommended Action Flashes alternately “0” alternating with “Lb” and a flashing dot. None. Charging battery pack. Initial power-up or power was reset. Battery discharged less than 10 hours on AC. Battery is in charge state. Keep unit on AC to fully charge battery. “Lb” will disappear once battery is charged depending on initial charge. “0” alternating with “Lb” and a flashing dot.
Display Readings DC Powered in Battery Backup Operation LED Display Shows Alarm Sound Unit Status Unit Condition Recommended Action 1 “chirp” “0” or CO concentration every 15 and “Lb” seconds displayed once every 60 seconds, flashing dot every second. Battery conserve mode, sensing for CO. Battery is partially discharged, after 5 minutes of operation on battery backup. Confirm battery connection is fully seated & oriented properly. Connect to AC power to fully charge battery.
Li-Ion Battery Handling Precautions • Do not connect the positive and negative terminals of the battery with any conductor such as metal wires. Do not store the battery or transport it together with any metal objects. • Do not disassemble or modify the battery pack under any circumstances. Disassembling the battery can cause internal shorts, resulting in bulging/bursting due to excess gas generation, overheat, ignition, explosion or other problems.
Warranty If after reviewing this manual you feel that your carbon monoxide alarm is defective in any way, do not tamper with the unit. In many cases, the quickest way to exchange your alarm is to return it to the original place of purchase. Alternatively, you may return it for servicing to Kidde. If you have questions, call Kidde Customer Service at 1-800-880-6788.