
Owner's Manual
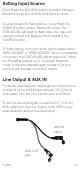
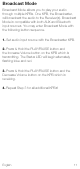
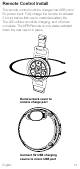
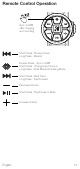
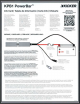
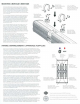
Table Of Contents

MOUNTING
I
MONTAJE
I
MONTAGE
With
three
different
sizes
of clamp
rings
provided,
it's
easy
to
choose
the
Clamp
Ring
best suitec for your
bar
or application.
Screw the Mounting
Bases
to the
PowerBar
using
the
Mounting
Screws.
Place
the
Clamp
Rings
around
your mounting bar
and
secure
the
Clamp R
ings
to
the
Mounting
Bases
using the Clamp
Screws.
The
KPB1
may
be mountec above or below
the
bars,
while
the
Mounting
Base
may
be rotatec ± 30° to accommodate
some curvec
bars.
Clamp Ri
ng
Anillo
de sujeci6n
Anneau
de
serrage
Klemmring
Mounting Screw
Torni
l
lo
de
fijaci6n
Clamp Screw
Tom
illo
de
abrazadera
Vis
de
serrage
Klemmschraube
1.5",
1.
75",
and2"
Provided Clamp
Rings
Anillos de sujeci6n provistos
Anneaux de
serrage
fournis
Mitgelieferte
Klemmringe.
Con tres
tamanos
diferentes de
anillos
de
su1eci6n
proporciona-
dos, es
facil
elegir
el
anillo
de sujeci6n
mas
adecuado para
su
barra
o aplicaci6n.
Atomille
las
bases de
montaje
al
PowerBar
con los
tomillos
de
montaje.
Coloque los
anillos
de sujeci6n
alrececor de
la
barra
de
montaje y asegure los
anillos
de
sujeci6n a
las
bases de montaje con los
tomillos
de
sujeci6n.
El
KPB1
se puece
montar
encima o debajo de
las
barras,
mientras
que
la
base de
montaje
se puece
girar
±
30
°
para
acomodar
algunas
barras
curvas.
Vis
de
fixation
Befestigungsschraube
Avec
trois
tailles
differentes d'anneaux de
serrage
foumis,
ii
est
facile
de choisir
l'anneau
de
serrage
le
mieux
adapte a
votre
barre
ou a votre application.
Vissez
les bases
de
montage a
la
PowerBar
a
!'aide
des
vis
de montage.
Placez
les
anneaux
de
serrage
autour
de
votre
barre
de
montage
et
fixez
les
anneaux
de
serrage
aux
bases
de
montage a
!'aide
des
vis
de
serrage.
Le
KPB1
peut
etre
monte au-dessus ou au-dessous des
barres,
tandis
que
la
base
de
montage
peut
etre
toumee de ±
30
° pour
accueillir
certaines
barres
courbes.
Mit
drei
verschiecenen
GroBen
von
Klemmringen
ist
es
einfach,
den
Klemmring
auszuwahlen,
der
fur
lhre
Stange oder
Anwendung
am
besten geeignet
ist.
Schrauben
Sie
die
Montagebasen
m1t
den Befestigungsschrauben
an
die
PowerBar
.
Legen
Sie die
Klemmnnge
um
lhre
Montagestange
und befestigen
Sie
die
Klemmnnge
mrt
den Klemmschrauben
an
den Montagebasen.
Der
KPB1
kann
Ober
oder unter den
Stangen
montiert
werden, wahrend die Montagebasis
um
± 30 °
gedreht werden
kann,
um
einige
gekrummte Stangen
aufzunehmen.while
the
Mounting
Base
may
be rotatec ±
30'.
Mounting
Base
Base de
montaje
Base de montage
Befestigungsbasis
PAIRING I
EMPAREJAMIENTO
I APPAIRAGE I
KOPPLUNG
Power
on
the
PowerBar
by
perfomning
a
long
press
(1
seconc) of the
POWER
Button.
Enter
Pairing
mode by
performing
a long press of the Bluetooth
(SOURCE)
button
while
the
PowerBar
is
powered
on.
The
STATUS
LED
will
flash
blue while
in
pairing
mode.
When
in
Bluetooth
Pairing
mcde,
tho
:-1c·vvc;-8a;
·
v•v
·i::
di::;plcy'
D.3
•!·<f'81
:<:C!<ER~
en
you;
Bluetooth
device.
You
iT:Uy
n:so
exit
pairing
mode by pressing
the
SOURCE
button. Once a Bluetooth device is connected,
the
light
will
be
solid
blue.
Press
the
SOURCE
button to switch between Bluetooth and
AUX
input
sources.
The
STATUS
LED
will
be
sohd
rec
when
in
AUX
mode.
When
the
PowerBar
powers
on
in,
or
enters,
Bluetooth mode, it
will
automatical~ begin to
search
for
anc
connect with
the
last
connectec device.
If
that
device is not founc, it
will
continue
to
search
for
the other savec connections
until
a connection
is
establishec.
Use
the
EQ
button
to toggle between 4
EQ
modes:
KICKER,
LOUD,
SOUND
QUALITY,
and
VOICE.
Encienda
el
PowerBar
presionando prolongadamente
(1
segundo)
el
bot6n de
ENCENDIDO.
Ingress
al
modo de
emparejamiento
presionando prolongadamente
el
bot6n de Bluetooth
(FUENTE)
mientras
el
PowerBar
esta encendido.
El
LED
DE
ESTADO
parpadeara
en
azul
mientras
este
en
modo de
emparejamiento.
Cuando este
en
el modo de emparejamiento de
Bluetooth,
el
PowerBar
se mostrara como
'KPB1
KICKER"
en
su dispositivo Bluetooth.
Tambien
puede
salir
del modo
de
emparejamiento presionando
el
bot6n
SOURCE.
Una
vez
que se
conecte
un
dispositivo Bluetooth,
la
luz
sera
azul
fiJa.
Pres
1one
el bot6n
SOURCE
para
cambiar
entre
las
fuentes
de entrada Bluetooth y
AUX.
El
LED
de
ESTADO
estara
en
rojo
fijo
cuando este
en
modoAUX.
Cuando
el
PowerBar
se
enciende o
ingresa
al
modo Bluetooth,
comenzara
automaticamente a
buscar y conectarse con
el
ultimo
dispositivo conectado.
Si
nose
encuentra ese dispositivo,
continuara
buscanco
las
otras conexiones guardadas hasta que
se
establezca
una
conexi6n.
Utilice el bot6n
EQ
para
altemar
entre 4 modos de
EQ:
KICKER,
LOUD,
SOUND
QUALITY
y
VOICE.
Mettez
la
PowerBar
sous tension
en
appuyant longuement
(1
seconds) sur
le
bouton
POWER.
Entrez
en
mode de couplage en appuyant longuement sur
le
bouton Bluetooth
(SOURCE)
pendant que
la
PowerBar
est sous
tension.
La
LED
STATUS
clignotera
en
bleu
en
mode
d'appairage.
En
mode de couplage Bluetooth,
la
PowerBar
s'affiche sous
la
forrne
•KPB1
KICKER•
sur
votre
appareil
Bluetooth.
Vous
pouvez
egalement
quitter
le
mode de couplage
en
appuyant
sur
le
bouton
SOURCE.
Une
fois
qu'un
appareil
Bluetooth est connecte,
le
voyant
sera
bleu
fixe.
Appuyez
sur
le
bouton
SOURCE
pour basculer
entre
les
sources d'entree Bluetooth et
AUX.
La
LED
STATUS
sera
rouge
fixe
en
mode
AUX.
Lorsque
le
PowerBar
s'allume
ou
entre
en
mode Bluetooth,
ii
commence automatiquement a
rechercher et a
se
connecter avec
le
demier
appareil
connecte.
Si
ce peripherique n'est pas
trouve,
ii
continuera a rechercher
les
autres connexions enregistrees jusqu'a ce qu'une
connexion
so1t
etablie.
Utllisez
le
bouton
EQ
pour basculer
entre
4 modes d'egalisation:
KICKER,
LOUD,
QUAI.JTt
SONORE
et
VOICE.
Schalten
Sie
die
PowerBar
ein,
indem
Sie
lange
(1
Sekunde)
auf
die
POWER-Taste
drucken.
Rufen
Sie
den Pairing-Modus
auf,
indem
S1e
lange
auf
die
Bluetooth-Taste
(SOURCE)
drucken,
wahrend
die
PowerBar
eingeschaltet
ist.
Die
STATUS-LED
blinkt
im
Pairing-Modus
blau.
Im
Bluetooth-Pairing-Modus
wird
die
PowerBar
auf
lhrem
Bluetooth-Gerat
als
,KPB1
KICKER"
angeze1gt.
Sie
kbnnen
den Pairing-Modus auch
verlassen,
indem Sie die
SOURCE-Taste
drucken. Sobald
ein
Bluetooth-Gerat verbunden
ist,
leuchtet die
Anze1ge
blau.
Drucken
Sie
die
SOURCE-Taste,
um zwischen Bluetooth- und
AUX-Eingangsquellen
zu
wechseln.
Die
STATUS-LED
leuchtet
im
AUX-Modus durchgehend
rot.
Wenn
sich die
PowerBar
im
Bluetooth-Modus
e1nschaltet
oder
in
diesen wechselt, beginnt
sie
automatisch mit der Suche
nach
dem
zuletzt
verbundenen
Gerat
und stellt
eine
Verbindung
mil
diesem
her.
Wenn
disses
Gerat
nicht gefunden wird, sucht es weiter nach den anderen
gespeicherten
Verbindungen,
bis
eine
Verb1ncung
hergestellt
ist.
Verwenden
Sie
die
EQ-Taste,
um
zwischen
4
EQ-Modi
umzuschalten:
KICKER,
LOUD,
SOUND
QUALITY
und
VOICE.
SOURCE
FUENTE
LA
SOURCE
QUEUE
POWER
PODER
PUISSANCE
LEISTUNG
PR~OUS
TRACK/
REWND
PISTA
ANTERIOR/
REBOBINADO
PISTE
PR~C~DENTE
/
REMBOBINAGE
VORHERK,ER
TRACK
/
REWND
I I
n.
►
®
U
AUX
<.!)
STATUS
LED
LED
DE
ESTADO
LED
D'l:TAT
STATUS
LED
0
0
EQ
◄
>))
0000
K(]~
0000
H"il
HI
~
◄
>
EOPRESETS
PREAJUSTES
DE
EO
PRESETS
EO
EOUAUZER
PRESETS
VOLUME
UP
SUBE
EL
VOLUMEN
MONTER
LE
SON
LAUTSTARKE
ERHOHEN
VOLUME
DOWN
BAJAR
VOLUMEN
SASSER
LE
VOLUME
LAUTSTARKE
RUNTER
PLAY/ PAUSE/
MLJTE
REPRODUOR
/
PAUSA
/
SILENCK)
LECTURE
/
PAUSE
/
MUET
SPIELEN
/
PAUSE
/
MLJTE
NEXT
TRACK
/
FAST
FORWARD
SIGUIENTE
PISTA
/
AV/WCE.
RAPIDO
PISTE
SUIVANTE
/
AV/WCE
RAPIDE
NACHSTER
SPUR
/
SCHNELL
VORWARTS
•
To
sync the remote control, press the SOURCE button twlce.
Para
s1ncronizar
el control remoto, presione el bot6n
de
FUENTE
dos veces.
Pour synchroniser
"'
telecommande, appuyez
deUJ<
le>s
sur
le
bouton
SOURCE.
Drucken Sie die SOURCE-Taste zweirnal, um die Fembedienung zu synchronisieren.