
Owner's Manual


{fKICKER
KICKER
MARINE
Tower
Enclosures
Owner's
Manual
MODEL:
KMTESB
Authorized
KICKER
Dealer:
Purchase Date:
Serial
Number:
The
KICKER
KM
Tower Enclosures
are the perfect way
to bring
your music out into the marine or power sports environment.
The KMTES8
is
compatible
with the
KICKER
KM8
speaker. The
injection-molded ABS
enclosures
are
UV
treated,
splash
resistant,
and weather
resilient.
Mount the
KM
Tower
Enclosures
in
your
boat
or get creative with a pair of them
in
the garage, on your 4x4 or
Side-by-Side's
roll
bars, or
in
any other bar-mounted
application.
INSTALLATION
I
'
6
17/3
2.
'' '
~-
---------
[
10
6mm}
-----------
-
---~
i
'
!
!
!
--
---
-
---------
----
--
T-
1
!
H+-l
---------------
---
--
----r
11
27
J
32"
[3Tm
1
1
I
[254mm!
i
'
: l
·Jl
S
~/32
"
j
i
[2
0~mm
]
!
;
:
JF
,~
,
lj
Mounting:
Your
KM
Tower
enclosures include plastic
adaptor inserts for use with the four most
popular
tower
tubing diameters: 2-1/4", 2-3/8", 2-1/2" and 2-5/8" (withoutinserts).
lfyourtubing
diameter
is
different, you may
need to use the KMTAP Accessory pack, which includes adaptors for 1-5/8", 1-3/4", 1-7/8" and 2". For other
tubing diameters, additional
shims may be needed.
Place
the
included
upper and
lower
gaskets between the
mounting inserts and mounting brackets. '
Study your mounting bar for the best
possible
mounting
~ocations
.
Spreading the
KM
Tower
Enclosures
apart
will
provide better stereo performance, and
is
usually preferable.
When determining the best locations
for mounting,
be careful
to look
for obstacles
or obstructions that
could complicate
mounting the
KM
Tower
Enclosures.
Please
keep
in
mind the routing of your speaker wires
as
this can affect where you
finally
mount your
KM
Tower
Enclosures.
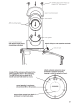
Aiming:
The mounting hardware design provides flexibility
in
angular mounting of your
KM
Tower-Enclosures.
This
is
accomplished
by using the included
female-threaded
internal
mounting plates.
It
is
recommended that
you
loosely assemble
your
KM
Tower
Enclosures
and attach them to your mounting bar/tower to determine
proper angular alignment.
Start by inserting two
stainless
socket -head cap screws through the
lower
mounting bracket, through the
enclosure
mounting
holes,
and into the threaded mounting
plate.
Leave these screws
loose
for the moment.
Attach the
enclosure to your mounting bar us)ng the upper mounting bracket and two more
stainless
socket-
head cap screws. While still loosely assembled, visually align
your
KM
Tower
Enclosures
to the desired
angle.
Using tape, a
pencil,
or some other means,
h,ark
the mounting
angle of the mounting bracket bottom
in
relation
to the
KM
Tower Enclosure(s). Remove the
1
enclosures and then
do
final
tightening of the
lower
mounting
bracket to the
enclosure, aligning
it
with the marks you made.
Once your
final
adjustments are made
do
not use
excessive force to further
aim
the
enclosures.
If
your
aim
is
off, remove the
KM
Tower
Enclosures
and
loosen
the
screws between the
enclosure and the
lower
mounting bracket, then reset the
angle.
2
lower
mounting bracket
(set desired
angle
before
completing mounting)