LIVIN’ LOUD ZX AMPLIFIER ZX350.4 ZX650.4 English Version Versión Español Amplificador del la Serie ZX.4 Deutsche Version Stereoverstärker der ZX.4-Serie Version Francaise Amplificateur de série ZX.4 2011 ZX 350.4 650.4 RevC.
ZX.4-SERIES AMPLIFIERS Owner’s Manual MODEL: ZX350.4 / ZX650.4 Authorized KICKER Dealer: Purchase Date: Model Number: Serial Number: PERFORMANCE Model: ZX350.4 ZX650.4 RMS Power, all channels driven @ 14.4V, 4Ω stereo, 1% THD+N @ 14.4V, 2Ω stereo, 1% THD+N @ 14.
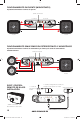
to amplifier core conductor source unit high-level speaker outputs + KICKER ZISL OR – to amplifier shield source unit high-level speaker outputs Install a fuse within 18” (45cm) of the battery and in-line with the power cable connected to your amplifier. If you ever need to remove the amplifier from the vehicle after it has been installed, the ground wire should be the last wire disconnected from the amplifier--just the opposite as when you installed it.
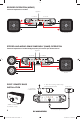
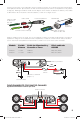
BRIDGED OPERATION (MONO) minimum impedance of 4 ohms signal in L+ L- R+ R- L+ L- R+ RL R L AMP1 R AMP2 AMP1 AMP2 L+ L- R+ R- L+ BRIDGE WIRING R- L+ L- R+ R- woofer woofer STEREO-AND-MONO-SIMULTANEOUSLY (SAMS) OPERATION minimum impedance of 4 ohms bridged (mono) and 2 ohms per channel stereo signal in L+ L- R+ R- L+ L- R+ RL R AMP1 L R AMP2 AMP1 AMP2 L+ L- R+ R- L+ BRIDGE WIRING R- L+ L- R+ R- woofer ZXRC* REMOTE BASS INSTALLATION 2.
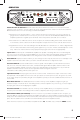
OPERATION AUTO TURN ON +12V INPUT LEVEL DC AUDIO LO OFFSET HI L R L R FADER XOVER1 OFF ON AMP1 OFF AMP2 HI LO XOVER2 OFF HI LO REMOTE BASS AMP1 AMP2 L+ L- R+ R- L+ BRIDGE WIRING R- L+ L- R+ R- Automatic Turn-On Selection: The ZX series offers three different automatic turn-on modes that can be selected on the end panel; +12V, DC Offset, and Audio. Using either the DC Offset or Audio mode causes the REM terminal to have +12V out for turning on additional amplifiers.
TROUBLESHOOTING If your amplifier does not appear to be working, check the obvious things first such as blown fuses, poor or incorrect wiring connections, incorrect setting of crossover switch and gain controls, etc. There is an illuminated red badge on top of the amplifier denoting the power state of the amp in addition to the Protection LED on the end panel of your KICKER ZX series amplifier. When the red badge is lit, this indicates the amplifier is turned on and the amplifier is functioning properly.
If you have more questions about the installation or operation of your new KICKER product, see the Authorized KICKER Dealer where you made your purchase. For more advice on installation, click on the SUPPORT tab on the KICKER homepage, www.kicker.com. Choose the TECHNICAL SUPPORT tab, choose the subject you are interested in, and then download or view the corresponding information. Please E-mail support@kicker.com or call Technical Services (405) 624-8583 for unanswered or specific questions.
AMPLIFICADOR DE LA SERIE ZX.4 Manual del propietario MODELOS: ZX350.4 / ZX650.4 Distribuidor autorizado de KICKER: Fecha de compra: Número de modelo del amplificador: Número de serie del amplificador: RENDIMIENTO Modelo: ZX350.4 ZX650.4 Potencia RMS, todos los canales activados @ 14.4V, 4Ω estereofónico, 1% THD+N @ 14.4V, 2Ω estereofónico, 1% THD+N @ 14.
muestra a continuación. Como alternativa, puede conectar producción de su unidad fuente a las entradas RCA del amplificador ZX RCA. Fije el selector de nivel de entrada del panel de extremo del amplificador en la posición de bajo (LO). Mantenga el cable de señal de audio alejado de los arneses de cableado de fábrica y otros cables de alimentación. Si es necesario cruzar este cableado, crúcelo en un ángulo de 90°.
FUNCIONAMIENTO EN PUENTE (MONOFÓNICO) impedancia mínima de 4 ohmios en puente señal de entrada L+ L- R+ R- L+ L- R+ RL R L AMP1 R AMP2 AMP1 AMP2 L+ L- R+ R- L+ BRIDGE WIRING R- L+ L- R+ R- woofer woofer FUNCIONAMIENTO SIMULTÁNEO EN ESTEREOFÓNICO Y MONOFÓNICO impedancia mínima de 4 ohmios en monofónico y 2 ohmios por canal en estereofónico simultáneamente señal de entrada L+ L- R+ R- L+ L- R+ RL R AMP1 L R AMP2 AMP1 AMP2 L+ L- R+ R- L+ BRIDGE WIRING R- L+ L- R+ R- woof
FUNCIONAMIENTO AUTO TURN ON +12V INPUT LEVEL DC AUDIO LO OFFSET HI L R L R FADER XOVER1 OFF ON AMP1 OFF AMP2 HI LO XOVER2 OFF HI LO REMOTE BASS AMP1 AMP2 L+ L- R+ R- L+ BRIDGE WIRING R- L+ L- R+ R- Selección de Encendido Automático: La serie ZX ofrece tres modalidades de encendido automático que se pueden seleccionar en el panel de extremo: +12V, compensación de CC y audio.
Control Remoto de Bajos-ZXRC (no incluido): Con el control remoto de bajos, el nivel de salida del amplificador ZX650.4 se puede controlar a distancia. Para montar el control remoto de bajos, atornille el soporte de metal en el lugar escogido. Luego deslice el alojamiento sobre el soporte hasta que encaje en posición. Encamine el cable desde el control hasta el enchufe de control remoto de bajos (REMOTE BASS) del chasis del amplificador. Nota: Cuando los cruzados en los amplificadores de la serie ZX650.
¿Hay mala imagen estereofónica o baja respuesta de bajos? Revise la fase del sistema girando el control de balance de izquierda a derecha. Si hay más salida de bajos cuando se pasa a uno de los dos lados, revise el cableado de altavoz, las redes de crossovers pasivos y las terminales de altavoz para asegurarse de que tengan las conexiones positivas y negativas correctas.
VERSTÄRKER DER ZX.4 SERIE Benutzerhandbuch ZX350.4 / ZX650.4 MODELL: Autorisierter KICKER-Händler: Kaufdatum: Verstärker-Modellnummer: Verstärker-Seriennummer: LEISTUNG Modell: ZX350.4 ZX650.4 RMS-Leistung, alle Kanäle betrieben @ 14.4V, 4Ω stereo, 1% Gesamtklirrfaktor @ 14.4V, 2Ω stereo, 1% Gesamtklirrfaktor @ 14.
Alternativ können Sie Ihre Quelle Einheit Cinch-Ausgänge zum ZX Verstärker Cinch-Eingänge anschließen. Stellen Sie den Eingangspegelschalter an der Endplatte des Verstärkers auf „LO“. Achten Sie beim Verlegen dieser Audiokabel darauf, dass sie Werks-Kabelbäume und andere Stromkabel nicht berühren. Wenn Sie die Kabel überkreuzen müssen, tun Sie dies in einem 90-Grad-Winkel.
BRÜCKENBETRIEB (MONO) Minimalimpedanz von 4 Ohm Signaleingang L+ L- R+ R- L+ L- R+ RL R L AMP1 R AMP2 AMP1 AMP2 L+ L- R+ R- L+ BRIDGE WIRING R- L+ L- R+ R- Tieftöner Tieftöner GLEICHZEITIGER STEREO- UND MONO-BETRIEB (SAMS) Mindestimpedanz von 4 Ohm (Mono) bzw.
BETRIEB AUTO TURN ON +12V INPUT LEVEL DC AUDIO LO OFFSET HI L R L R FADER XOVER1 OFF ON AMP1 OFF AMP2 HI LO XOVER2 OFF HI LO REMOTE BASS AMP1 AMP2 L+ L- R+ R- L+ BRIDGE WIRING R- L+ L- R+ R- Automatische Einschaltung: Die ZX-Serie bietet drei verschiedene automatische Einschaltmethoden, die an der Endplatte gewählt werden können: +12V, DC Offset und Audio.
Basspegel-Fernbedienung-ZXRC (nicht inbegriffen). Mit der Basspegel-Fernbedienung können Sie den Ausgangspegel des ZX650.4 Verstärkers per Fernbedienung kontrollieren. Um die Basspegel-Fernbedienung zu befestigen, schrauben Sie einfach die Metallhalterung am gewünschten Installationsort ein. Schieben Sie dann das Gehäuse in die Halterung, bis es einrastet. Stecken Sie das Kabel von der Fernbedienung in die „Remote Bass“-Buchse am Verstärkergehäuse. Hinweis: Wenn die Frequenzweiche Verstärker ZX650.
Keine Fade-Funktion? Wenn Sie beide Gruppen von Niedrigpegel- (RCA) oder Hochpegeleingängen (Lautsprecherkabel) verwenden, muss die Fader-Taste gedrückt sein. Störung durch Erdung? KICKER-Verstärker sind mit den Autoradios aller Hersteller kompatibel. Manche Autoradios erfordern eventuell weitere Erdung, um Störungen am Audiosignal zu verhindern. Wenn Sie Probleme mit dem Autoradio haben, reicht es meist, ein Massekabel von den RCA-Ausgängen am Autoradio zur Karosserie zu verlegen.
AMPLIFICATEUR SÉRIE ZX.4 Manuel d’utilisation MODÈLE: ZX350.4 / ZX650.4 Revendeur agréé KICKER : Date d’achat : Numéro de modèle de l’amplificateur : Numéro de série de l’amplificateur : PERFORMANCES Modèle: ZX350.4 ZX650.4 Puissance Efficace en Watts, tous les canaux en service @ 14.4V, 4Ω stereo, 1% THD+N @ 14.4V, 2Ω stereo, 1% THD+N @ 14.
l’installation avec une ZISL KICKER, comme indiqué ci-dessous. Alternativement, vous pouvez connecter les sorties de votre unité source RCA aux entrées de l’amplificateur ZX RCA. Réglez le commutateur de niveau d’entrée sur le panneau d’extrémité de l’amplificateur à la position « LO ». Acheminez le câble du signal audio à l’écart des harnais de câblage d’usine et des autres câblages électriques. Si vous devez éventuellement croiser ces fils, procédez à angle droit.
FONCTIONNEMENT PONTÉ (MONO) impédance minimum de 4 ohms Entrée du signal L+ L- R+ R- L+ L- R+ RL R L AMP1 R AMP2 AMP1 AMP2 L+ L- R+ R- L+ BRIDGE WIRING R- L+ L- R+ R- woofer woofer FONCTIONNEMENT SIMULTANÉ STÉRÉO ET MONO (SAMS) impédance minimum simultanément de 4 ohms en mono et 2 ohms par canal en stéréo Entrée du signal L+ L- R+ R- L+ L- R+ RL R AMP1 L R AMP2 AMP1 AMP2 L+ L- R+ R- L+ BRIDGE WIRING R- L+ L- R+ R- woofer ZXRC* TÉLÉCOMMANDE DU NIVEAU DES GRAVES INSTA
UTILISATION AUTO TURN ON +12V INPUT LEVEL DC AUDIO LO OFFSET HI L R L R FADER XOVER1 OFF ON AMP1 OFF AMP2 HI LO XOVER2 OFF HI LO REMOTE BASS AMP1 AMP2 L+ L- R+ R- L+ BRIDGE WIRING R- L+ L- R+ R- Sélection de Mise sous Tension Automatique : La série ZX est dotée de trois modes différents de mise sous tension automatique pouvant être sélectionnés au panneau d’extrémité de l’amplificateur : +12V, DC Offset (décalage c.c.) et Audio.
Télécommande du Niveau des Graves-ZXRC (non inclus) : La télécommande du niveau des graves permet de contrôler à distance le niveau de sortie de l’amplificateur ZX650.4. Pour monter la télécommande du niveau des graves, il suffit de visser le support métallique à l’emplacement choisi. Ensuite, faites glisser le logement sur le support jusqu’à ce qu’il s’enclenche en place. Faites passer le câble du contrôleur à la prise de la télécommande des graves (« Remote Bass ») sur le châssis de l’amplificateur.
Mauvaise image stéréo ou réponse réduite des graves ? Vérifiez le phasage du système en tournant le bouton de commande de balance de gauche à droite. Si la sortie des graves augmente lorsque vous tournez le bouton d’un côté ou de l’autre, vérifiez le câblage des haut-parleurs, les réseaux de filtrage passif et les bornes des haut-parleurs pour déterminer si les branchements positifs et négatifs sont corrects.
ELECTRONICS LIMITED WARRANTY KICKER warrants this product to be free from defects in material and workmanship under normal use for a period of THREE (3) MONTHS from date of original purchase with receipt. When purchased from an Authorized KICKER Dealer it is warranted for TWO (2) YEARS from date of original purchase with receipt. In all cases you must have the original receipt.
INTERNATIONAL WARRANTY Contact your International KICKER dealer or distributor concerning specific procedures for your country’s warranty policies. WARNING: KICKER products are capable of producing sound levels that can permanently damage your hearing! Turning up a system to a level that has audible distortion is more damaging to your ears than listening to an undistorted system at the same volume level.
©2010 Stillwater Designs 2011 ZX 350.4 650.4 RevC.