LIVIN’ LOUD IX AMPLIFIER IX1000.5 English Version Versión Español Amplificador del la Serie IX.5 Deutsche Version Stereoverstärker der IX.5-Serie Version Francaise Amplificateur de série IX.5 2011 IX 1000.5 RevF.
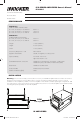
IX.5-SERIES AMPLIFIERS Owner’s Manual IX1000.5 Authorized KICKER Dealer: Purchase Date: Serial Number: PERFORMANCE RMS Power: AMP1 & AMP2 channels driven @ 14.4V, 4Ω stereo, 1% THD+N @ 14.4V, 2Ω stereo, 1% THD+N @ 14.4V, 4Ω mono, 1% THD+N 65W x 4 125W x 4 250W x 2 RMS Power: SUBWOOFER channel driven @ 14.4V, 4Ω mono, 1% THD+N @ 14.
Wiring: Disconnect the vehicle’s battery to avoid an electrical short. Then, connect the ground wire to the amplifier. Make the ground wire short, 24” (60cm) or less, and connect it to a paint-and-corrosion-free, solid, metal area of the vehicle’s chassis. Adding an additional ground wire of this same gauge (or larger) between the battery’s negative post and the vehicle chassis is recommended.
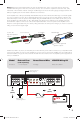
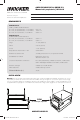
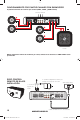
FOUR CHANNEL OPERATION with SUBWOOFER minimum impedance of 2 ohms per channel (AMP1, AMP2, and SUB channels) signal in L+ AMP1 L– R+ R– GND POWER REM +12V AMP1 AMP2 SUB REMOTE BASS AUTO TURN ON L+ AMP2 L– R+ SUB R– + – 12V DC AUDIO OFFSET L INPUT LEVEL FADER SUB INPUT R LO HI BRIDGED OFF ON AMP2 SUB BRIDGED woofer NOTE: minimum impedance of 4 ohms per channel when AMP1 or AMP2 speaker outputs are bridged. ZXRC REMOTE BASS INSTALLATION 2.
OPERATION L+ AMP1 L– R+ R– GND POWER REM +12V AMP1 AMP2 SUB REMOTE BASS AUTO TURN ON AMP2 L– R+ L+ SUB R– + – 12V DC AUDIO OFFSET L INPUT LEVEL FADER SUB INPUT R LO HI BRIDGED OFF ON AMP2 SUB BRIDGED Automatic Turn-On Selection: The IX series offers three different automatic turn-on modes that can be selected on the end panel; +12V, DC Offset, and Audio. Using either the DC Offset or Audio mode causes the REM terminal to have +12V out for turning on additional amplifiers.
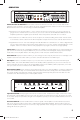
Crossover Control: The variable crossover on the front of the amplifier allows you to adjust the crossover frequency from 50–200Hz. The setting for this control is subjective; 80Hz is a good place to start. Bass Boost Control: The variable bass boost control on the front of the amplifier is designed to give you increased output, 0–18dB, at 40Hz. The setting for this control is subjective. If you turn it up, you must readjust the input gain control to avoid clipping the amplifier.
Please Note: Modern high performance speakers have a lower DC Resistance than what used to be available. The KICKER Coaxial and Component speakers are rated at four ohms (some DC Resistances may be as low as 3 ohms) and work with any amplifier designed to operate at a four ohm load. If you want to use two KICKER Coaxial or Component speakers on a single channel of your amplifier, wire the speakers in series.
AMPLIFICADOR DE LA SERIE IX.1 Manual del propietario | IX1000.5 Distribuidor autorizado de KICKER: Fecha de compra: Número de serie del amplificador: RENDIMIENTO RMS Potencia: AMP1 y AMP2 canales activados @ 14.4V, 4Ω estereofónico, 1% THD+N @ 14.4V, 2Ω estereofónico, 1% THD+N @ 14.4V, 4Ω monofónico, 1% THD+N 65W x 4 125W x 4 250W x 2 RMS Potencia: SUBWOOFER canales activados @ 14.4V, 4Ω monofónico, 1% THD+N @ 14.
plg. (3 mm) y monte el amplificador con los tornillos N° 8 que se suministran. Utilice el IXSM soporte de montaje (se vende por separado) a la pila IX amplificadores de diferentes tamaños. Cableado: Desconecte la batería del vehículo para evitar cortocircuitos. Luego, conecte un cable de conexión a tierra al amplificador. El cable de conexión a tierra debe ser corto, de 24 plg. (60 cm) o menos, y debe ir conectado a un punto sólido del chasis del vehículo en que no haya ni pintura ni corrosión.
FUNCIONAMIENTO POR CUATRO CANALES CON SUBWOOFER impedancia mínima de 2 ohmios por canales (AMP1, AMP2, y SUB canales) señal de entrada L+ AMP1 L– R+ R– GND POWER REM +12V AMP1 AMP2 REMOTE BASS SUB AUTO TURN ON AMP2 L– R+ L+ SUB R– + – 12V DC AUDIO OFFSET L INPUT LEVEL FADER SUB INPUT R LO HI BRIDGED OFF ON AMP2 SUB BRIDGED woofer NOTA: impedancia mínima de 4 ohmios por canal, salidas de los altavoces o AMP1 AMP2 están puenteados. ZXRC CONTROL REMOTO DE BAJOS INSTALACIÓN 2.
FUNCIONAMIENTO L+ AMP1 L– R+ R– GND POWER REM +12V AMP1 AMP2 SUB REMOTE BASS AUTO TURN ON AMP2 L– R+ L+ SUB R– + – 12V DC AUDIO OFFSET L INPUT LEVEL FADER SUB INPUT R LO HI BRIDGED OFF ON AMP2 SUB BRIDGED Selección de Encendido Automático: La serie IX ofrece tres modalidades de encendido automático que se pueden seleccionar en el panel de extremo: +12V, compensación de CC y audio.
Selector de Crossover: Fije el crossover interno en posición de desactivado (OFF) o alto (HI) con el selector de crossover (XOVER) ubicado en el panel de extremo del amplificador. Cuando el selector se pone en posición de desactivado (OFF), todo el ancho de banda de la señal se amplifica. Fije el selector en la posición de alto (HI) si desea que el crossover interno del amplificador sirva como filtro de pasaaltas.
¿Hay mala imagen estereofónica o baja respuesta de bajos? Revise la fase del sistema girando el control de balance de izquierda a derecha. Si hay más salida de bajos cuando se pasa a uno de los dos lados, revise el cableado de altavoz, las redes de crossovers pasivos y las terminales de altavoz para asegurarse de que tengan las conexiones positivas y negativas correctas.
VERSTÄRKER DER IX.1 SERIE Benutzerhandbuch | IX1000.5 Autorisierter KICKER-Händler: Kaufdatum: Verstärker-Seriennummer: LEISTUNG RMS-Leistung: AMP1 & AMP2 Kanäle betrieben @ 14.4V, 4Ω stereo, 1% Gesamtklirrfaktor @ 14.4V, 2Ω stereo, 1% Gesamtklirrfaktor @ 14.4V, 4Ω mono, 1% Gesamtklirrfaktor 65W x 4 125W x 4 250W x 2 RMS-Leistung: SUBWOOFER Kanal betrieben @ 14.4V, 4Ω mono, 1% Gesamtklirrfaktor @ 14.
IXSM separat erhältlich Anschluss: Trennen Sie den Anschluss der Fahrzeugbatterie, um einen Kurzschluss zu vermeiden. Schließen Sie dann das Massekabel an den Verstärker an. Verwenden Sie ein kurzes Erdungskabel (maximal 60 cm) und schließen Sie es an eine lack- oder korrosionsfreie Metallstelle an der Fahrzeugkarosserie an. Es wird auch empfohlen, ein weiteres Massekabel mit gleicher (oder größerer) Drahtstärke zwischen dem negativen Pol der Autobatterie und der Fahrzeugkarosserie zu verwenden.
Ferneinschaltung (Seite 17) L+ AMP1 L– R+ R– GND POWER REM +12V AMP1 AMP2 SUB AUTO TURN ON REMOTE BASS AMP2 L– R+ L+ R– + SUB – 12V DC AUDIO OFFSET L INPUT LEVEL FADER SUB INPUT R LO HI BRIDGED OFF ON AMP2 SUB BRIDGED 18” (45cm) 24” (60cm) Masse externe Sicherung 12V Batterie VIERKANALBETRIEB MIT SUBWOOFER Minimal impedanz von 2 Ohm pro Kanal (AMP1, AMP2, und SUB Kanäle) Signaleingang L+ AMP1 L– R+ R– GND POWER REM +12V AMP1 AMP2 SUB REMOTE BASS AUTO TURN ON L+ AM
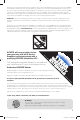
2. Schieben Sie das Gehäuse ein, bis es in der Metallhalterung einrastet. ZXRC BASSPEGELFERNBEDIENUNG INSTALLATION 1.
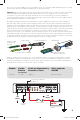
GAIN PWR X-OVER FREQ BASS BOOST GAIN X-OVER FREQ GAIN XOVER PRT OFF 0 11 200Hz 0dB 50Hz 18dB 0 HI 11 X-OVER FREQ XOVER OFF 50Hz 200Hz 0 HI 11 50Hz 200Hz IX SUB AMP2 AMP1 Eingangsverstärkungsregler: Der Eingangsverstärkungsregler ist kein Lautstärkeregler. Er passt den Ausgang des Autoradios an den Eingangspegel am Verstärker an. Stellen Sie das Autoradio auf etwa 3/4 der Lautstärke ein (wenn es also bis 30 geht, wählen Sie 25).
des Betriebsbereichs von 10–16 Volt. Lassen Sie das Lade- und Elektriksystem des Fahrzeugs inspizieren. Der Verstärker erzeugt nur geringe Lautstärke = Die Kurzschluss-Sicherung ist aktiviert. Prüfen Sie, ob Lautsprecherkabel miteinander oder mit der Karosserie Kurzschlüsse erzeugen. Prüfen Sie, ob beschädigte oder unterhalb des Mindestwiderstands funktionierende Lautsprecher vorliegen. Keine Ausgabe aus einem Kanal? Prüfen Sie den Balanceregler am Autoradio.
AMPLIFICATEUR SÉRIE IX.1 Manuel d’utilisation IX1000.5 Revendeur agréé KICKER : Date d’achat : Numéro de série de l’amplificateur : PERFORMANCES Puissance Efficace: AMP1 & AMP2 canaux en service @ 14.4V, 4Ω stereo, 1% THD+N @ 14.4V, 2Ω stereo, 1% THD+N @ 14.4V, 4Ω mono, 1% THD+N 65W x 4 125W x 4 250W x 2 RMS Power: SUBWOOFER canal en service @ 14.4V, 4Ω mono, 1% THD+N @ 14.
Câblage: Débranchez la batterie du véhicule pour éviter un court-circuit. Ensuite, raccordez le fil de masse à l’amplificateur. Le fil de masse doit être le plus court possible, de 60 cm (24 po) maximum. Raccordez-le à une partie métallique solide du châssis du véhicule, ne comportant ni peinture ni rouille. Il est recommandé d’ajouter un fil de masse supplémentaire de même calibre (ou de calibre supérieur) entre la borne négative de la batterie et le châssis du véhicule.
FONCTIONNEMENT À QUATRE CANAUX AVEC CAISSON DE GRAVES impédance minimum de 2 ohms par canal (AMP1, AMP2, et le SUB canaux Entrée du signal L+ AMP1 L– R+ R– GND POWER REM +12V AMP1 AMP2 REMOTE BASS SUB AUTO TURN ON AMP2 L– R+ L+ SUB R– + – 12V DC AUDIO OFFSET L INPUT LEVEL FADER SUB INPUT R LO HI BRIDGED OFF ON AMP2 SUB BRIDGED woofer NOTE: impédance minimale de 4 ohms par canal lorsque les sorties haut-parleur ou AMP1 AMP2 se rapprochent.
UTILISATION L+ AMP1 L– R+ R– GND POWER REM +12V AMP1 AMP2 SUB REMOTE BASS AUTO TURN ON AMP2 L– R+ L+ SUB R– + – 12V DC AUDIO OFFSET L INPUT LEVEL FADER SUB INPUT R LO HI BRIDGED OFF ON AMP2 SUB BRIDGED Sélection de Mise sous Tension Automatique : La série IX est dotée de trois modes différents de mise sous tension automatique pouvant être sélectionnés au panneau d’extrémité de l’amplificateur : +12V, DC Offset (décalage c.c.) et Audio.
Commande de Filtre: Située sur le haut de l’amplificateur, la commande de filtre variable permet de régler la fréquence du filtre de 50 à 200 Hz. Le réglage de cette commande est subjectif. 80 Hz constitue un bon réglage de départ. Commande de l’Augmentation des Graves: Située sur le haut de l’amplificateur, la commande de l’augmentation des graves variable permet d’augmenter la sortie de 0 à 18 dB à 40 Hz. Le réglage de cette commande est subjectif.
Piaulement prolongé de l’alternateur avec le régime du moteur ? Vérifiez l’état du câble RCA (ou d’entrée de haut-parleur) Vérifiez l’acheminement du câble RCA (ou d’entrée de haut-parleur) Vérifiez que l’appareil source est correctement mis à la masse Vérifiez les paramètres de gain et baissez-en la valeur s’ils sont trop élevés. Mauvaise image stéréo ou réponse réduite des graves ? Vérifiez le phasage du système en tournant le bouton de commande de balance de gauche à droite.
ELECTRONICS LIMITED WARRANTY KICKER warrants this product to be free from defects in material and workmanship under normal use for a period of THREE (3) MONTHS from date of original purchase with receipt. When purchased from an Authorized KICKER Dealer it is warranted for TWO (2) YEARS from date of original purchase with receipt. In all cases you must have the original receipt.
INTERNATIONAL WARRANTY Contact your International KICKER dealer or distributor concerning specific procedures for your country’s warranty policies. WARNING: KICKER products are capable of producing sound levels that can permanently damage your hearing! Turning up a system to a level that has audible distortion is more damaging to your ears than listening to an undistorted system at the same volume level.
©2010 Stillwater Designs 2011 IX 1000.5 RevF.