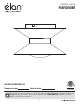
MODEL #84132 FLUSHMOUNT CEILING FIXTURE Français p. 9 ATTACH YOUR RECEIPT HERE Serial Number Purchase Date Questions, problems, missing parts? Before returning to your retailer, call our customer service department at 1-866-558-5706, 8 a.m. - 4 p.m., EST, Monday - Friday.
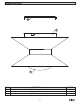
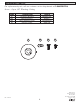
PACKAGE CONTENTS B A C PART A B C DESCRIPTION Canopy Mounting Bracket LED Assembly 2 QUANTITY 1 1 1
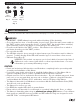
HARDWARE CONTENTS AA BB CC Wire Canopy Connector Short Screw Qty: 3 Machine Qty: 3 Screw Qty: 2 SAFETY INFORMATION Please read and understand this entire manual before attempting to assemble, operate or install the product. WARNING • IMPORTANT: NEVER attempt any work without shutting off the electricity. • Go to the main fuse box, or circuit breaker, in your home.
PREPARATION Before beginning assembly of product, make sure all parts are present. Compare parts with package contents list. If any part is missing or damaged, do not attempt to assemble the product. Estimated assembly time: 30 minutes to 1 hour Tools Required for Assembly (not included): Phillips screwdriver, flathead screwdriver, wire strippers, electrical tape, ladder, safety glasses.
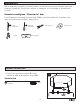
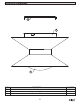
ASSEMBLY INSTRUCTIONS 2 2. Wire connection guide: Ground wire: • For installation in the United States: Wrap ground wire from outlet box around ground screw preassembled on mounting bracket (B) no less than 2 in. from wire end. Tighten ground screw. If fixture is supplied with a ground wire, connect to outlet ground wire with a wire connector (AA). • For installation in Canada: If fixture is supplied with ground wire, wrap ground wire around ground screw on mounting bracket (B). Tighten ground screw.
CARE AND MAINTENANCE •Always be certain that electric current is turned off before cleaning this item. •Use a soft, moist cloth with mild non-abrasive soap to clean fixture. Never use glass cleaner on fixture, as it will damage the metal finish. TROUBLESHOOTING PROBLEM POSSIBLE CAUSE CORRECTIVE ACTION Fixture does not light. 1. Fixture may be wired incorrectly. 1. Check wiring.
WARRANTY (continued) Kichler Lighting LLC 7711 East Pleasant Valley Rd Cleveland, OH 44161-8010 Proof of purchase (original sales receipt) from the original purchaser must be made available to Kichler Lighting LLC for all warranty claims.
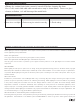
REPLACEMENT PART LIST For replacement parts, call our customer service department at 1-866-558-5706, 8 a.m. - 4 p.m., EST, Monday - Friday. PART B AA BB CC DESCRIPTION Mounting Bracket Wire Connector Short Machine Screw Canopy Screw B PART # XBAR84132 WC001 SCR832X050 CS84132 AA BB CC Distributed by: Kichler Lighting LLC 88 Long Hill St. East Hartford, CT 06108 Printed in China Rev.
MODÈLE #84132 PLAFONNIER JOIGNEZ VOTRE REÇU ICI Numéro de série Date d’achat Des questions, des problèmes, des pièces manquantes? Avant de retourner l’article au détaillant, appelez notre service à la clientèle au 1 866 558-5706, entre 8 h et 16 h (HNE), du lundi au vendredi.
CONTENU DE L’EMBALLAGE B A C PIÈCE A B C DESCRIPTION Pavillon Support de fixation Ensemble DEL 10 QUANTITÉ 1 1 1
QUINCAILLERIE INCLUSE AA BB CC Capuchon Vis du de connexion Vis à métaux pavillon Qté : 3 courte Qté : 2 Qté : 2 CONSIGNES DE SÉCURITÉ Veuillez vous assurer de lire et de comprendre l’intégralité du présent guide avant d’assembler, d’utiliser ou d’installer ce produit. AVERTISSEMENT • IMPORTANT : Coupez l’électricité avant TOUTE manipulation. • Accédez au panneau central de disjoncteurs ou de fusibles de votre demeure.
PREPARATION Avant de commencer l’assemblage du produit, assurez-vous d’avoir toutes les pièces. Comparez les pièces dans l’emballage avec la liste du contenu. S’il y a des pièces manquantes ou endommagées, ne tentez pas d’assembler le produit. Temps d’assemblage approximatif : de 30 à 60 minutes Outils requis pour l’assemblage (non fournis) : tournevis cruciforme, tournevis à tête plate, pinces à dénuder, ruban isolant, échelle, lunettes de sécurité.
INSTRUCTIONS POUR L’ASSEMBLAGE 2. Guide de raccordement électrique Fil de mise à la terre : • Pour une installation aux États-Unis : Enroulez le fil de mise à la terre provenant de la boîte de sortie autour de la vis de mise à la terre située sur le support de fixation (B), à au moins 5,08 cm de l’extrémité du fil. Serrez la vis de mise à la terre. Si le luminaire est muni d’un fil de mise à la terre, raccordez-le au fil de mise à la terre de la boîte de sortie à l’aide d’un capuchon de connexion (AA).
ENTRETIEN •Vérifiez toujours que le courant est coupé avant de nettoyer le luminaire. •Les abat-jour en verre peuvent être nettoyés dans un évier couvert de serviettes, à l’aide d’eau tiède et de savon doux. Ne nettoyez pas les abat-jour dans un lave-vaisselle. TROUBLESHOOTING DÉPANNAGE PROBLÈME Le luminaire ne s’allume pas. CAUSE POSSIBLE 1. Le luminaire est mal branché. MESURE CORRECTIVE 1. Vérifiez si le luminaire est bien branché.
GARANTIE (suite) Kichler Lighting LLC 7711 East Pleasant Valley Rd Cleveland, OH 44161-8010 La preuve d’achat (ticket de caisse original) de l’acheteur original doit être fourni à Kichler Lighting LLC pour toutes réclamations au titre de la garantie.
LISTE DES PIÈCES DE RECHANGE Pour obtenir des pièces de rechange, appelez notre service à la clientèle au 1 866 558-5706, entre 8 h et 16 h (HNE), du lundi au vendredi. PIÈCE B AA BB CC DESCRIPTION Support de fixation Capuchon de connexion Vis à métaux courte Vis du pavillon B Nº DE PIÈCE XBAR84132 WC001 SCR832X050 CS84132 AA BB CC Distribué par: Kichler Lighting LLC 88 Long Hill St. East Hartford, CT 06108 Imprimé en Chine Rev.