
Owner manual


5
LS-Navigator-M-NO5-E
5-22
5-10
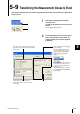
Setting the Measurement Conditions for the Program
This section describes how to set the measurement conditions for [Limits], [Calibration], [Area
settings], and [Output settings].
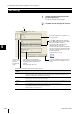
1
Click on the [Limits] tab in the program
setting area.
The [Limits] window appears.
2
Set [Limits] for OUT1 and OUT2.
Note
・ Use the controller to change settings in limit mode.
For more details, see the “Tolerance Settings” section in the “User’s Manual” for each controller.
・ Set the same values for [Units] and [Minimum display unit] in the settings for the controller and LS-Navigator. (Refer to
Page 5-5.)
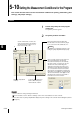
Limits
Select the output (OUT1
or OUT2).
Set the standard value, as well as the
upper and lower limits for the deviation.
The measurement is judged as one of
three levels: HI, GO, or LO.
Set the upper limits and lower limits with
absolute values. The measurement is judged
as one of five levels: HH, HI, GO, LO, or LL.
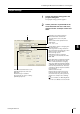
Reference
The range for each parameter depends on the
settings for [Units] and [Minimum display unit].
If dust or foreign objects become attached to
the measurement target, the displayed
measurement value may become extremely
inaccurate. If dust or foreign objects become
attached to the measurement target, the
displayed measurement value may become
extremely inaccurate
. When this para
meter is
set on, measurement values that exceed the
upper limit for errors (HOLD-H) or fall below the
lower limit for errors (HOLD-L) are automatically
detected and eliminated. Select [ON] from the
pull-down menu and enter the upper limit or
lower limit for errors in the text box.
Copies the limit settings from
OUT1 or OUT2 and pastes
them into OUT1 or OUT2.
1