
Owner's manual


6-5 Index
6-13
- Digital Fiber Sensor FS-N10 Series User's Manual -
6
Appendix
* Not available for the FS-N10 Series shipped before March 10, 2011.
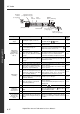
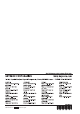
Loading the
recommended set-
tings
15
Load the recommended settings.
(Recipe function)
1. Press and hold the [SET] button and [PRE-
SET] button.
2. Display the LoAd screen with the ( )
button, and press the [MODE] button.
3. Select the recipe such as r-1 FALL with the
() button.
4. Press the [MODE] button to execute.
3-19
Initializing the set-
tings
16
Initializing (Restore to factory default
settings)
1. Press and hold the [SET] button and [PRE-
SET] button.
2. Press the [MODE] button while on the rSt
screen.
3. Select init with the ( ) button.
4. Press the [MODE] button to execute.
3-21
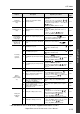
Displaying the out-
put 2 display
screen with the
2-output type
17 Switch to the output 2 display screen.
Set the channel switch to .
* The output 2 sensitivity and advanced set-
tings can be modified in this state.
4-35
Switching to the
maximum received
light intensity
power mode
18
Adjust the power mode to the MEGA
mode.
Set the power select switch to .
3-22
Preventing
incorrect
operations
19 Activat
ing the key lock
Pr
ess and hold the [MODE] button and the
() button simultaneously.
3-23
20 Deactivating the key lock
Press and hold the [MODE] button and the
() button simultaneously.
3-23
21
Activating the password-protected key
lock
1. Press the ( ) button10 times while
holding down the [MODE] button.
2. Input the password with the ( ) button.
3. Press the [MODE] button to execute.
3-24
22
Deactivating the password-protected
key lock
1. Press the ( ) button 10 times while
holding down the [MODE] button.
2. Input the password with the ( ) button.
3. Press the [MODE] button to deactivate the
key lock.
3-24
Others
(Advanced
function settings,
etc.)
23 Setting the advanc
ed functions Press an
d hold the [MODE] button. 4-1
24
Setting to rescale at each preset exe-
cution so that analog output is "5 V"
output in respect to "100.0".
*
1. Press and hold the [MODE] button, but-
ton and [SET] button simultaneously.
2. Press the [MODE] button once or twice.
3. Select "Pr-A PrST" with ( ) button, and
press the [MODE] button.
4-22
25
Switching the display to extended dis-
play or received light intensity hold
display, etc. (sub-display)
After setting the sub-display with the advanced
function settings, press the [MODE] button
twice.
4-23
26
Resetting the following values
* Received light intensity hold value
* Excess gain hold value
* Output when output 2 is in limit set-
ting detection mode
Press and hold the [MODE] button and [SET]
button.
4-25
4-36
Saving and
loading the
settings
27 Saving the settings (custom save)
1. Press and hold
the [SET] button and [PRE-
SET] button.
2. Display the SAvE screen with the ( )
button, and press the [MODE] button.
3. Select yES with the ( ) button.
4. Press the [MODE] button to execute.
4-39
28 Loading the settings (user reset)
1. Press and hold the [SET] button and [PRE-
SET] button.
2. Press the [MODE] button on the rSt screen.
3. Select USEr with the ( ) button.
4. Press the [MODE] button to execute.
4-40
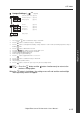
Purpose Description Operation procedures
Reference
page
Quick Reference