
Tus neeg siv phau ntawv

CLIFC-W 2015-05 Clima Flex Wall Mounted FCU (S type panel)
29
4.
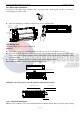
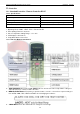
RESET Button: When the RESET button is pushed, all of the current settings are cancelled and the
control will return to the initial settings.
5. ECONOMIC RUNNING Button: Push this button to go into the Energy-Saving operation mode.
6. LOCK Button: Push this button to lock in all the current settings. To release settings, push again.
7. CANCEL Button: Push this button to cancel the TIMER settings.
8.
TIMER Button: This button is used to preset the time ON (start to operate) and the time OFF (turn off
the operation)
9. ON/OFF Button: Push this button to start the unit operation. Push the button again to stop the unit
operation.
10. FAN SPEED Button: This button is used for setting fan speed in the sequence that goes from AUTO,
LOW, MED to HIGH, and then back to Auto.
11. TEMP UP Button: Push this button to increase the indoor temperature setting or to adjust the timer in a
counter-clockwise direction.
12.
VENT Button: Push this button to set the ventilating mode. The ventilating mode will operate in the
following sequence:
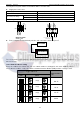
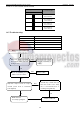
13.1.4 Indicators Introduction
1. TRANSMISSION Indicator: This indicator lights when remote controller transmits signals to indoor unit.
2. MODE Display: Shows the current operation mode - AUTO, COOL, DRY or HEAT. HEAT only available
for heat pump model.
3. HEAT PUMP ONLY- LOCK display is displayed by pushing the LOCK button. Push the LOCK button
again to clear display.
4. TIMER Display: This display area shows the settings of TIMER. That is, if only the starting time of
operation is set, it will display the TIMER ON. If only the turning off time of operation is set, it will display
the TIMER OFF. If both operations are set, it will show TIMER ON OFF which indicates you have chosen
to set both the starting time and off time.
5. FAN Display: When the FAN button is pushed, this signal indicator lights.
6. Digital Display Area: This area will show the temperature, and if in the TIMER mode, it will show the
ON and OFF settings of the TIMER.
NOTE: All items are shown in the Fig for the purpose of clear presentation, But during the actual operation
only the relative functional items are shown on the display panel.
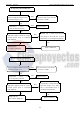
13.1.5 Operational Guidelines
13.1.5.1 Operating the Remote Controller