KERN & Sohn GmbH Ziegelei 1 D-72336 Balingen E-Mail: info@kern-sohn.com Tel: +49-[0]7433- 9933-0 Fax: +49-[0]7433-9933-149 Internet: www.kern-sohn.com Operating instructions Compact balance KERN WTB-N Version 2.
GB KERN WTB-N Version 2.0 09/2012 Operating instructions Compact balance Contents 1 Technical data ............................................................................................ 3 1.1 Dimensions............................................................................................................................. 5 2 Appliance overview .................................................................................... 6 2.1 2.2 Overview of display ...............................
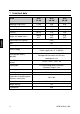
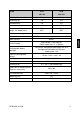
1 Technical data KERN WTB WTB WTB 1K -4N 3K -3N 6K -3N Weighing range (max) 1.5 kg 3 kg 6 kg Readability (d) 0.2 g 0.5 g 1g Reproducibility 0.2 g 0.5 g 1g Linearity ±0.4 g ±1 g ±2 g Recommended adjustment weight, not added (class) 1500 g (M1) 3 kg (M1) 6 kg (M1) Stabilization time (typical) Units 2 sec. kg Warm-up time 30 min.
KERN WTB WTB 10K -3N 30K -3N 15 kg 30 kg Readability (d) 2g 5g Reproducibility 2g 5g Linearity ±4 g ±10 g Recommended adjustment weight, not added (class) 15 kg (M1) 30 kg (M1) Weighing range (max) Stabilization time (typical) Units 2 sec. kg Warm-up time 30 min.
1.
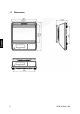
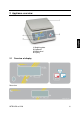
2 Appliance overview 1 Weighing plate 2 Keyboard 3 Bubble level 4 Display 2.
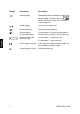
Display Description Description Zeroing display Should the balance not display exactly zero despite empty scale pan, press the button. The balance will be set to zero after a short standby time.
2.
3 Basic Information (General) 3.1 Proper use The balance you purchased is intended to determine the weighing value of material to be weighed. It is intended to be used as a “non-automatic balcance”, i.e. the material to be weighed is manually and carefully placed in the centre of the weighing pan.. As soon as a stable weighing value is reached the weighing value can be read. 3.2 Improper Use Do not use balance for dynamic weighings.
4 Basic Safety Precautions 4.1 Pay attention to the instructions in the Operation Manual Carefully read this operation manual before setup and commissioning, even if you are already familiar with KERN balances. All language versions contain a non-binding translation. The original German is binding. 4.2 Personnel training The appliance may only be operated and maintained by trained personnel. 5 Transport and storage 5.
6 Unpacking, Setup and Commissioning 6.1 Installation Site, Location of Use The balances are designed in a way that reliable weighing results are achieved in common conditions of use. You will work accurately and fast, if you select the right location for your balance.
6.2 Unpacking and placing Carefully remove the balance from the packaging, remove plastic cover and setup balance at the intended workstation.
Level balance with foot screws until the air bubble of the water balance is in the prescribed circle. 1 Rechargeable battery compartment 2 Mains port 3 Pressure compensation screw Pressure compensation screw: [1] On the lower side of the balance there is a pressure compensation screw [1] which has to be opened for the weighing process. Fasten the screw before cleaning the balance.
Membrane for degree of protection IP65 6.2.1 Scope of delivery Serial accessories: Balance Weighing pan Carrier weighing plate Fastening screw of the carrier weighing plate Operating instructions Hexagonal socket wrench 6.3 Rechargeable battery operation (optional) The rechargeable battery is charged via the delivered power supply. The operating time of the rechargeable battery with background illumination is 30h, without that it is 50 hrs. Charging time until complete recharging 12h.
Remove battery compartment cover and the foam pieces Connecting the rechargeable battery Watch the colours: Red on red ! Black on black! Insert the rechargeable battery in a manner that it cannot slip (fasten with a rubber foam mat) Ensure that the cables are not squeezed.
Close the rechargeable battery cover Rotate both levers (1) 90 degrees to the right If in the display the triangle appears above the capacity display , the rechargeable battery is nearly exhausted. Connect power pack, the rechargeable battery is loaded. Avoid excess pressure on the balance in order to avoid damaging it, particularly as it is supported by the weighing plate. 6.3.
6.4 Initial Commissioning In order to obtain exact results with the electronic balances, your balance must have reached the operating temperature (see warming up time chap. 1). For this warm-up period the scale must be connected to the power supply (batteries). The accuracy of the balance depends on the local acceleration of gravity. Strictly observe hints in chapter Adjustment. 6.5 Type of protection IP65 The KERN WTB meets the requirements for IP65 protection type.
7.1.1 Adjustment Display Operation Start balance by pressing While the balance carries out a self test (00…- 99…), press and keep pressed until „F1 CAL“ appears on the display. Press ; in the display appears „UnLod“. Wait for the triangle above the stability symbol, then press , the value of the lastused adjustment weight is displayed. Exp: „6 kg“. If necessary, change value by .
8 Operation 8.1 Weighing Start balance by pressing . The balance will carry out a self-test When the weight display shows "0.0" and the triangle symbol above the stability display appears, the scale is ready for weighing. However, you can reset the weighing scale to zero by pressing the 8.2 key. Switch off balance using . The "0.0" display disappears and the scales are switched off.
The tare weight is saved until it is deleted. Remove the load from the balance and press . The zero display appears and the triangle above the net weight symbol vanishes. Gross weight: Press as long as the weighing container and the object to be weighed are on the weighing plate. Remove the object to be weighed as well as the weighing container. The gross weight is displayed as a negative value. 8.3 Background illumination In weighing mode appears.
8.4 Weighing with tolerance range You can set an upper or lower limit when weighing with tolerance range and thus ensure that the weighed load remains exactly within the set tolerance limits. Settings: In weighing mode press for about 3 seconds, the display for entering the upper limit appears. The left digit blinks. A triangle appears above the "+" symbol. Moreover, the background of the screen turns red. Enter upper limit value, the active position blinks.
Optical signals: The triangle above the "+" - or the "-" symbol indicates whether the sample weighed is within the tolerance range: Goods to be weighed above tolerance limit Goods to be weighed within tolerance range Goods to be weighed below tolerance limit Traffic light function: The indicator lights up in red, green and orange, depending on the area in which your sample is: red Goods to be weighed above tolerance limit green Goods to be weighed within tolerance range orange Goods to be weighed bel
9 The menu 9.1 Navigation in the menu Switch on the scales by test, press Use and during the balance’s self- until "F1 CAL" is displayed.
9.2 Menu overview Menu item Function Adjustment process. 3000 6000 dual Resolution Please do not change default setting 1.5 kg 3 kg 6 kg 15 kg 25 kg 30 kg Max load Do not change the default setting not documented 3 min 5 min 15 min off Auto-OFF function, adjustable between off, 3, 5 and 15 minutes not documented SP 7.
9.3 Set auto-OFF function Switch on the scales by test, press Press and during the balance’s self- until "F1 CAL" is displayed.
9.4 Multi-Tare function The scale has the ability to tare several times in a row. For this purpose, select the menu item "F8 tm" and set the parameter "P tare".
11 Instant help In case of an error in the program process, briefly turn off the balance and disconnect from power supply. The weighing process must then be restarted from the beginning. Fault Possible cause The displayed weight does not glow. The balance is not switched on. Batteries are inserted incorrectly or empty No batteries inserted.
12 Service, maintenance, disposal 12.1 Cleaning Before cleaning, please remove batteries from the appliance Please do not use aggressive cleaning agents (solvents or similar agents), but a cloth dampened with mild soap suds. Ensure that no liquid penetrates into the device and wipe with a dry soft cloth. Loose residue sample/powder can be removed carefully with a brush or manual vacuum cleaner. Spilled weighing goods must be removed immediately. 12.
Note on battery recycling regulations ( BattV) Applies to Germany only! In our capacity as retailers we are obliged in connection with the distribution of batteries and storage batteries to inform our end users as follows: End users are bound by law to return waste batteries / storage batteries. Batteries / storage batteries can be returned to municipal collection points or specialist shops whilst taking into account common expiration times.