KERN & Sohn GmbH Ziegelei 1 D-72336 Balingen E-Mail: info@kern-sohn.com Phone: +49-[0]7433- 9933-0 Fax: +49-[0]7433-9933-149 Internet: www.kern-sohn.com Operating instructions Set for density determination for analytical and precision balances KERN ALT-B,PLT-A, PLT-F, ALS-A / ALJ-A, PLS-A / PLJ-A, PLS-F / PLJ-F, PLE-N KERN ALT-A02 / PLT A01 Version 1.
KERN ALT-A02 / PLT A01 GB Version 1.0 01/2013 Operating instructions Set for density determination for analytical and precision balances KERN ALT-B,PLT-A, PLT-F, ALS-A / ALJ-A, PLS-A / PLJ-A, PLS-F / PLJ-F, PLE-N Contents: 1 INTRODUCTION ............................................................................................................................ 3 1.1 2 SCOPE OF DELIVERY .................................................................................................................
1 Introduction The density sets ALT-A02 and PLT-A01 differ in the support of the weighing plate. For the density set suitable for your balance, please refer to the following overview. KERN ALT-A02 KERN PLT-A01 Set for density determination for analytical and precision balances d= 0.
1.1 Scope of delivery Check packaging and density determination set immediately when unpacking for possible visible damage. Make sure that all parts are completely present. Retainer of immersion basket Universal immersion basket for floating and descending solid matter ∅ 70 mm, 95 mm high Retainer for sinker Glass beaker for density determination „solid matter“ Platform for glass container ∅ 55 mm, 150 mm high Glass beaker for density determination „liquid“ 3.
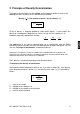
2 Principle of Density Determination Three physical magnitudes are the volume and the mass of bodies as well as the density of matter. In density mass and volume are related. Density [ ρ ] is the relation of mass [ m ] to volume [ V ]. ρ= m V SI-unit of density is kilogram divided by cubic meter (kg/m³). 1 kg/m³ equals the density of a homogenous body that, for a mass of 1 kg, has the volume of 1 m³.
Determining density of liquids The density of a liquid is determined with the help of a sinker providing a known volume [ V ]. The sinker is weighed in air [ A ] as well as in the test liquid [ B ]. According to the Archimedes’ Principle a body immersed in a liquid experiences a force of buoyancy [ G ]. This force equals the weight force of the liquid displaced by the volume of the body. The volume [ V ] of the immersed body equals the volume of the displaced liquid.
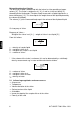
3 How to prepare the weighing balance When the density set is installed, correct adjustment is not possible. Perform necessary adjustment before installation of the density set using the standard weighing plate. If the balance is equipped with an internal adjustment weight (ALT / PLT, ALJ-A, PLJ-A, PLJ-F) carry out an internal adjustment. After adjustment, enable “external adjustment” in the adjustment mode menu. This will avoid a request of an internal adjustment, when the density set is installed.
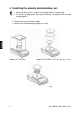
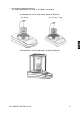
4 Installing the density determination set • When the density set is installed, correct adjustment is not possible. • For reasons of adjustment, take away the density set and place the standard weighing plate. Disconnect scale from power supply. Remove the standard weighing plate acc. to fig. Models ALT, ALS/ALJ Models PLE, PLS/PLJ, PLT; d = 0.
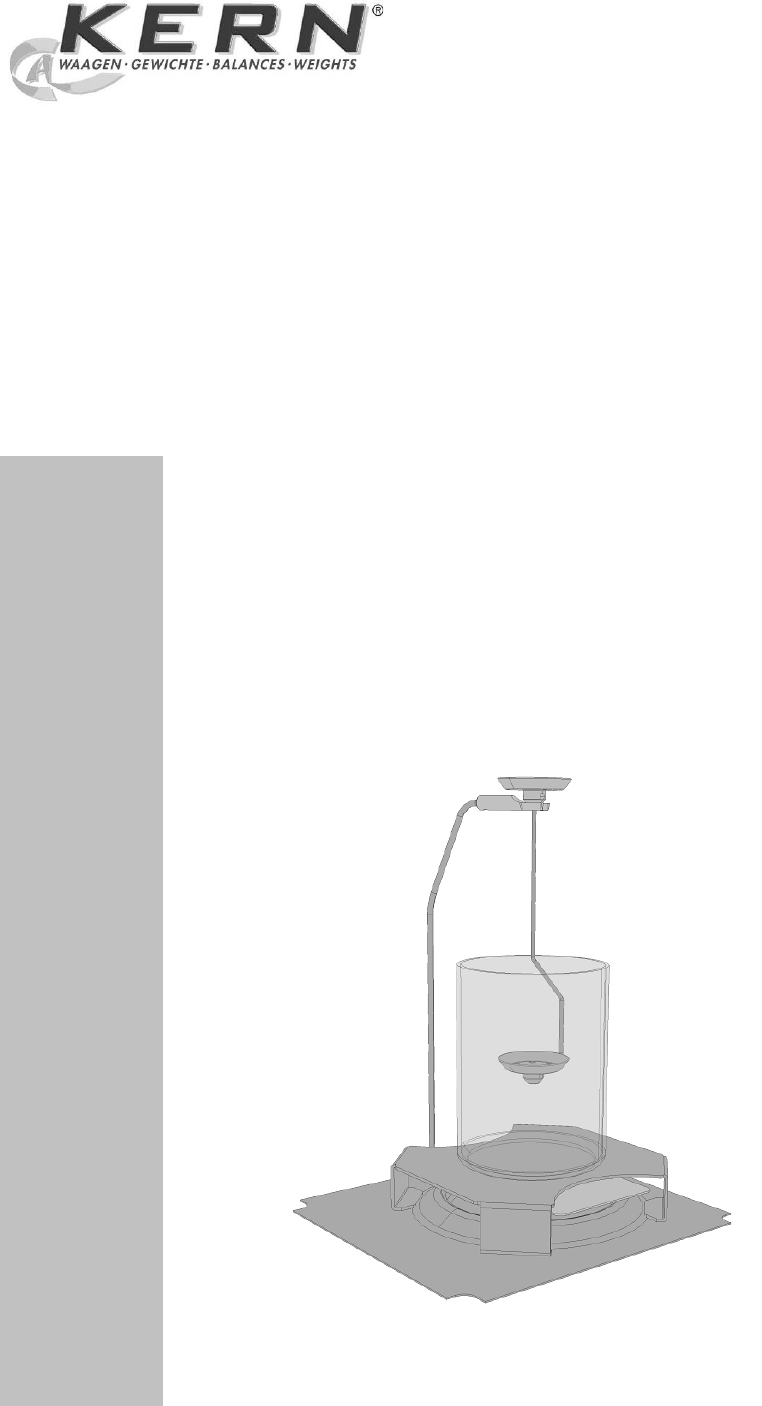
Install density determination set (for solid matter please see chap. 5, for liquids see chap. 6) Installed density set for solid matter „precision balances“ d= 10 mg d = 0.
5 Density determination of solids For the determination of the density of solids, the solid is first weighed in air and then in the aid liquid, whose density is known. From the weight difference results the buoyancy from where the software calculates the density. As aid liquid, usually distilled water or ethanol is used, see density table chapter 8. Prepare balance as described in chapter 3 "Installation of density determination set".
For determination of density of solid matter, the universal immersion basket for floating (d > 1 g /cm3) and descending solid matter (d < 1 g /cm3) must be used. d > 1 g /cm3 Liquid Fig. 1 For descending solid matter suspend the immersion basket as shown in fig. 1.
d < 1 g /cm3 At solid material with density less than 1 g/cm3, a density determination with two different methods is possible. Method 1: As aid liquid is used a liquid with less density than that of the solid material, e.g. ethanol approx. 0.8 g/cm3. This method should be applied when the density of the solid is just slightly different from that of the distilled water. Using ethanol is not recommended, when the solid material is being attacked.
5.1 Balances with graphic display (KERN ALT-B, PLT-A, PLT-F) In weighing mode press MENU button. The master menu will be displayed. Use the navigation buttons to select the menu item „Density“. Acknowledge using PRINT button, the current setting is displayed. Use the navigation buttons to select setting „Solid body“. Confirm using the PRINT button, the set density of the aid liquid is displayed (factory setting 1.0000 g /cm3 for distilled water at 20°C). To change (see table chap.
Place sample in the upper sample dish. Sample Wait for stability display [ ], then take over the weight value using the PRINT button.
Wait until the display for determination of „sample in aid liquid“ appears. Remove the sample and if required tare by using the TARE button. Lay the sample into the lower sample dish and immerse it in the aid liquid trying to avoid bubble formation. Make sure that the sample is at least 1 cm immersed. Sample Wait for stability display [ ], take over the weight value using PRINT button. The density of the sample is shown.
When an optional printer is connected, the displayed value can be edited using the PRINT button. Printout example (KERN YKB-01N): 07-09-11 d : 11:14:57 8.0700 g/cm3 If at the density determination errors have appeared, „d-----„ is displayed. For further measurements go back to density determination mode, press MENU button. Back to weighing mode, press ON/OFF button.
5.2 Balances with LCD display (KERN ALS-A / ALJ-A, PLS-A / PLJ-A, PLS-F / PLJ-F, PLE-N) In weighing mode press MENU button. The first menu item „count“ is displayed. Press MENU button Acknowledge using PRINT button, the current setting is displayed. Using MENU button select „d SoLid“ Confirm by pressing the PRINT button. The currently set density of the aid liquid is displayed (factory setting 1.0000 g /cm3 for distilled water at 20°C).
The display for weight determination of the "sample in air“ appears. Confirm by pressing the PRINT button. Should the balance not show Zero, press the TARE button. Lay the solid matter in the upper sample dish. Sample Wait for stability display [ ], then take over the weight value „sample in air“ using the PRINT button. Wait until the display for weight determination of „sample in aid liquid“ appears. Confirm by pressing the PRINT button.
Lay the sample into the lower sample dish and immerse it in the aid liquid trying to avoid bubble formation. Make sure that the sample is at least 1 cm immersed. Sample Wait for stability display [ ], then take over the weight value „sample in aid liquid“ using the PRINT button. The density of the sample is shown. When an optional printer is connected, the displayed value can be edited using the PRINT button. Printout example (KERN YKB-01N): d : 2.
6 Determining density of liquids At the density determination of liquids, a glass sinker is used whose density is known. The glass sinker is weighed first in air and then in the liquid whose density is to be determined. From the weight difference results the buoyancy from where the software calculates the density. Prepare balance as described in chapter 3 "Installation of density determination set". Place the retainer of the immersion basket on the cone of the weighing plate.
6.1 Balances with graphic display (KERN ALT-B, PLT-A, PLT-F) In weighing mode press MENU button. The master menu will be displayed. Use the navigation buttons to select the menu item „Density“. Acknowledge using PRINT button, the current setting is displayed. Use the navigation buttons to select the setting „Liquid“. Confirm using the PRINT button, the currently set density of the sinker is displayed (factory setting 3.0000 g/cm3).
Attach the sinker. Wait for stability display [ ], take over the weight value using PRINT button Wait until the display for weight determination of „sinker in test liquid“ appears. Remove the sinker and if required tare by using the TARE button.
If possible, immerse the sinker bubble-free in the test liquid. Make sure that the sinker is at least 1 cm immersed. Wait for stability display [ ], take over the weight value using PRINT button. The density of the test liquid is shown at the temperature displayed by the thermometer.
If at the density determination errors have appeared, „d-----„ is displayed. When an optional printer is connected, the displayed value can be edited using PRINT. Printout example (KERN YKB-01N): 07-09-11 11:14:57 3 d : 0.9748 g/cm For further measurements go back to density determination mode, press MENU button. Back to weighing mode, press ON/OFF button.
6.2 Balances with LCD display (KERN ALS-A / ALJ-A, PLS-A / PLJ-A, PLS-F / PLJ-F, PLE-N) In weighing mode press MENU button. The first menu item „count“ is displayed. Press MENU button Acknowledge using PRINT button, the current setting is displayed. Using MENU button select „d Liquid“ Confirm using the PRINT button, the currently set density of the sinker is displayed (factory setting 3.0000 g/cm3). Read off and enter the density of the sinker on the storage box or suspension bracket.
Confirm input by pressing the PRINT button. The display for weight determination of the "Sinker in air“ appears. Confirm by pressing the PRINT button. If weighing balance does not show Zero, press TARE. Attach the sinker centrically. Wait for stability display [ ], take over the weight value „sinker in air“ using the PRINT button. Wait until the display for weight determination of „sinker in test liquid“ appears. Confirm by pressing the PRINT button.
If possible, immerse the sinker bubble-free in the test liquid. Make sure that the sinker is at least 1 cm immersed. Wait for stability display [ ], take over the weight value „sinker in test liquid“ using the PRINT button. The density of the test liquid is shown at the temperature displayed by the thermometer. When an optional printer is connected, the displayed value can be edited using the PRINT button. Printout example (KERN YKB-01N): d: 2.
7 Preconditions for Precise Measurements There are numerous error possibilities during density determination. Accurate knowledge and caution are required to achieve precise results when applying this density set in combination with the balance. 7.1 Calculation of Results The balance displays results for density determination by giving four decimal places. However, this does not mean that the results are accurate down to the last decimal place as this would be the case for a calculated value.
7.2.3 Solid matter sample A sample possessing too great a volume that is immersed in liquid will result in an increase in liquid level inside the glass pitcher. As a result, part of the suspension bracket of the sample dish will also be immersed causing buoyancy to increase. As a consequence the weight of the specimen in the liquid will drop. Samples that change the volume or assimilate liquid are unsuitable for measurement. 7.2.
8 Density Table for Liquids Temperature [°C] 10 11 12 13 14 15 16 17 18 19 20 21 22 23 24 25 26 27 28 29 30 31 32 33 34 35 30 Density ρ [g/cm3] Water 0.9997 0.9996 0.9995 0.9994 0.9993 0.9991 0.9990 0.9988 0.9986 0.9984 0.9982 0.9980 0.9978 0.9976 0.9973 0.9971 0.9968 0.9965 0.9963 0.9960 0.9957 0.9954 0.9951 0.9947 0.9944 0.9941 Ethyl alcohol 0.7978 0.7969 0.7961 0.7953 0.7944 0.7935 0.7927 0.7918 0.7909 0.7901 0.7893 0.7884 0.7876 0.7867 0.7859 0.7851 0.7842 0.7833 0.7824 0.7816 0.7808 0.7800 0.7791 0.
9 User Instructions • To form a reproducible mean value several density measurement are necessary • Remove fat from solvent-resistant sample / /glass sinker /beaker. • Regularly clean sample dishes/glass sinker/glass beaker, do not touch immersing part with your hands • Dry sample/glass sinker/pincers after each measurement. • Adjust sample size to sample dish (ideal sample size > 5 g). • Only use distilled water.