KERN & Sohn GmbH Ziegelei 1 D-72336 Balingen E-mail:info@kern-sohn.com Phone: +49-[0]7433- 9933-0 Fax: +49-[0]7433-9933-149 Internet: www.kern-sohn.com Operating instructions Precision balance KERN PCD Version 1.
GB KERN PCD Version 1.1 10/2012 Operating instructions Precision balance Contents 1 Technical data ................................................................................................ 4 2 Basic Information (General) .......................................................................... 6 2.1 2.2 2.3 2.4 Proper use .................................................................................................................................. 6 Improper Use ...........................
8 Menu ............................................................................................................. 21 8.1 8.2 8.3 8.3.1 8.3.2 8.3.3 8.3.4 8.3.5 8.3.6 8.3.7 8.4 8.4.1 8.4.2 8.4.3 8.4.4 Navigation in the menu ............................................................................................................. 21 Menu overview..........................................................................................................................
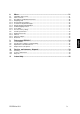
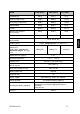
1 Technical data KERN PCD 250-3 PCD 400-3 0.001 g 0.001 g Weighing range (max) 250 g 400 g Taring range (subtractive) 250 g 400 g Reproducibility 0.002 g 0.002 g Linearity ±0.005 g ±0.005 g Minimum unit weight at piece counting 0.002 g 0.002 g Warm-up time 2 hours 4 hours Readability (d) Reference quantities at piece counting 5, 10, 20, 25, 50 Weighing Units Details „Weighing units“ see chpt. 8.3.1 Recom.
KERN PCD 2500-2 PCD 4000-2 Readability (d) 0.01 g 0.01 g 0.1 g Weighing range (max) 2500 g 4000 g 10 kg Taring range (subtractive) 2500 g 4000 g 10 kg Reproducibility 0.02 g 0.02 g 0.1 g Linearity ±0.05 g ±0.05 g ±0.3 g Minimum unit weight at piece counting 0.02 g 0.02 g 0.2 g Warm-up time 4 hours 4 hours 2 hours Reference quantities at piece counting Weighing Units Recom. adjustment weight, not added (class) Details about „Selection of adjustment weight“ see chap. 8.3.
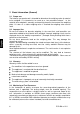
2 Basic Information (General) 2.1 Proper use The balance you purchased is intended to determine the weighing value of material to be weighed. It is intended to be used as a “non-automatic balance”, i.e. the material to be weighed is manually and carefully placed in the centre of the weighing plate.. As soon as a stable weighing value is reached the weighing value can be read. 2.2 Improper Use Do not use balance for dynamic weighing.
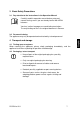
3 Basic Safety Precautions 3.1 Pay attention to the instructions in the Operation Manual Carefully read this operation manual before setup and commissioning, even if you are already familiar with KERN balances. Versions in other languages are non-binding translations. The only binding version is the original document in German. 3.2 Personnel training The appliance may only be operated and maintained by trained personnel. 4 Transport and storage 4.
5 Unpacking, Setup and Commissioning 5.1 Installation Site, Location of Use The balances are designed in a way that reliable weighing results are achieved in common conditions of use. You will work accurately and fast, if you select the right location for your balance.
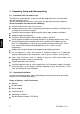
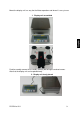
Mount the display unit in a way that facilitates operation and where it is easy to see. 1. Display unit assembled For disassembly remove the assembly sheet by loosening the marked screws. After that the display unit can be placed freely. 2.
3. Using with tripod (optional) In order to raise the display, the display unit can be assembled to an optionally available tripod (KERN PCD-A03). Assembly see installation instructions of the tripod. or The balance must be installed in a way that the weighing plate is exactly in horizontal position. Level balance with foot screws until the air bubble of the water balance is in the prescribed circle.
5.3 Mains connection Power is supplied via the external mains adapter. The stated voltage value must be the same as the local voltage. Only use original KERN mains adapters. Using other makes requires consent by KERN. 5.4 Operation using a rechargeable battery (optional) Lift-off the battery cover on the lower side of the balance. Connect 9 V compound battery. Replace the battery compartment cover.
The empty battery is indicated on the display by “LO“. Press ON/OFF-key and replace the battery immediately. If the balance is not used for a longer time, take out the batteries and store them separately. Leaking battery liquid could damage the balance. If there exists an optional rechargeable battery, it has to be connected in the battery compartment via a separate plug-in socket. Now the mains adapter delivered with the rechargeable battery must be applied.
5.8 Adjustment The adjustment should be made with the recommended adjustment weight (see chap. 1 "Technical data"). Adjustment is also possible with the weights of other nominal values (see table 1), but not the optimum for measuring technique. Procedure when adjusting: Observe stable environmental conditions. A warming up time (see chapter 1) is required for stabilization. Turn on balance by pressing the ON/OFF key. Press the MODE key and keep it pressed, in the display appears shortly „CAL“.
6 Operating elements 6.1 Overview of display 6.
7 Basic Operation 7.1 Start-up ON OFF 7.2 Switching Off ON OFF 7.3 Press ON button. The balance will carry out a self-test As soon as the weight display appears, the balance is ready for weighing. Press OFF button, the display disappears Weighing Place goods to be weighed on balance. Wait for standstill control, after the standstill control, the weighing unit appears right hand in the display (e.g. g or kg) Read weighing result.
7.4 Taring Place an empty weighing container, the weight of the weighing container will be displayed. TARE Press the TARE button, the zero display disappears. The tare weight is saved until it is deleted. Weigh the material, the net weight will be indicated. The taring process can be repeated any number of times, e.g. when adding several components for a mixture (adding). The limit is reached when the whole weighing range is exhausted.
7.5 Pre-Tare function MODE CAL Using this function the weight of a tare vessel is stored. Even after turning off/on the weighing balance will continue working with the saved tare value. In weighing mode put tare vessel on the weighing plate Press repeatedly the MODE key until „PtArE“ flashing appears. Use SET key to store the current weight on the weighing plate as a PRE-TARE value. Delete PRE-TARE value MODE CAL 7.
7.7 Parts counting During piece counting parts can either be counted into a container or out of a container. To count a greater number of parts the average weight per part has to be determined with a small quantity (reference quantity). The larger the reference quantity, the higher the counting exactness. High reference must be selected for small parts or parts with considerably different sizes. The larger the reference quantity, the more accurate the parts counting.
7.8 Net-total weighing It is useful if a mixture of several components is weighed into a tare vessel and finally the sum weight of all weighed components is necessary for control purposes (net-total, i.e. the weight of the tare vessel). Example: SET M 1. Place tare container on the weighing plate. Press the TARE button, the zero display disappears. 2. Weigh-in component . Press the SET button, the zero display disappears. [] is displayed on the right border of the display. 3.
7.9 Percent determination Percentage calculation facilitates weight display in percent related to a reference weight equivalent to 100 %. MODE CAL In weighing mode press MODE key repeatedly, until “100 %“ is displayed flashing. Put a reference weight which corresponds to 100 %. SET M Store by pressing the SET key. If the display stops flashing, remove the reference weight. Place goods to be weighed on balance. The weight of the sample is displayed in percentage in terms of the reference weight.
8 Menu 8.1 Navigation in the menu Access to menu PRINT In weighing mode keep the PRINT key pressed until „Unit“ appears. How to select menu items MODE CAL Using the MODE key the individual menu items can be selected one after the other. Change settings SET M Acknowledge selected menu item using SET key, the current setting is displayed. MODE CAL Change the settings using the MODE key. At any pressing of the MODE key, the next setting is displayed, see chapter .8.2 „Menu Overview“. 1.
2. Change settings of several menu items SET M MODE CAL TARE Acknowledge selected menu item using SET key, the current setting is displayed. Use the MODE key to change settings. Press the TARE key, „Exit“ is displayed. Either SET M Acknowledge with SET key (yes), „StorE“ is displayed.
Save/reject and exit the menu SET M Save SET M Reject Either Any changes carried out are stored by pressing the SET key (yes). The balance returns automatically into weighing mode. or PRINT To cancel changes, press the PRINT key (no). The balance returns automatically into weighing mode.
8.2 Menu overview Description of function Function Parameter s UNIT g* Gram oz Pound ozt Ounce ct Carat (dependent on model) tlh Tael Hongkong tlt Tael Taiwan gn Grain (dependent on model) dwt Pennyweight model) mo Momme Tol Tola FFA Freely selectable factor Data output via remote control commands (see chapter . 9.3) Data output by pressing the PRINT key (see chapter 9.3) Continuous data output (see chapter 9.3) Printout on barcode printer (see chapter 9.4) Autom.
Baud rate bAUd (see chap. 8.4.4) 19200 9600* 4800 2400 1200 Auto off (battery operation), see (chap. 5.4) AF Auto Zero (see chapter 8.3.2) tr Selection adjustment weight (see chapter 8.3.3) CAL Background illumination of the display, (see chap. 8.3.4) bL Animal weighing function (see chapter 8.3.5) Foot switch (see chap. 8.3.6) Reset to factory setting (see chap. 8.3.
8.3 Description of individual menu items 8.3.1 Weighing Units In weighing mode keep the PRINT key pressed until [Unit] appears. Press SET key, the selected unit is displayed. Use the MODE key to select between the different units (see following table).
8.3.2 Dosing and Zero-tracking The Auto-Zero function is used to tare small variations in weight automatically. In the event that small quantities are removed or added to the material to be weighed, incorrect weighing results can be displayed due to the “stability compensation“. (Example: Slowly draining fluids from a container on the balance). When apportioning involves small variations of weight, it is advisable to switch off this function.
8.3.3 Selection of adjustment weight In the model series KERN PCD, the adjustment weight can be selected from pre-set nominal values (refer also to following table, factory setting with grey background). In order to achieve highquality weighing results in the sense of the measuring technology, it is recommended to select the nominal value as high as possible. The non delivered adjustment weights can be purchased from KERN as option. In weighing mode keep the PRINT key pressed until [Unit] appears.
8.3.4 Display background illumination In weighing mode keep the PRINT key pressed until “Unit“ appears. Press the MODE button several times until „bl“ is displayed. Acknowledge using SET key, the current setting is displayed. Select the desired settings by pressing the MODE key. bl on bl off bl Ch Background illumination switched on Background illumination switched off Contrastful display which can also be red in the darkness.
8.3.5 Animal weighing function The animal weighing function can be applied for busy weighings. During a defined period the mean value of the weighing results is formed. The more unquiet the weighed item, the longer the period should be selected. In weighing mode keep the PRINT key pressed until “Unit“ appears. Press the MODE button several times until „ANL“ is displayed. Acknowledge using SET key, the current setting is displayed.
8.3.6 Foot switch The foot switch is used to send the weighing values to a printer or to a PC. Alternatively can also be tared. Connection and operation see in the operating instructions supplied with this foot switch. 8.3.7 Reset to factory setting This function resets all balance settings to factory setting. In weighing mode keep the PRINT key pressed until “Unit“ appears. Press the MODE button several times until „rSt“ is displayed. Acknowledge using SET key, the current setting is displayed.
8.4 Interface parameters Data output is carried out via interface RS 232 C. General The previous condition for the data transfer between balance and a periphericall device (e.g. printer, PC ...) is that the appliances are set to the same interface parameters (e.g. baud rate, transfer mode ...). 8.4.1 Data transfer mode In weighing mode keep the PRINT key pressed until “Unit“ appears. Press the MODE button several times until „Pr“ is displayed.
8.4.2 Printout Using this function data are selected which are to be sent via the RS232C (not valid for data transfer mode BAPr ). In weighing mode keep the PRINT key pressed until “Unit“ appears. Press the MODE key several times until „LAPr“ is displayed. Acknowledge using SET key, the current setting is displayed.
8.4.3 Printout example line1 line 2 line 3 line 4 line 5 G N T M P A R Page forward feed when started Edition of the headlines 135.81 g 28.27 g 1.49 g 12.25 g 5 pcs 5.63 g 2 pcs Total weight Net weight Tare weight Saved weight Quantity Piece weight Reference quantity Page forward feed when ended 8.4.4 Baud rate The baud rate defines the transfer speed vie the interface, 1 Baud = 1 Bit/second. In weighing mode keep the PRINT key pressed until “Unit“ appears.
9 Data output RS 232 C 9.1 Technical data 8-bit ASCII Code 1 start bit, 8 data bits, 1 stop bit, no parity bit Baud rate selectable at 1200, 2400, 4800, 9600 and 19200 Baud Miniature plug-in necessary (9 pole D-Sub) For operation with interface faultless operation is only ensured with the correct KERN – interface cable (max. 2m) 9.
9.3 Explanation of the data transfer Pr PC Press the PRINT key, at stable weight the format is transferred from LAPR. a. Format for stable values for weight/quantity/percentage 1 2 3 4 5 6 7 8 9 10 11 12 13 M S N1 N2 N3 N4 N5 N6 N7 N8 N9 N10 B 14 U1 15 U2 16 U3 17 18 CR LF b.
rE Cr: The remote control commands s/w/t are sent from the remote control unit to the balance as ASCII code. After the balance having received the s/w/t commands, it will send the following data. Take into account that the following remote control commands must be sent without a subsequent CR LF.
Symbols M Blank or M S Space character or negative sign (-) N1 … N10 10 numeric ASCII codes for weight values including decimal places or blanks U1 … U3 3 ASCII codes for weighing unit pcs. / % / or blank B Blank E, o, r ASCII code or “E, o, r” CR Carriage Return LF (Line Feed) 9.4 Output on bar code printer The data transfer mode has to be set on „BA Pr“ (chapter 8.4.1). As bar code printer the Zebra printer model LP2824 is provided.
10 Service, maintenance, disposal 10.1 Cleaning Before any maintenance, cleaning and repair work disconnect the appliance from the operating voltage. Please do not use aggressive cleaning agents (solvents or similar agents), but a cloth dampened with mild soap suds. Take care that the device is not penetrated by fluids and polish it with a dry soft cloth. Clean the stainless-steel parts with a soft cloth soaked with a cleaning agent suitable for stainless steel.
11 Instant help In case of an error in the program process, briefly turn off the balance and disconnect from power supply. The weighing process must then be restarted from the beginning. Help: Fault The displayed weight does not glow. Possible cause The balance is not switched on. The mains supply connection has been interrupted (mains cable not plugged in/faulty). Power supply interrupted. Battery is inserted incorrectly or is empty. No batteries inserted.