KERN & Sohn GmbH Ziegelei 1 D-72336 Balingen E-Mail: info@kern-sohn.com Phone: +49-[0]7433- 9933-0 Fax: +49-[0]7433-9933-149 Internet: www.kern-sohn.com Operating manual Pallet truck scales KERN VFB Version 1.
GB KERN VFB Version 1.0 07/2013 Operating instructions Pallet truck scale Contents 1 Technical data ................................................................................................... 4 2 Basic instructions about weighing system ..................................................... 5 2.1 2.2 2.3 2.4 Proper use .................................................................................................................................. 5 Improper Use ...............................
9 Menu ................................................................................................................. 34 9.1 9.2 Navigation in the menu ............................................................................................................. 34 Menu overview.......................................................................................................................... 35 10 Servicing, maintenance, disposal ..............................................................
1 Technical data KERN Readability (d) Weighing range (max) Reproducibility VFB 2T-3 1 kg 2000 kg 1 kg Linearity ± 2 kg Warm-up time 10 min Recommended adjustment weight (not added) class 1t ( M1 ) Allowable ambient temperature -10° C .... + 40° C Humidity of air max. 95 % (not condensing) Weighing Units kg, lb Electric Supply 110V-230V AC 12 V, 500 mA Rechargeable battery Auto Off 7.
Dimensions in mm: 2 Basic instructions about weighing system 2.1 Proper use The weighing system you purchased is intended to determine the weighing value of material to be weighed. It is intended to be used as a “non-automatic balance”, i.e. the material to be weighed is manually and carefully placed in the centre of the loading fork. As soon as a stable weighing value is reached the weighing value can be read.
2.2 Improper Use The weighing system is not suitable for dynamic weighing. In the event that small quantities are removed or added to the material to be weighed, incorrect weighing results can be displayed due to the “stability compensation“ in the weighing system. (Example: Slowly draining fluids from a container on the weighing system.) Do not leave permanent load on the loading fork. This may damage the measuring system.
3 Basic safety notes about weighing system 3.1 Pay attention to the instructions in the Operation Manual Carefully read this operation manual before setup and commissioning, even if you are already familiar with KERN balances. All language versions contain a non-binding translation. The original German is binding. 3.2 Personnel training The appliance may only be operated and maintained by trained personnel. 4 Transport and storage 4.
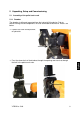
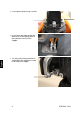
5 Unpacking, Setup and Commissioning 5.1 Assembly of the pallet truck scale 5.1.1 Drawbar The drawbar is delivered separated from the hydraulic lifting device. Prior to commissioning the two components must be connected to each other. Details see below.
Fix the grab handle using 3 screws Insert rod at the lower end of the draw chain at the oblong hole of the hydraulic lever till to the stopper To start-up the lifting mechanism screw down the adjustment screw till to the preset stopper 9 VFB-BA-e-1310
5.1.2 Display Unit Fasten the display device with both turning knobs (1) on the pallet truck scale and screw-in the load cell cable (2) into the connection of the display device. 5.
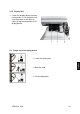
5.3 Installation site, location of use of the weighing system The weighing system is designed to achieve reliable weighing results under normal conditions of use. You will work accurately and fast, if you select the right location for your weighing system. Therefore, observe the following for the installation site: The load must be lifted clear of the display unit’s case and other pallets.
Load Pallet Non-optimal positioning of load Optimal positioning of load Temperature range: The maximum deviation for 0.1% of the weighed load is between -10 and +40°C. Outside this temperature range deviations of up to 0.3% may occur. Avoid jarring during weighing Protect the weighing system against high humidity, vapours and dust Do not expose the device to extreme dampness for longer periods of time.
5.4 Scope of delivery Serial accessories: Pallet truck scales Battery 7.2V/2000 mAh Mains adapter Hexagon screw driver Operating manual 5.5 Mains connection Power is supplied via the external mains adapter. The stated voltage value must be the same as the local voltage. Only use original KERN mains adapters. Using other makes requires consent by KERN. 5.6 Rechargeable battery operation Before the first use, the battery should be charged by connecting it to the mains power supply for at least 12 hours.
5.
5.
5.
Actuation of a button is only accepted, when the load is stable (and the stability display „STABLE“ is illuminated). The display unit only carries out functions as long as the load is stable. 5.10.
6 Linearization Linearity shows the greatest deviation of a weight display on the scale to the value of the respective test weight according to plus and minus over the entire weighing range. If linearity deviation is discovered during a testing instrument control, you can improve this by means of linearization. Carrying out linearization is restricted to specialist staff possessing well acquainted with the workings of weighing scales.
Call up menu Press and The first menu block at the same time in weighing mode. is displayed. Press repeatedly until is displayed. Press , password query will appear. Press subsequently shown. Press , , Confirm by , until the first menu item is will be displayed. will be displayed. repeatedly until Confirm with , will be shown. Confirm by Press , is displayed. , select desired setting by = adjustment see chap. 7 = linearization, see chap.
How to carry out linearization: Call up menu item Acknowledge with . Ensure that there are no objects on the weighing plate. Wait for stability display, then press . When “LoAd 1“ is displayed, put the first adjustment weight (1/3 max) carefully in the centre of the weighing platform. Wait for stability display, then press . . When “LoAd 2“ is displayed, put the second adjustment weight (2/3 max) carefully in the centre of the weighing platform. Wait for stability display, then press .
7 Adjustment As the acceleration value due to gravity is not the same at every location on earth, each balance must be coordinated - in compliance with the underlying physical weighing principle - to the existing acceleration due to gravity at its place of location (only if the balance has not already been adjusted to the location in the factory). This adjustment process must be carried out for the first commissioning, after each change of location as well as in case of fluctuating environment temperature.
, see chapter 9.1 “How to invoke a menu“. Invoke menu item How to carry out adjustments Acknowledge with . Ensure that there are no objects on the weighing plate. Wait for stability display, then press adjustment weight will be displayed. . The currently set (example) To change by using the navigation buttons (see chap. 5.10.1) select the desired setting, the active digit is flashing. Acknowledge by . Carefully place adjusting weight in the centre of the weighing plate.
8 Functions of display unit 8.1 Prior to weighing 8.1.1 Zero-point check Prior to each weighing process ensure that the system is unloaded and clear of obstructions. The display device must show „0“, should this not be the case, press the button. 8.1.2 Net weighing: Taring by button The display unit offers an option that allows tare weights to be reset to zero by pressing a button. In this way net weight changes can be traced.
Note: When the balance is unloaded the saved taring value is displayed with negative sign. To delete the stored tare, unload the weighing plate and press the button, the zero display appears. The taring process can be repeated any number of times. The limit is reached when the whole weighing range is exhausted. 8.2 Numerical tare input (PRETARE) The system has the possibility to enter the tare weight. A tare weight which is bigger than the maximum of the weighing system, will not be accepted. 8.2.
8.3 Weighing Press downwards the hand lever of the lifting device, the weighing system is lowered. Switch-on by display „0“ , after a concluded self-test the system changes to zero If „0“ is not displayed, press Place the loading fork under the pallet in a way that the pallet is in the center of the loading fork.
8.4 Weighing units switch-over Press the button to set the different weighing units. These must be activated before in the menu (chap. 9.2). How to enable weighing units: + Press Press until , is displayed or is displayed with the respective weighing unit. Use to change between and deactivating [off] the displayed weighing unit. Use , thus activating [on] / to save the selected setting Repeat sequence for each desired weighing unit.
8.5 Weighing with tolerance range You can set an upper or lower limit when weighing with tolerance range and thus ensure that the weighed load remains exactly within the set limits. During tolerance controls such as dispensing, portioning or sorting the unit will indicate whether a value exceeds or falls short of limits with an optical [ok] as well as an audio signal according to the setting in the menu block “ “; see chapter 9.2.
Press displayed. , the current setting for the upper limit will be Press the navigation buttons (see chap. 5.10.1) to enter the upper limit value, the active digit is flashing. Confirm input by Press (example) . , the unit will return to the menu 3. How to set tolerance weighing mode Press repeatedly until Confirm by , is displayed. will be displayed. Select BEEP by pressing Press , the current setting will be displayed.
4. Weighing with tolerance range Tare when using a weighing container. Put on goods to be weighed, tolerance control is started. Load below specified tolerance Load within specified tolerance (example) (example) Load exceeds specified tolerance (example) The tolerance control is not active when the weight is under 20d. To delete limits, enter “00000 kg“. 8.6 Manual totalizing With this function the individual weighing values are totalized into the sum memory by pressing .
Loading the system with the load to be added Wait for stability display „STABLE“, then press , the weight value will be added into a sum memory „ACC 1“ is displayed for approx. 2 sec., after that the system returns into the standard weighing mode.
8.7 Automatic adding-up This function is used to issue and add individual weighing values automatically to the summation memory on unloading of weighing scale without pressing Menu settings: „ . “ The indicator „AUTO“ will appear. Add up: Charge the system with the load which shall be added After a successful standstill control you will hear an audio sound. Unload the weighing good, the weighing value is added into the summation memory.
You can repeat this process until the capacity of the weighing system is exhausted. Display and delete weighing data see chap. 8.6 8.8 Animal weighing The mean value function is suitable for weighing restless loads. Menu setting: The indicator ANIMAL will be displayed. Move load onto weighing system. When the load has somewhat calmed down, you will hear an audio sound. The mean value achieved will be shown.
8.9 Peak value function This function displays the highest load value (peak value) of a weighing. The peak value remains in the display until it will be deleted.
9 Menu In the menu the settings of the weighing system can be modified and functions can be activated. With that the weighing system may be adapted to individual weighing requirements. Four menu items can be selected to change settings. Moreover there is an other menu item for adjustment. 9.1 Navigation in the menu Call up menu In weighing mode press und time and the first menu block at the same will appear.
9.2 Menu overview Menu block Weighing with tolerance range, see chap. 8.5 Menu item Available settings / explanation SET Lo Upper limit value, input (factory setting 000.000) SET Hi Lower limit value, input (factory setting 000.000) to Clr to P-C Not documented to Prt glboztJ hJ Factory setting „kg“ Weighing units see chap. 8.4 bl bEEP see chap. 8.
Select desired setting with and acknowledge by . Manual totalizing: After pressing the weighing value will be added into the summation memory. not documented Automatic adding-up: This function is used to add the individual weighing values automatically to the summation memory on unloading of weighing scale.
Position decimal point available selection 0, 0.0, 0.00, 0.000, 0.
10 Servicing, maintenance, disposal 10.1 Clean Please do not use aggressive cleaning agents (solvents or similar agents), but a cloth dampened with mild soap suds. Ensure that no liquid penetrates into the device and wipe with a dry soft cloth. 10.2 Servicing, maintenance The same maintenance guidelines apply to the chassis of the mobile weighing system as those for simple manual pallet trucks.
11 Error messages Error message Possible cause Remedy ----- Weighing range exceeded To unload the weighing system Err 4 System out of zero range during switching-on or by Unload weighing system and tare again using pressing the Err 6 . button Internal A/D value outside the normal range To unload the weighing system Check connectors If the error message appears repeatedly, please contact your retailer.
12 Instant help In case of an error in the program process, briefly turn off the weighing system and disconnect from power supply. The weighing process must then be restarted from the beginning. Help: Fault The displayed weight does not glow. Possible cause Weighing system is not switched on. Rechargeable battery empty The displayed weight is permanently changing Draught/air movement - Sites with vibration. Loading fork is in contact with foreign matter.