KERN & Sohn GmbH Ziegelei 1 D-72336 Balingen email: info@kern-sohn.com Phone: +49-[0]7433- 9933-0 Fax: +49-[0]7433-9933-149 Internet: www.kern-sohn.com Operating instructions Bottleweighing Balance KERN SMT Version 1.
GB KERN SMT Version 1.4 12/2014 Operating instructions Bottleweighing Balance Table of Contents 1 2 Technical Data ........................................................................................................... 3 Basic Information (General) ..................................................................................... 4 2.1 2.2 2.3 2.4 Proper use ...........................................................................................................................................
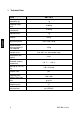
1 Technical Data KERN SMT 10K-3 Readability (d) 1g Weighing range (max) 10 000 g Taring range (subtractive) 10 000 g Reproducibility Linearity Adjustment points Recommended adjusting weight F1 (not supplied) Humidity of air 1g ±0,5 g 2 kg / 5 kg / 10 kg 10 kg max. 80% rel. (non-condensing) Stabilization time (typical) 3 sec. Allowable ambient temperature +10 °C ...
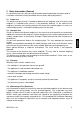
2 Basic Information (General) It is absolutely necessary that you read and understand the operating instructions prior to installation and commissioning and follow the instructions during the process! 2.1 Proper use The balance you purchased is intended to determine the weighing value of material to be weighed. It is intended to be used as a “non-automatic“ balance, i.e. the material to be weighed is manually and carefully placed in the centre of the weighing plate.
3 Basic Safety Precautions 3.1 Pay attention to the instructions in the Operation Manual Carefully read this operation manual before setup and commissioning, even if you are already familiar with KERN balances. 3.2 Personnel training The appliance may only be operated and maintained by trained personnel. 4 Transportation & Storage 4.1 Testing upon acceptance When receiving the appliance, please check packaging immediately, and the appliance itself when unpacking for possible visible damage.
5 Unpacking, Setup and Commissioning 5.1 Installation Site, Location of Use The balances are designed in a way that reliable weighing results are achieved in common conditions of use. You will work accurately and fast, if you select the right location for your balance.
5.6 Adjustment As the acceleration value due to gravity is not the same at every location on earth, each balance must be coordinated - in compliance with the underlying physical weighing principle - to the existing acceleration due to gravity at its place of location (only if the balance has not already been adjusted to the location in the factory). This adjustment process must be carried out during the initial start-up, after change in location and variation of surrounding temperature.
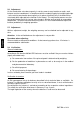
6 Operation 6.1 Starting balance by touch screen Welcome display: After touching the touch screen and starting the balance, this screen will appear. To start stocktaking, it is obligatory to enter location and operator. Please press the inverted buttons.
SMT-BA-e-1414
SMT-BA-e-1414 10
6.2 Select operator and location Select operator: Press the operator button and an option display for admitted operators will appear. Confirm them with selection. If no operators are available, these must be entered anew via MENUE / CONFIGURATION / OPERATOR / DESCRIPTION. In the second information line appears now the selected operator (see arrow).
Select location: Press the Location button and the option displays of the available locations will appear. Confirm the correct location by pressing the selection button. If no selection fields can be found, enter some of them via MENU / CONFIGURATION / LOCATION / DESCRIPTION. 6.3 Start stocktaking: In the first information line appears now the selected location of stocktaking. In addition the “STRT/TAKE“button will appear on the display screen.
Press the start button to trigger this screen asking you to select a drink. Drink may be selected via SRCH-CODE SRCH-NAME AUTO-LIST or SCAN function may be carried out. 6.4 Selecting the drink / Find out the ingredients and save: Input via keyboard: If selected via „SRCH-NAME“, this keyboard input field will appear. Enter the name of the drink until a direct selection via selecting fields will be possible. If selected via „SRCH-CODE“, this keyboard input field will appear.
Enter the name of the drink. In the second information line the information will appear if a selection via selecting fields will be available. Please press the return button. Now a direct selection can take location via the selecting fields. The selected drink now will appear at the left in the second information line.
Put the selected drink on the balance. Now the contents of the bottle will be displayed as a result in cl. Press the “FRAC/VOL” button and the proportional value for the content will be displayed. Save the bottle content using the „OK/TAKE“ button. 6.5 Deleting a record: Press the OK/Take button to trigger the second information line asking you to select an other drink. If the last item of inventory is to be deleted or the same beverage put into another bottle, then press the "CLR / BACK" button.
After pressing the "CLR / BACK" button, the last inventory will be displayed. To delete the last inventory "Clear Registry" will be pressed. Should the same kind of beverage be filed again then press "Last beverage” button. 6.6 Entry with autolist: For the selection of the existing drink list from the stocktaking screen (STOP/TAKE) press the „STRT/TAKE“ button. After that this screen will appear. Now press the „AUTO/LIST“ button.
Now in the second information line the first listed drink appears. Place the specified bottle. The bottle content will be displayed in „CL“. For automatic storage of results the result will be taken over and in the second information line the note „next drink“ will ask you to remove the bottle.
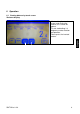
When the bottle is removed, the following drink appears. Use the „BACK/DRNK“ button to register an other bottle of the previous drink. Use the „NEXT/DRNK“ button to skip not existing drinks. 6.7 Scanner selection: The type of drink selection must be carried out from the basic screen (STOP/TAKE) via the menu button. Now press the „Communication“ button.
Now select the suitable scanner. When the desired scanner is selected, confirm via the return button.
Handheld Scanner Datalogic Quick Scan Mobile SMT-BA-e-1414 20
6.8 Activate automatic storage results: To determine the automatic storage of results from the basic screen, press the „MENU“ button. If the automatic storage of results has to be activated, press the „Configuration“ button.
Now press the „Basic settings“ button. Press the „Store Result:Auto“ button and acknowledge with Enter. 6.
Now press the „Configuration“ button. Now press the „Operator“ button. To enter a location press the „Location“ button. With the help of the operator number the admitted operators can be called up and edited.
To enter a new operator, overwrite no longer required operators or call up empty description fields by pressing them. Enter the name via the input keyboard field. Save the correct name via the Enter button. Input of a location: To enter a new location via the location number, call up a previous location and overwrite or write anew into an empty field. For this purpose press the „Description“ button.
Enter the location via the input keyboard field. Save the location via the Enter button. 6.10 Enabling / Disabling the zero passing: Press the „MENU“ button from the basic screen (STOP/TAKE). Subsequently trigger the „Weighing technology“ button.
Now the selection may take location via the zero-passing button. After that save with the enter button. 6.11 Activation of the automatic switch-over to numeric entry In order to shorten the time for a serial input via SRCH / CODE in time, so an automatic switch-over can be generated after saving. To do this press the "MENU" button. Now press the configuration button.
Now press the „Basic settings“ button. Now press the arrow button Set AUTO INPUT to "ON" and save.
6.12 Data Transfer PC-SMT, SMT-PC SETUP Setup Balance Bring back balance into the basic screen (STOP/TAKE). Connect the PC to the balance via the RS 232 interface.
Setup Application Requirements: • Windows XP or higher • Microsoft Office 2003 or higher • .Net Framework 2.0 or higher 1. Go to Settings Menu 2. Choose the SerialPort you connected your balance to 3.
UPLOAD DATA 1. Make sure balance is in basic Mode 2.
3. Press „Upload from PC > balance“ Button to Upload the chosen File Information: It will upload the same file everytime, till you select another one.
DOWNLOAD DATA 1. Make sure balance is in basic Mode 2. Press „Download balance PC“ Button 3.
4.
7 Data output RS 232 C Technical data: 8-bit ASCII Code 1 start bit, 8 data bits, 1 stop bit, no parity bit Baud rate selectable from 2400, 4800, 9600 Baud (factory setting) and 19200 Baud. Sub-D plug 9-channel required For operation with interface faultless operation is only ensured with the correct KERN – interface cable (max. 2m) Pin allocation of the balance output socket (front view) Sub-D jack 9-channel 5 1 9 6 Pin 2: Transmit data Pin 3: Receive data Pin 5: Signal ground 7.
8 Service, maintenance, disposal 8.1 Cleaning Before cleaning, please disconnect the appliance from the operating voltage. Please do not use aggressive cleaning agents (solvents or similar agents), but a cloth dampened with mild soap suds. Ensure that no liquid penetrates into the device and wipe with a dry soft cloth. Loose residue sample/powder can be removed carefully with a brush or manual vacuum cleaner. Spilled weighing goods must be removed immediately. 8.
9 Instant help In case of an error in the program process, briefly turn off the balance and disconnect from power supply. The weighing process must then be restarted from the beginning. Help: Fault Possible cause The displayed weight does not glow. • The balance is not switched on. • The mains supply connection has been interrupted (mains cable not plugged in/faulty). • Power supply interrupted.
10 Declaration of conformity KERN & Sohn GmbH D-72322 Balingen-Frommern Postfach 4052 E-Mail: info@kern-sohn.de Tel: 0049-[0]7433- 9933-0 Fax: 0049-[0]7433-9933-149 Internet: www.kern-sohn.