KERN & Sohn GmbH Ziegelei 1 D-72336 Balingen email: info@kern-sohn.com Phone: +49-[0]7433- 9933-0 Fax: +49-[0]7433-9933-149 Internet: www.kern-sohn.com Operating Manual Electronic Moisture analyzer KERN MLS_C Version 3.
GB KERN MLS_C Version 3.0 11/2013 Operating Manual Electronic Moisture analyzer Table of Contents 1 TECHNICAL DATA ............................................................................................. 4 1.1 2 Dimensions ............................................................................................................................... 5 DEVICE OVERVIEW ........................................................................................... 6 2.1 2.2 3 Keyboard overview......
8 USER MENU ..................................................................................................... 22 8.1 P1 Calibration (adjustment) ................................................................................................... 23 8.2 P2 GLP (Good laboratory practice) ...................................................................................... 33 8.2.1 P3 Date/time ...............................................................................................................
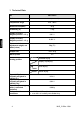
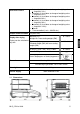
1 Technical Data ata MLS 50-3C Radiator Infrared (1 x 400 W) Temperature range max. 160°C Maximum load (Max) 50 g Readability (d) 1 mg Display accuracy Weighed portion < 1.5 g 0,01 % Display accuracy Weighed portion > 1.5 g 0,001 % Recommended adjustment weight, not added (class) 50g (F1) Sample size max.
Shut-down criteria • • • • • • • Automatic 1 (shut-down at change of weighing value < 1mg within 10 s) Automatic 2 (shut-down at change of weighing value < 1mg within 25 s) Automatic 3 (shut-down at change of weighing value < 1mg within 60 s) Automatic 4 (shut-down at change of weighing value < 1mg within 90 s) Automatic 5 (shut-down at change of weighing value < 1mg within 120 s) Manual Time-controlled (1 min – 99h 59 min) Sample dishes included 10 (Ø 92 mm) Display after drying Moisture [%] = Weight
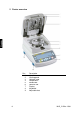
2 Device overview Pos.
2.
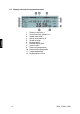
2.2 Display overview (during measurement) 1. 2. 3. 4. 5. 6. 7. 8. 9. 10. 11. 12. 8 Display in moisture % Current moisture content in %.
3 Basic Information (General) 3.1 Proper use The device purchased by you is designed for a fast and reliable determination of material moisture in liquid, porous and solid materials by applying the method of thermogravimetrics. 3.2 Improper Use Impacts and overloading exceeding the stated maximum load (max) of the device, minus a possibly existing tare load, must be strictly avoided. Balance may be damage by this. Never operate device in explosive environment. The serial version is not explosion protected.
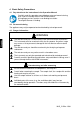
4 Basic Safety Precautions 4.1 Pay attention to the instructions in the Operation Manual Carefully read this operation manual before setup and commissioning, even if you are already familiar with KERN balances. All language versions contain a non-binding translation. The original German is binding. 4.2 Personnel training The appliance may only be operated and maintained by trained personnel. 4.3 Danger Information WARNING ! The moisture analyser is used to analyse the moisture content of materials.
CAUTION The moisture analyzer operates using heat! + Maintain sufficient space in the environment of the instrument to prevent heat build-up (distance from the instrument 20cm, upwards 1m). + The heat extractor of the sample must never be covered, blocked, taped up or altered in any other way. + Never place combustible materials on, under or next to the instrument, as the environment of the instrument heats up to a high temperature. + Careful when removing the sample.
5 Transportation & Storage 5.1 Testing upon acceptance When receiving the appliance, please check packaging immediately, and the appliance itself when unpacking for possible visible damage. 5.2 Packaging / return transport Keep all parts of the original packaging for a possibly required return. Only use original packaging for returning. Prior to dispatch disconnect all cables and remove loose/mobile parts.
Secure all items against slipping or damage.
6 Unpacking, Setup and Commissioning 6.1 Installation Site, Location of Use The instrument is designed to achieve reliable weighing results under normal conditions of use. You will work accurately and fast, if you select the right location for the instrument. On the installation site observe the following: ! Remove explosion prone and easily flammable material in the immediate vicinity.
6.2 Unpacking and assembly Take the moisture meter carefully out of its packaging, remove the plastic jacket and install it at the designated work space. The moisture meter is supplied part-assembled. Control whether the delivery is complete immediately after unpacking the individual parts and assemble the separate component parts according to the enclosed diagram.
6.3 Scope of delivery Serial accessories: • Moisture analyzer, see illustration chap. 2 • • 10 sample dishes Power cable • Operating manual 6.4 Mains connection Power supply is provided via the supplied mains cable. Check, whether the voltage acceptance on the scales is set correctly. Do not connect the scales to the power grid unless the information on the scales (sticker) matches the local mains voltage.
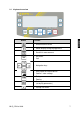
6.7 Operating the scales using PS keyboard Using a PS keyboard will help you to enter numbers and texts faster and easier. Balance keyboard PS keyboard Balance keyboard PS keyboard 7 Menu The menu is arranged in a user and operator menu. Activate the user menu via the F key, the operator menu via the MENU button. The table below shows the functions of the user menu.
P3 Date/time P3 01 date format M/T/J; T/M/J P3 02 clock time format 12 h; 24 h P3 03 time P3 04 date P4 P5 P6 P3 05 display time yes/no P3 06 display date yes/no Readout P4 01 filter Extra slow; slow; standard; fast; extra fast P4 02 auto zero yes/no P4 03 temperature yes/no P4 04 negative yes/no RS-232 P5 01 Baud speed 2400; 4800; 9600; 19200 P5 02 parity None, even, odd P5 03 data bits 7 bits; 8 bits P5 04 stop bits 1 bit; 2 bits P5 05 handshake none; XON/XOFF; RTS/CTS P5 06
7.1 Navigation in the menu: Operation/display: Description: The overview for the Operator Menu appears Either P7 02 program library “on“ (See chpt. 9.2.1) Up to 100 different drying processes can be stored in the device. Simply invoke and start the finished processes from the library. or P7 02 program library “off” (See chpt. 9.1.1) Press the Esc-key and exit the overview without changing any settings 29.12.
29.12.04 Setup Confirm the setting by pressing the -key; the submenu appears on the display How to change functions and parameters Use the arrow keys to move within and enter into the menu: To select parameters in a function or to increase/decrease the value of a digit or number press the - and -key. To shift to the right or left by one menu item press the - and -key.
Any changes made will be saved when returning to weighing mode by using the following saving procedure: Actuate Esc key again, a message will inquire whether you want to save the changes you made. Einstellungen 29.12.04 ? Save setup? [Enter/Esc] either To save your changes, press the PRINT-key. 29.12.04 Setup Einstellungen ! Saveing...
8 User menu Press the F-key; the main menu appears: 1 3 2 29.12.04 P1 C alibration P2 GLP P3 Date/Time P4 Readout P5 RS-232 P6 Printouts P7 Globals Setup 1. Menu number (P1 - P9) 2. Menu designation 3. Cursor (►) indicates the current menu item Use the cursor (►) to select your setting. Use the key to move the cursor (►) down, the -key to move it up Press the – key; the submenu appears: 1 5 2 7 3 4 Setup 6 22 8 1. Menu number (P1 - P9) 2. Submenu number and name 3.
8.1 P1 Calibration (adjustment) As the acceleration value due to gravity is not the same at every location on earth, each balance must be coordinated - in compliance with the underlying physical weighing principle - to the existing acceleration due to gravity at its place of location (only if the balance has not already been adjusted to the location in the factory).
Place the adjustment weight in the centre of the sample dish, then press the PRINT key. If the adjustment was successful, this will be followed by automatic reset to the menu. The ESC key may be used to cancel the adjustment. Errors during adjustment or the use of an incorrect adjusting weight will result in an error message. Repeat adjustment. 29.12.04 Setup Return to weighing mode: Press the ESC-key repeatedly until the query ”SAVE?“ appears.
Ensure that there are no objects on the weighing plate. Press the PRINT key. In the display there appears the value of the adjustment weight. Place the required adjustment weight in the centre of the sample dish, then press the PRINT key. If the adjustment was successful, this will be followed by automatic reset to the menu. Take away adjustment weight. The ESC key may be used to cancel the adjustment. Errors during adjustment or the use of an incorrect adjusting weight will result in an error message.
03 Calibration test This is used to determine the deviation from the last adjustment. This is only a check, i.e. no values are changed. 29.12.04 Setup Press the arrow keys ( ), to select “03 Cal. test“. Einstellungen Calibration check Cear the pan [Enter] Press button Ensure that there are no objects on the weighing plate. Einstellungen Calibration check Weight measuring Press PRINT key, on the display appears the weight value of the required adjusting weight.
06 Temperature calibration We recommend occasionally checking the temperature level of the device using the temperature calibration set MLB-A12. Preparation: Switch off instrument. Remove sample dish, dish holder, removal aid and windshield. Install the temperature-calibration set acc. to fig. Switch on instrument.
Begin temperature calibration: Close heating hood and carry out temperature calibration as described in the following. On the temperature calibration set switchon the digital thermometer by the ON/OFF button. Press the arrow keys ( ), to select “06 Drying test “ Press the -key The display to enter the temperature value to be tested will appear. The current menu item blinks. Select the desired temperature with the navigation keys. Press PRINT button to accept.
Printout example KERN YKB-01N: Return to weighing mode: Press the ESC-key repeatedly until the query ”SAVE?“ appears. Confirm query by pressing the PRINT-key or reject it by pressing the ESC-key. After ineffective temperature calibration you will have to carry out temperature adjustment; see function „P1 04“.
04 Temperature adjustment The temperature is measured at three points and can be adjusted at these temperature points. Before you do this, allow the device to cool down for at least 3 hours after the last heating phase. For preparation/installation of temperature calibration set( MLB-A12) , see function "06 Temperature calibration“ Begin temperature adjustment: 29.12.04 Setup 29.01.08 Setup Select by using the arrow keys ( ) „04 Temp.cal“ Press key Temperature calibration starts.
Temperature calibration of third point will take 8 min after which you will hear an acoustic signal Enter the temperatur value as indicated on the external thermometer with the help of the navigation buttons . Setup 29.01.08 Temperature calibration Set temp. value [°C] 3 point 00:00 122 Setup 29.01.08 Temperature calibration Set temp. value [°C] 122 140 Setup 29.01.08 Temperature calibration Set temp. value [°C] 122 139 Setup 29.12.
05 Report printout This menu point is used to enable the function for printing your adjustment data. Press the arrow keys ( ), to select “05 Print report“ 29.12.04 Setup Press the -key; the current menu item blinks. Press the arrow keys ( ), to select the desired settings: 0 1 Report printout disabled Report printout enabled Confirm by pressing the PRINT key. Return to weighing mode: Press the ESC-key repeatedly until the query ”SAVE?“ appears.
8.2 P2 GLP (Good laboratory practice) Quality assurance systems require printouts of weighing results as well as of correct adjustment of the balance stating date and time and balance identification. The easiest way is to have a printer connected. Definition of a standard log: Operation Call up menu item "P1 Calibration" (see chapt. 7.1) Press button Display 29.12.
All settings that are supposed to be printed must be activated with "1 / yes" Example 1: Adjustment P2 P2 P2 P2 P2 P2 03 04 05 06 07 08 Printout time Printout date User printout Project printout ID-printout Cal. printout printout 1 1 1 1 1 1 yes yes yes yes yes yes Date : 18.01.13 Time : 10:41:13 User : Mustermann Project : AB/007 Balance no. : WL 041078 ---------------------------18.01.13 07:48 Calibration Deviation : 0.
8.2.1 P3 Date/time Under this menu item you can set output and format of time and date. Operation Display Call up menu item "P3 Date/time" (see chap. 7.1) Press button 29.12.04 P1 C alibration P2 GLP P3 Date/Time P4 Redout P5 RS-232 P6 Printouts P7 Globals Setup 01 Date format Press the arrow keys ( ), to select ”01 Date Format“. Press button Press the arrow keys ( ), to select among the settings below: 1 0 29.12.04 P 3 01 02 03 04 05 06 Date format Time format Time Date Disp. time Disp.
03 Time 29.12.04 Press the arrow keys ( ), to select “03 Time“. Press button Press the arrow keys ( ), to select the desired settings: P 3 01 02 03 04 05 06 Date format Time format Time Date Disp. time Disp. Date Setup 0 DA/M O/YR 1 2 4 S td . Func tion ******** Func ********1 On tion 1 On Press button Press the arrow keys ( ), to trigger your selection. Press the -key, to confirm the selected setting (e.g.
05/06 Overlay of time/date on display Press the arrow keys ( ), to select “05/06 display. Select time/date“ . 29.12.04 P 3 01 02 03 04 05 06 Press the key; the current menu item blinks Press the arrow keys ( ), to select among the settings below: Date format Time format Time Date Disp. time Disp. Date Setup 0 DA/M O/YR 1 2 4 S td .
02 Auto zero Press the arrow keys ( ), to select “02 Auto zero“. Setup 29.12.04 Press the -key; the current menu item blinks Press the arrow keys ( ), to select among the settings below: 0 Deviations from the Zero display are not automatically tared. 1 Deviations from the Zero display are automatically tared. Confirm by pressing the PRINT key 03 Temperature 29.01.08 Press the arrow keys ( ), to select “03 Temperature“ .
8.2.3 P5 RS-232 In this menu item you can save your settings for the interface. Operation Call up menu item "P5 RS-232" (see chapt. 7.1) Press button Display P1 P2 P3 P4 P5 P6 P7 C alibration GLP Date/Time Redout RS-232 Printouts Globals Setup 01 - 08 Press the arrow keys ( ) to select your settings (01 – 08). Press the -key; the current menu item blinks Use the arrow keys (see chapter 7.1) to save your settings 29.12.
8.2.4 P6 output In this menu item you can select between 5 different types of data output: Operation Display Call up menu item "P6 Output" (see chapt. 7.1) P1 P2 P3 P4 P5 P6 P7 Press button C alibration GLP Date/Time Redout RS-232 Printouts Globals Setup 01 Printout no. Press the arrow keys ( ) to select “01 printout no.“ Press the -key; the current menu item blinks Press the arrow keys ( ), to select among the settings below: 0 standard 1 1. printout 4 4.
Example in drying mode: ------------------- Start drying------------------Program nb : 1 Name : Floar 100 Profile : Standard Dry temp. : 120 °C Switch off : Automatical 3 Result : Moisture contents - %M Printout int : 30 s Target : None T. coeficjent : 0.00 Start weight : 0:00:30 0:01:00 0:01:30 Header 9.993 g 0.01 %M 0.02 %M 0.03 %M Final mass : 9.990 g Dry time : Final result : 0:01:45 0.03 %M --------- End of drying procedure --------- Measured values Footers 8.2.4.
Text input: • Max. 640 characters • 80 lines • 8 characters per line After each line confirm your text input using the PRINT-key. After entering full text press the ESC –key; query appears, whether you want to save your entries. Confirm by pressing the PRINT-key (See chpt. 7.1). Apart from flow text (characters, numbers and numerals) the following variables are stored in the menu: General variables %% %N %d %t %i %r %P %U %k %K %I %1 %2 %3 %4 %5 %6 42 Printout of 1 character “%” (i.e.
Print related variables \\ c r n \t s \0 Printout of 1 character “/” (i.e.
Example of text input in weighing mode: Example 1: Max mass can not exceed 11.250 g! Parameter No. 20 21 22 23 24 25 Text 10 Text 11 Text 12 Text 13 Text 14 Text 15 1 2 M a c e 1 1 ! 3 x a x . Text 4 5 m n c e 2 5 3 r n D \ t i c U r . \ * Text 4 5 n G a t c Z \ r c h \ c n t i f . . c * \ c 6 a n e 0 7 s o d 6 & m u e \ t * e t 7 8 s t g Example 2: Kern & Sohn GmbH Date: Time: Weight: *****Signature:.......... *** current mode*** Parameter No.
Example for text input in drying mode Parameter selection: Header Measured value Footers – 2. printout (menu item P6 01header no.) – 3. Printout (menu item P6 01 line no.) – 4. Printout (menu item P6 01 footnote no.) 2. printout 3. printout 4. printout * string = Text Printout: Start of the measurement Date : 27:11:2003 Time : 11:27 Dryling parameters.
8.2.5 P7 General functions Operation Display Call up menu item "P7 Others" (see chapt. 7.1) Press button P1 P2 P3 P4 P5 P6 P7 C alibration GLP Date/Time Readout RS-232 Printouts Globals Setup 01 – 12 Parameter selection Press the arrow keys ( ), to select your settings (01 – 12) . 29.12.04 Einstellungen 1 P 9 01 Password 1 02 Prog.library 03 Beep 1 04 Language ******** 05 Backlight 1 06 Contrast ******** W l0 4 3 0 5 07 Balance Id M X A 0 .4 0 08 Software rev. 09 Par.printout ******** 10 Par.
9 Operator menu – moisture analysis The device has space for up to 100 different, operator-defined drying processes. Simply invoke and start the finished processes (See chpt. 9.2). How to set drying parameters without using the program library is describes in the chapter below. 9.1 Moisture analysis without using the program library 9.1.
9.1.2 Setting drying parameters You can enter parameters for each drying process in the menu, as follows: • Heating profile (temperature, time) • Shutoff criterion • Unit of measured result • Output interval Operation Display To enable the operator menu, press the Menu-key. The first menu item “Profiles“ appears. 1. Heating profiles This is used to select suitable heating programs as well as to enter drying temperature and drying time.
To return to menu, press the PRINT-key. This is where you can store further drying parameters. or Return to weighing mode: Press the ESC-key repeatedly until the query ”SAVE?“ appears. Confirm query by pressing the PRINT-key or reject it by pressing the ESC-key. 2. Shutoff criterion This is used to select the criteria used for finishing the drying process. Press the button; the menu item “Finish“ appears.
Define Settings are available for selection from 0 to 10 mg in 0.1 mg steps and from 5 seconds to 175 in 5 second steps. Press key; the cursor (►) marks the adjustable parameter Press the - button anew and the current setting will flash Press the arrow keys ( ), to carry out the desired setting Confirm by pressing the PRINT key Define 2 Drying is shut off as soon as the weight loss within 60 s is smaller than the set percentage value (adjustable from 0.001% to 9.999%).
To return to menu, press the PRINT-key. This is where you can store further drying parameters. or Return to weighing mode: Press the ESC-key repeatedly until the query ”SAVE?“ appears. Confirm query by pressing the PRINT-key or reject it by pressing the ESC-key. 3. Unit of measured result This is used to define the unit of the measured result. Press the key; the menu item “Result“ appears Press button Press the arrow keys ( ), to select among Types of Output (see tab.
Tab.
4. Output interval This is used to set at which interval interim results are to be printed. Press the -key; the menu item “Printout Interval“ appears Press button Press the arrow keys ( ), to adjust the printer interval from 1 second to 5 minutes or to determine that no printout is required. Confirm by pressing the PRINT-key. Press the PRINT-key once more; the device returns to weighing mode. 9.1.
1. Date 2. Time 3. drying parameters: Heating profile / shutoff criteria / unit of measured result / output interval 4. Processing time 5. Target temperature 6. Processing temperature 7. Graphics showing current status Operation Display Actuate START/STOP-key Place removal aid with empty sample dish on the sample dish retainer. Make sure that the sample dish is resting flat on the sample dish retainer. Use the sample retainer at all times as it allows safe working and prevents burns.
Place sample in sample dish Close lid; the device is ready for measuring Drying will start automatically after scales have settled. Drying parameters are shown on the display.
To switch the display to the various units of the measured result, press the M-key. When drying is finished, you will hear an acoustic signal and the heating will be shut off. The display shows the measured result in the set unit. Open lid and remove the sample with the help of the removal aid. Caution: Caution! Sample dish and all parts of the sample chamber are hot! Data output via RS 232 interface is achieved by pressing the PRINT-key: --------------- Start drying---------------Program no.
9.2 Moisture analysis using the program library The device has a memory for drying processes! 99 drying processes can be allocated to this memory (library). Simply invoke and start the finished processes from the library. 9.2.1 Enabling of program library Operation Press F key Call up menu item "P7 Others" (see chapt. 7.
9.2.2 Setting drying parameters Operation Display Press Menu-key; library opens Information: The most recent program used is shown in P00 Press the arrow keys ( ), to select “Program No“ Press -key; parameter options of program appear. Parameter selection is achieved with the help of the arrow keys ( ) 1.
Press the arrow keys ( ), to select “Profile“ Press -button Press the -key anew; the current menu item blinks Press the arrow keys ( ), to select among the heating programs below plus the related parameters Standard • Step-by-step It is possible to increase the temperature step-bystep. The number and size of steps can be selected at will, see chpt. 11.8. • Soft Temperature is slowly increased. It is possible to adjust the lengths of the ramp, see chpt. 11.
3. Drying temperature This is used to enter the drying temperature a second time. This setting overwrites the drying time entered under the menu item “Profile“. Press the arrow keys ( ), to select the “Drying Temperature” Press the -key; currently set temperature flashes Press the arrow keys ( ), to enter the desired temperature. Confirm entry by pressing the PRINT-key and enter additional parameters as follows. 4.
Press the arrow keys ( ), to select “Shutoff“ Press the -key for the current setting to appear Press the -key; the current menu item blinks Press the arrow keys ( ), to select desired shutoff criterion. For further details, see chpt. 9.1.2 “Shutoff Criterion“. Confirm entry by pressing the PRINT-key and enter additional parameters as follows. 5.
7. How to enter a target weight for a sample The user can enter a target weight stating a tolerance range for the sample. This entry facilitates the application of identical sample sizes for each drying process.
8. Determine and enter corrective factor Certain materials emit more heat than is introduced from the outside. Dark substances for instance absorb heat and falsify measured results. In order to achieve an accurate measured result it is necessary to make a correction. Setting a corrective factor allows the user to correct differences between the set temperature of the moisture meter and the actually measured temperature on the specimen with the help of a temperature calibration set.
How to enter the determined corrective factor: Press the arrow keys ( ), to select “Corrective Factor“ Press the -button and the current setting will flash Press the arrow keys, to enter the determined corrective factor Use the , to select the digit Press the keys, to select the digit on the left/right (relevant enabled digit flashes). Confirm setting by pressing the PRINT-key and enter additional parameters as follows. 9.
10. Printing drying parameters If the device is connected to an optional printer the drying parameters settings can be printed out Press the arrow keys ( ), to select “Print“ Press -key; query “Print Program?“ appears Confirm by pressing the PRINT-key, drying parameters are printed. Example: ------- Program parameters -----Program no. :1 Name : FLOUR 100 Profile : Standard Dry temp. : 120 °C Switch off : Automatic 3 Result : Moisture content %M Print int. : 30 s Target : None T.
9.2.3 How to save drying parameters After all drying parameters have been set, press the ESC-key The query “Save Program?“ appears Confirm by pressing the PRINT-key; the drying parameters of the program are saved. The device returns to the program library. If the drying parameters are not saved, press the ESC-key. 9.2.4 How to invoke drying parameters / drying When the program library (see chpt. 9.2.1) is enabled, invoke the desired drying program as follows.
Press START/STOP-key Place removal aid with empty sample dish on the sample dish retainer. Make sure that the sample dish is resting flat on the sample dish retainer. Use the sample retainer at all times as it allows safe working and prevents burns. To help with stabilisation, close lid.
Place sample in sample dish Close lid; the device is ready for measuring Drying will start automatically after scales have settled. You can read the processing parameters (target temperature, processing temperature, type of calculation etc.) on the display.
To switch the display to the various units of the measured result, press the M-key. When drying is finished, you will hear an acoustic signal and the heating will be shut off. The display shows the measured result in the set unit. Open lid and remove the sample with the help of the removal aid. Caution: Sample dish and all parts of the sample chamber are hot! Data output via RS 232 interface is achieved by pressing the PRINT-key: ---------------- Start drying---------------Program no.
10 Storing measured results The device is able to store the most recently carried out measurements (max. 100 measurements). In addition to the measured result, all drying parameters are also stored. When 100 measurements have been allocated to the memory the next measurement (101) will be saved under position 99. For this purpose the entire memory list is shifted up by one space.
11 General information concerning moisture analysis 11.1 Application In all cases where moisture is added to or removed from products, a fast determination of the moisture content is of enormous importance. For countless products the moisture content is not only a quality feature but also an important cost factor.
the same time, they should be packed in airtight boxes so that they do not undergo changes during storage. To receive reproducible results, spread the sample thinly and evenly on a sample dish. Patchy spreads will produce inhomogeneous heat distribution in the sample to be dried resulting in incomplete drying and increased measuring time. Sample clusters generate increased heating of the upper layers resulting in combustion or incrustation.
11.
11.7 Drying temperature Bear in mind the following factors when setting the drying temperature: Surface of the sample: Compared with powdery or grainy samples, liquid and spreadable samples have a smaller surface for the transmission of heat energy. The use of a glass fibre filter improves the heat application. Colour of sample: Light-coloured samples reflect more heat radiation than dark ones and therefore require a higher drying temperature.
11.8 Description of heating profiles 4 heating profiles are available, as follows: • • • • Standard Fast Soft Step-by-step drying Standard drying Standard drying is the most frequently used drying process. This type of heating method is suitable for the majority of substances. Soft drying The soft heating method is suitable for substances that are unable to tolerate a sudden rise in temperature applied by radiators. There are also those substances that form a film when warmed up quickly.
11.9 Recommendations / Guidelines Prepare standard sample: Crush sample, as required, and spread it evenly in the aluminium dish. Prepare special samples: For sensitive or hard to spread test materials (e. g. mercury) a glass fibre filter is available for use. Spread sample evenly on glass fibre filter and cover is with a second glass fibre filter. The glass fibre filter is also useful as a protection when splashing materials are dealt with (each splash falsifies the final result).
12 Data output Pin allocation of the balance output plug (front view): 5 1 9 Pin 2: Pin 3: Pin 5: Receive data Transmit data Signal ground 6 Interface cable: Balance - printer 3 (TxD) 5 (GND) 7 - 8 clench 1 (RxD) 3 (GND) Balance – PC 9-pole 2 (RxD) 3 (TxD) 5 (GND) 4 - 6 clench 7 - 8 clench 3 (TxD) 2 (RxD) 5 (GND) 4 - 6 clench 7 - 8 clench Balance – PC 25-pole 2 (RxD) 3 (TxD) 5 (GND) 7 - 8 clench 2 (RxD) MLS_C-BA-e-1330 3 (TxD) 7 (GND) 4 – 5 clench 6 - 20 clench 77
12.
13 Service, maintenance, disposal Before any maintenance, cleaning and repair work disconnect the appliance from the operating voltage. 13.1 Cleaning + Only carry out cleaning tasks when the equipment has cooled down. Sample dish Dish retainer Removal aid Windshield Draft protection base plate Please do not use aggressive cleaning agents (solvents or similar agents), but a cloth dampened with mild soap suds. Ensure that no liquid penetrates into the device. Polish with a dry soft cloth.
Clean temperature sensor Temperature sensor Clean the same way, as described above. Ensure the emitter is not touched or damaged in any way.
13.2 Change fuse + Disconnect equipment from power supply. + Swap fuse as shown in illustration. 13.3 Servicing, maintenance The appliance may only be opened by trained service technicians who are authorized by KERN. Ensure that the balance is regularly calibrated, see chap. Monitoring of test resources. 13.4 Disposal Disposal of packaging and appliance must be carried out by operator according to valid national or regional law of the location where the appliance is used.
14 Instant help Fault Possible cause Display is not lit up. • The display unit is not switched on • The mains supply connection has been interrupted (mains cable not plugged in/faulty) • Power supply interrupted • Fuse has blown The display does not change when a sample is being loaded • The weight display changes • constantly / the stability display does not appear. • Sample dish / dish holder is fitted incorrectly.
15 Declaration of Conformity KERN & Sohn GmbH D-72322 BalingenFrommern Postfach 4052 E-Mail: info@kern-sohn.de Tel: 0049-[0]7433- 9933-0 Fax: 0049-[0]7433-9933149 Internet: www.kernsohn.