KERN & Sohn GmbH Ziegelei 1 D-72336 Balingen E-Mail: info@kern-sohn.com Tel: +49-[0]7433- 9933-0 Fax: +49-[0]7433-9933-149 Internet: www.kern-sohn.com Operating instructions Baby scale KERN MBC-M Version 1.
GB KERN MBC-M Version 1.2 01/2013 Operating instructions Baby scale Contents 1 Technical data ................................................................................................ 4 2 Declaration of conformity ............................................................................. 5 2.1 Explanation of the graphic symbols ....................................................................................... 5 3 Appliance overview ....................................................
8 Unpacking, Setup and Commissioning ..................................................... 19 8.1 8.2 8.3 8.4 8.5 8.6 8.7 Installation Site, Location of Use .......................................................................................... 19 Unpacking ............................................................................................................................... 19 Scope of delivery ...................................................................................................
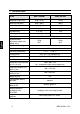
1 Technical data KERN MBC 15K2DM MBC 20K10M Weighing range (max) 6 kg / 15 kg 20 kg Minimum load (Min) 40 g / 100 g 200 g Readability (d) 2g/5g 10 g Verification value (e) 2g/5g 10 g Reproducibility 2g/5g 10 g Linearity ± 2g/5g 10 g Display Recommended adjustment weight, not added (class) LCD with 25mm high digits 15 kg (M1) 20 kg (M1) Stabilization time (typical) 2 sec. Warm-up time 10 min Operating temperature + 0° C …. + 40° C Humidity of air max.
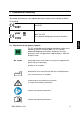
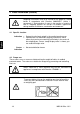
2 Declaration of conformity Declaration of conformity: see separate document showing serial number of device CE marking: 93/42/EEC 0297 year M 0103 2.1 2009 / 23 / EG Non-automatic Weighing Instruments Directive Explanation of the graphic symbols This EC verification mark indicates that these scales are in conformity with EC Directive 2009 / 23 / EC for NonAutomatic Weighing Instruments. Weighing instruments bearing this mark are approved for medical purposes within the European Union.
Identification of manufacturer of medical product including address Kern & Sohn GmbH D–72336 Baligen,Germany www.kern-sohn.com “Electro-medical appliance“ with attachment for type B Device protection category II Dispose of old appliances separately from your household waste! Instead, take them to communal collection points.
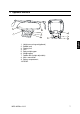
3 Appliance overview 1. Height measuring rod (optional) 2. Bubble level 3. Display Unit 4. LED 5. Baby weighing pan 6. Weighing pan 7. Rubber feet (height adjustable) 8. Mains connection 9. Battery compartment 10.
3.1 Overview of display Display Description Description GROSS Gross weight display Lights up during indication of the gross weight of the baby (after drinking) Net weight display Lights up during indication of the net weight of the baby (before drinking) NET Illuminated after weighing scale was tared ZERO Zeroing display Should the balance not display exactly zero despite empty scale pan, press the button. Your balance will be set to zero after a short standby time.
3.2 Keyboard overview Key Description Function ON/OFF-switch Turn on/off Zeroing key Weighing scale will be reset to „0.0“ kg.
4 Basic Information (General) Weighing instruments have to be verified for the purposes stated below in accordance with Directive 2009/23/EC. Article 1, paragraph 4. “Determination of mass in the practice of medicine that is, weighing patients for reasons of medical supervision during medical surveillance, examination and treatment.” 4.1 Specific function Indication Determining the body weight in the medical practice area.
4.3 Improper Use Do not use these scales for dynamic weighing processes. Do not leave permanent load on the weighing pan. This may damage the measuring system. -Impacts and overloading exceeding the stated maximum load (max) of the weighing plate, minus a possibly existing tare load, must be strictly avoided. This could cause damage to the balance. Never operate balance in explosive environment. The serial version is not explosion protected.
5 Basic Safety Precautions 5.1 Pay attention to the instructions in the Operation Manual Carefully read this operation manual before setup and commissioning, even if you are already familiar with KERN balances. All language versions contain a non-binding translation. The original German is binding. 5.2 Personnel training The medical staff must apply and follow the operating instructions for proper use and care of the product. 5.
6 Electromagnetic compatibility (EMC) 6.1 General hints The installation and use of this baby scale MBC-M requires special precautionary measures as outlined in the EMC information below. This device complies with the limits set for medical electrical devices of group 1, class B (as per EN 60601-1-2). Electromagnetic compatibility (EMC) describes a device’s ability to perform reliably within an electromagnetic environment without causing inadmissible electromagnetic interference at the same time.
6.2 Electromagnetic interferences Guidelines and manufacturer’s declaration – electromagnetic interferences The baby scale MBC-M is designed for use in an electromagnetic environment that meets the requirements stated below. The customer or user of the medical electrical device must ensure that operation takes place in such an environment.
6.3 Electromagnetic noise immunity Guidelines and manufacturer’s declaration - electromagnetic noise immunity The baby scale MBC-M is designed for use in an electromagnetic environment that meets the requirements stated below. The customer or user of the medical electrical device must ensure that operation takes place in such an environment.
Guidelines and manufacturer’s declaration - electromagnetic noise immunity The baby scale MBC-M is designed for use in an electromagnetic environment that meets the requirements stated below. The customer or user of the medical electrical device must ensure that operation takes place in such an environment. Noise immunity tests IEC 60601 test level Conformity Electromagnetic environment guideline Conducted HF disturbance variables 3 150 kHz to 80 MHz 3V 3 80 MHz to 2.
6.3.1 Crucial features of performance Note: The baby scale MBC-M does not have any crucial features of performance as per IEC 60601-1. The system may be subject to interference by other devices even if these devices conform to current emission requirements as per CISPR. 6.
7 Transport and storage 7.1 Testing upon acceptance When receiving the appliance, please check packaging immediately, and the appliance itself when unpacking for possible visible damage. 7.2 Packaging / return transport Keep all parts of the original packaging for a possibly required return. Only use original packaging for returning. Prior to dispatch disconnect all cables and remove loose/mobile parts. Reattach possibly supplied transport securing devices.
8 Unpacking, Setup and Commissioning 8.1 Installation Site, Location of Use The balances are designed in a way that reliable weighing results are achieved in common conditions of use. You will work accurately and fast, if you select the right location for your balance.
8.3 Scope of delivery Balance Power pack unit (EN 60601-1 attestation of conformity) Operating instructions 8.4 Placing Carefully remove the balance from the packaging, remove plastic cover and setup balance at the intended workstation. Make sure that all transport locking devices are removed To loosen the transport guard screw out transport screw [1] anticlockwise. For transportation carefully screw-in transport screw clockwise till to the stopper and then fix it using locknut.
Levelling Level balance with foot screws until the air bubble of the water balance is in the prescribed circle. 8.5 Battery operation is possible by obtaining an optional battery power pack. Open the battery compartment cover (1) at the base of the display unit and insert the rechargeable battery pack. Charge the battery for at least 12 hours before initial use. The appearance of the symbol in the weight display indicates that the battery packs is almost exhausted.
8.6 Mains connection Power is supplied by the external power unit which also serves to isolate the mains supply from the scale. The stated voltage value must be the same as the local voltage. Only approved genuine KERN power supply units may be used in compliance with Directive EN 60601-1. The small sticker attached to the side of the display unit indicates the power port: The LED remains illuminated as long as the weighing scale remains connected to the mains.
9 Operation 9.1 Weighing Start balance by pressing The balance will carry out a self-test The scales are ready for operation as soon as the weight display for “0.0kg“ has appeared. However, you can reset the weighing scale to zero by pressing the key. Put the baby in the centre of the weighing pan. Wait for stability display "STABLE", then read the weighing result. 9.2 If the baby is heavier than the max. weighing range, the display shows "oL" (overload) and a beep sounds.
9.3 When the balance is unloaded the saved taring value is displayed with negative sign. To delete the stored tare value, release scales and press . Hold function (Standstill function) The balance has an integrated standstill function (mean value calculation). This allows one to weigh the baby exactly, even if it is not restful in the weighing pan. Start balance by pressing . Wait for stability display „STABLE to appear. Press button, „--------„ is displayed.
9.4 Feeding function (control of weight gain) The baby's weight can be saved before feeding. Then the weight gain can be calculated by pressing a button. Start balance by pressing . Stability display await "STABLE" Place the baby on the weighing pan center before feeding. (example) After the stability display shows STABLE", press . The weight of the baby is recorded and stored. Display "DRINK" lights up. Take the baby from the weighing pan. Place the baby on the scale pan after feeding.
9.6 Use the optional size measurement device The scale has the ability to determine not only the weight but also the body height using the optional height measuring rod. For this purpose proceed as follows: Put the head stopper (left) (1) to zero (2) Put the baby in the centre of the weighing pan.
10 Menu Access to service menu „tCH“is locked in verified balances. To disable the access lock, destroy the seal and actuate the adjustment switch. For position of adjustment switch, see chap. 13. Attention: After destruction of the seal the weighing system must be reverified by an authorised agency and a new verification wire/seal mark fitted before it can be reused for applications subject to verification. 10.
10.2 Menu overview Function Settings Description F1 oFF Automatic cutout Auto Off oFF 0* Automatic shutdown off oFF 3 Automatic shutdown after 3 sec oFF 5 Automatic shutdown after 5 sec oFF 15 Automatic shutdown after 15 sec oFF 30 Automatic shutdown after 30 sec bl on Back lighting for display on bl oFF Display background illumination off bl AU* Backlighting for display will come on automatically as soon as the weighing scale is operated.
11 Error messages Display Description Zero range exceeded (on start-up or when pressing the key) Load on weighing pan Excess load, during zero setting of weighing scale Incorrect adjusting process Fault on load cell Value outside the A/D changer range Damaged weighing cell Damaged electronics Should other error messages occur, switch balance off and then on again. If the error message remains inform manufacturer.
12 Service, maintenance, disposal 12.1 Cleaning Before any maintenance, cleaning and repair work disconnect the appliance from the operating voltage. 12.2 Cleaning / disinfecting Clean weighing pan and housing with a household cleaner or a commercial disinfectant. Please follow manufacturer’s instructions. Do not use abrasive or aggressive cleaners such as spirits or alcohol or similar as they might damage the high-quality surface.
13 Instant help In case of a fault in the program sequence, the balance should be shortly switched off. The weighing process must then be restarted from the beginning. Failure: Possible causes: The displayed weight does not glow. The displayed weight is permanently changing The weighing result is obviously incorrect The balance is not switched on. The mains supply connection has been interrupted (mains cable not plugged in/faulty). Power supply interrupted.
14 Verification General introduction: According to EU directive 2009/23/EC balances must be officially verified if they are used as follows (legally controlled area): a) For commercial transactions if the price of goods is determined by weighing. b) For the production of medicines in pharmacies as well as for analyses in the medical and pharmaceutical laboratory. c) For official purposes d) For manufacturing final packages In cases of doubt, please contact your local trade in standard.
Position adjustment switch and seals: 1 1 2 3 1. 2. 3. Self-destroying seal mark Cover Adjustment switch 14.
15 Adjustment As the acceleration value due to gravity is not the same at every location on earth, each display unit with connected weighing plate must be coordinated - in compliance with the underlying physical weighing principle - to the existing acceleration due to gravity at its place of location (only if the weighing system has not already been adjusted to the location in the factory).
Procedure: Turn on the scale during the self-test press function [F1 oFF] is displayed. Press repeatedly until "t CH" is displayed. Press , [Pin] is displayed , the first Operate adjustment switch; for position see chap.13 Press , and subsequently, [P1 SPd] will appear Press , „P2 CAL“ will be displayed Press , the currently set balance type is displayed. SnGrA = single range balance dUArG = dual range balance To change select scale type with [dESC] appears.
Ensure that there are no objects on the weighing pan. Wait for stability display "STABLE", then confirm with The size of the currently set adjustment weight is displayed, the active site flashes. (example) If required, select with he digit to be altered and change the digit with . Confirm with , [LoAd] appears Put the required adjustment weight carefully in the centre of the weighing pan. Wait until stability display „STABLE“ appears Confirm with [PASS] is displayed.