KERN & Sohn GmbH Ziegelei 1 D-72336 Balingen email: info@kern-sohn.com Phone: +49-[0]7433- 9933-0 Fax: +49-[0]7433-9933-149 Internet: www.kern-sohn.com Operating instructions Baby weighing scale KERN MBB-M Version 1.
GB KERN MBB-M Version 1.4 02/2013 Operating instructions Baby weighing scale Table of Contents 1 Technical Data ............................................................................................... 4 2 Declaration of conformity ............................................................................. 5 2.1 Explanation of the graphic symbols ....................................................................................... 5 3 Basic Information (General) ..........................
9 Unpacking, Setup and Commissioning ..................................................... 14 9.1 Installation Site, Location of Use .......................................................................................... 14 9.2 Unpacking ............................................................................................................................... 14 9.3 Scope of supply .................................................................................................................
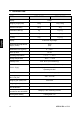
1 Technical Data KERN MBB 15K5M Display MBB 15K2DM 6-digit Weighing range (max) 15 kg 6 kg; 15 kg Minimum load (Min) 100 g 40 g Verification value (e) 5g 2 g; 5 g Reproducibility 5g 2 g; 5 g Linearity 10 g 2 g; 5 g Display Recommended adjustment weight, (Class) Stabilization time (typical) Warm-up time LCD 24mm digit height 15 kg (M1) 2 – 3 sec. 10 min Operating temperature + 5° C …. + 35° C Storage temperature - 20°C … + 60°C Humidity of air max.
2 Declaration of conformity Declaration of conformity: See separate document showing serial number of device CE marking: 93/42/EEC 0297 year M 0103 2.1 90/384/EEC Non-automatic Weighing Instruments Directive Explanation of the graphic symbols This EEC verification mark indicates that these scales are in conformity with EEC Directive 90 / 384 / EEC for Non-Automatic Weighing Instruments. Weighing instruments bearing this mark are approved for medical purposes within the European Union.
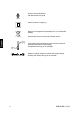
“Electro-medical appliance“ with attachment for type B Device protection category II Dispose of old appliances separately from your household waste!l! Instead, take them to communal collection points.
3 Basic Information (General) Weighing instruments have to be verified for the purposes stated below in accordance with Directive 90/384/EEC. Article 1, paragraph 4. “Determination of mass in the practice of medicine that is, weighing patients for reasons of medical supervision during medical surveillance, examination and treatment.” 3.1 Specific function Indication Determining the body weight in the medical practice area.
3.3 Improper Use Do not use these scales for dynamic weighing processes. Do not leave permanent load on the balance. This may damage the measuring system. -Impacts and overloading exceeding the stated maximum load (max) of the weighing pan, minus a possibly existing tare load, must be strictly avoided. This could cause damage to the balance. Never operate balance in explosive environment. The serial version is not explosion protected.
4 Basic Safety Precautions 4.1 Pay attention to the instructions in the Operation Manual Carefully read this operation manual before setup and commissioning, even if you are already familiar with KERN balances. 4.2 Personnel training The medical staff must apply and follow the operating instructions for proper use and care of the product. 4.3 Preventing contamination To prevent cross-contamination (fungal skin infections, …), clean the seating surface or weighing platform every time.
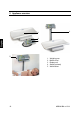
5 Appliance overview 4 1 2 3 5 1. 2. 3. 4. 5.
6 Overview of displays Display 1 0 Designation Description Zeroing display Should the balance not display exactly zero despite empty scale pan, press the button. Your balance will be set to zero after a short standby time.
7 Keyboard overview Button 12 Designation Function ON/OFF-switch Turn on/off Zero setting key Balance will be reset to 0.0 kg. Possible up to max.
8 Transportation & Storage 8.1 Testing upon acceptance When receiving the appliance, please check packaging immediately, and the appliance itself when unpacking for possible visible damage. 8.2 Packaging / return transport Keep all parts of the original packaging for a possibly required return. Only use original packaging for returning. Prior to dispatch disconnect all cables and remove loose/mobile parts. Reattach possibly supplied transport securing devices.
9 Unpacking, Setup and Commissioning 9.1 Installation Site, Location of Use The balances are designed in a way that reliable weighing results are achieved in common conditions of use. You will work accurately and fast, if you select the right location for your balance.
9.3 Scope of supply Balance Power unit (in conformity with EN 60601-1), including fuse and LED Wall bracket Operating instructions 9.4 Assembly and erection Make sure that the weighing pan is exactly horizontal. Set the adjustable rubber feet of the baby scale in such a way that the air bubble inside the spirit level (on the right next to the cable outlet to the control unit) is in the centre. 1. Push the front of the weighing pan (arrow) up to the stop across the weighing platform. 2.
3. Then screw in the corresponding locking screw to achieve a tight fit. 4. Use the supplied knurled screws to attach the wall bracket to the terminal. 9.
9.6 Stand assembly (optional) Use the 4 screws to attach the stand to the bottom of the scale. Remove the two lateral rubber plugs from the display unit. Secure the display unit with the two black rotary knobs to the fixing device. Position display unit with the rotary knobs. 9.
9.8 Rechargeable battery operation (optional) When an optional rechargeable battery is used, proceed as follows: On models where the back of the display unit is not directly accessible, remove the two black rotary knobs from both sides of the display unit in order to open the battery compartment and remove the display unit from the holder.
Carefully insert the rechargeable battery block and insert plug into connection CN 3 Ensure that the cables are not squeezed Close the battery cover If the rechargeable battery is exhausted, „LO“ is displayed. The rechargeable battery is loaded via the provided plug-in power supply unit (loading time 23 h for a complete loading). If the balance is not used for a longer time, take out the rechargeable battery and store it separately. Leaking liquid could damage the balance.
9.9 Connecting the power supply Power is supplied by the external power unit which also serves to isolate the mains supply from the scale. The stated voltage value must be the same as the local voltage. Only approved genuine KERN power supply units may be used in compliance with Directive EN 60601-1. 9.10 Initial Commissioning In order to obtain exact results with the electronic balances, your balance must have reached the operating temperature (see warming up time chap. 1).
10 Menu overview Start balance by pressing Press ON OFF for 3 sec., “SETUP“ will be displayed. Select parameter by using described. TARE ( ) and Confirm the selected parameter by pressing HOLD TARE ( ), as ( ). 0.0 kg AOFF Auto off: 120 sec / 180 sec / 240 sec / 300 sec / OFF bUrr Audio signal: ON/OFF End Exit menu If End is selected, finish set up by pressing the MBB-M-BA-e-1314 HOLD button.
11 Operation 11.1 Weighing ON OFF Start balance by pressing The balance carry out a segment test, then the program version is displayed. The scales are ready for operation as soon as the weight display for “0.0kg“ has appeared. 0 The time. button can be used to set the balance to zero at any Put baby in the centre of the weighing pan. Wait for the rest position display , then read the weighing result.
The balance is able to only store one taring value. When the balance is unloaded the saved taring value is displayed with negative sign. To delete the stored tare value, release scales and press TARE . 11.3 Hold function (Standstill function) The balance has an integrated standstill function (mean value calculation). This allows correct weighing determination of a baby although the latter is not keeping still on the scales.
12 Error messages Display Description Underload Weight on weighing pan is too low. Please increase weight. If the error message remains inform manufacturer.
13 Service, maintenance, disposal 13.1 Cleaning Disconnect the unit from the mains power supply prior to cleaning. Please do not use aggressive detergents (solvents etc.). Apply soapy water to moist cloth or use household detergent. Prevent fluid from penetrating into device. Finish by polishing with dry soft cloth. Remove dirt immediately.
14 Instant help In case of a fault in the program sequence, the balance should be shortly switched off. The weighing process must then be restarted from the beginning. Failure: Possible cause: The displayed weight does not glow. The displayed weight is permanently changing The weighing result is obviously incorrect The balance is not switched on. The mains supply connection has been interrupted (mains cable not plugged in/faulty).
15 Verification Verified scales bear a verification mark or one or more seals affixed by the Bureau of Standards or the manufacturer on or inside the housing which will self-destroy on removal. This makes it impossible to verify scales without damaging the seals. 15.1 Adjustment Observe stable environmental conditions. A warming up time (see chapter 1) is required for stabilization. In calibrated balances the adjustment function is switch locked.
Press HOLD repeatedly until “CAL 0“ appears. TARE Press , the display will show a numeric value. Then press , “CAL 0“ appears. HOLD Press , “CAL 5“ appears. TARE Press Enter the required size of the adjustment weight (See Section 1, "Technical Data"): For this select the digit to be changed with HOLD and the numeric value using Acknowledge by TARE . . Place the adjustment weight carefully in the centre of the weighing pan and a numerical value will appear in the display.
15.2 Adjustment controls and seals After a verification the balance is sealed at the indicated positions. Verification of the balance is invalid without the "seal". Position of the official seals: 1. Rear 2. Battery compartment 3.
Position of the adjustment switch: 1 Position of the adjustment switch 2 3 State 1. to left Not documented 2. concentric Adjustment position - adjustment possible 3. to right Verification position - adjustment locked 15.3 Checking the balance verification settings For the adjustment function, the balance must be switched over to service mode. To achieve the effect, turn the adjustment switch to adjustment position. In the service mode all parameters of the balance can be modified.
15.4 Navigation in the menu With the balance switched on, keep the button depressed for approx. 3 sec until "SETUP" is displayed followed by "9rAd". Press the displayed. Press the TARE HOLD button as often as necessary until the required function is button to confirm the selected function. The first parameter will be displayed. Press the pressing the TARE HOLD button to select the required parameter and confirm by button. 15.4.
Press the [HOLD] and [TARE] buttons to make the selection * * * * * * * * * * * * default setting 32 MBB-M-BA-e-1314
Description: Weighing unit: kg Partition steps, weighing range (max.) and readout (d) Multi-range balance/ single-range balance selection Single-range balance Multi-range balance Filter: fast/ normal/ slow Auto Zero Tracking: 0.25d / 0.5d / 1d / 3d / OFF Stabilisation range: 0.25d / 0.5d / 1d / 3d / OFF Zero range: 2% / 100% Overload range: 9d / 2% Adjustment Auto off: 120 sec. / 180 sec. / 240 sec. / 300 sec.
15.5 Verification validity period (current status in G) Personal scales in hospitals 4 year Personal scales if not used in hospitals unlimited Baby weighing scales and mechanical birth weight scales 4 year Bed scales 2 year Wheelchair scales 2 year Rehab clinics and local health authorities are treated as hospitals (4 years verification validity). Not treated as hospitals (verification validity not limited) are dialysis stations, nursing homes and doctor’s surgeries.