KERN & Sohn GmbH Ziegelei 1 D-72336 Balingen E-Mail: info@kern-sohn.com Phone: +49-[0]7433- 9933-0 Fax: +49-[0]7433-9933-149 Internet: www.kern-sohn.com Operating and Installation Instructions Display Unit KERN KDE-T Version 1.
GB KERN KDE-T Version 1.0 12/2012 Operating and installation instructions Display unit Contents 1 Technical data ................................................................................................ 4 2 Appliance overview ....................................................................................... 5 2.1 Keyboard overview .................................................................................................... 6 3 Basic Information (General) .........................
8 Menu ............................................................................................................. 21 8.1 8.2 Navigation in the menu: ............................................................................................21 Menu overview..........................................................................................................22 8.2.1 8.2.2 8.2.3 8.2.4 8.2.5 8.2.6 8.2.7 Weighing units (Unit) ..........................................................................
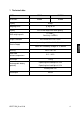
1 Technical data KERN KDE-T KDE-TH Resolution 20.000 35.000 Display Weighing Units Display DMS weighing cells Range calibration 6-digit g, kg, lb, oz LCD 25 mm digits with back lighting 87-1600 Sensitivity 2-3 mV/V We recommend ≥ 50 % max. Input voltage 100 V – 240 V, 50 / 60 Hz Electric Supply Power unit secondary voltage 15 V, 600mA Housing Admissible ambient temperature Net weight Rechargeable battery (optional) 225 x 110 x 45 5°C – 35°C 1.
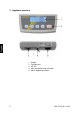
2 Appliance overview 1. 2. 3. 4. 5.
2.
3 Basic Information (General) 3.1 Proper use The display unit acquired by you is used in combination with a weighing plate and serves to determine the weighing value of material to be weighed. It is intended to be used as a “non-automatic weighing system”, i.e. the material to be weighed is manually and carefully placed in the centre of the weighing plate. As soon as a stable weighing value is reached the weighing value can be read. 3.2 Improper Use Do not use display unit for dynamic weighing.
3.4 Monitoring of Test Resources In the framework of quality assurance the measuring-related properties of the display unit and, if applicable, the testing weight, must be checked regularly. The responsible user must define a suitable interval as well as type and scope of this test. Information is available on KERN’s home page (www.kern-sohn.com with regard to the monitoring of display units’ test substances and the test weights required for this.
6 Unpacking and placing 6.1 Installation Site, Location of Use The display units are designed in a way that reliable weighing results are achieved in common conditions of use. Precise and fast work is achieved by selecting the right place for your display unit and your weighing plate. On the installation site observe the following: Place the display unit and the weighing plate on a stable, even surface.
6.3 Unpacking/installation Carefully remove the display unit from packaging, remove plastic cover and place it in the designated work area. Mount the display unit in a way that facilitates operation and where it is easy to see. 6.4 Mains connection Power is supplied via the external mains adapter. The stated voltage value must be the same as the local voltage. Only use original KERN mains adapters. Using other makes requires consent by KERN. 6.
6.6 Adjustment As the acceleration value due to gravity is not the same at every location on earth, each display unit with connected weighing plate must be coordinated - in compliance with the underlying physical weighing principle - to the existing acceleration due to gravity at its place of location (only if the weighing system has not already been adjusted to the location in the factory).
6.7 Linearization Linearity shows the greatest deviation of a weight display on the scale to the value of the respective test weight according to plus and minus over the entire weighing range. If linearity deviation is discovered during a testing instrument control, you can improve this by means of linearization. Carrying out linearization is restricted to specialist staff possessing well acquainted with the workings of weighing scales.
6.7.1 Carry out linearization Set menu item “CAL” in service menu (chap. 12.5). Afterward proceed as follows: “F” will appear briefly before the weighing scale changes to adjusting mode and “CAL” will be displayed. ò Press , the value for the first weight will be displayed. Here is an example of “12.500 kg” Put on first weight in the centre of the weighing pan Press , the value for the first weight will be displayed. Here is an example of “25.
7 Basic Operation 7.1 Start-up Press , the appliance will carry out a self-test. As soon as the weight display appears, the instrument will be ready to weigh. 7.2 Switching Off Press , the display will disappear. 7.3 Zeroing Resetting to zero corrects the influence of light soiling on the weighing plate. Resetting range ± 2 % max. To unload the weighing system Press 7.4 , the zero display appears. Simple weighing Place goods to be weighed on balance.
7.5 Weighing with tare Deposit weighing vessel. After successful standstill control press the button. The zero display appears. The weight of the container is now internally saved. Weigh the material, the net weight will be indicated. After removing the weighing container, the weight of the weighing container appears as negative display. The tare procedure can be repeated as many times as necessary, for example with initial weighing of several components for a mix (add-on weighing).
Turning off pre-tare function: Unload weighing pan and press Press to set to zero repeatedly until „PrETArE“ is displayed flashing Press to delete the saved pre-tare value. 7.7 Plus/minus weighings For example unit weight control, fabrication control etc. Turn on weighing scale by and wait for zero to be displayed. Put desired weight on weighing pan (example) Press to tare and “0.
7.8 Parts counting During piece counting parts can either be counted into a container or out of a container. To count a greater number of parts the average weight per part has to be determined with a small quantity (reference quantity). The larger the reference quantity, the higher the counting exactness. High reference must be selected for small parts or parts with considerably different sizes. The average piece weight can only be determined by stable weighing values.
7.9 Net-total weighings It is useful if a mixture of several components is weighed into a tare vessel and finally the sum weight of all weighed components is necessary for control purposes (nettotal, i.e. the weight of the tare vessel). Example: Turn on weighing scale and wait for zero to be displayed. Put on empty vessel and use to tare to “0.0000 kg”. Weigh in component 1 ( 2 kg) and use to tare to “0.0000 kg”. The memory function is shown by the symbol on the left side of the screen.
Weigh in component 3 ( 5 kg) Press and the total weight (7.5 kg) following from component 1, component 2 and component 3 will be shown. Follow the same sequence of operations for additional components. Back to weighing mode by pressing the 19 button.
7.10 Percent weighings Percent weighing allows to display weight in percent, in relation to a reference weight. Turn on weighing scale by and wait for zero to be displayed. Press repeatedly until a flashing display of “100.0 %” appears. First the reference numbers of pieces of the counting function appear, followed by “100.0 %”. Place the reference object on the weighing plate Press and the weight of the substance will be imported as reference (100%). The display stops flashing.
8 Menu 8.1 Navigation in the menu: Call up menu In weighing mode keep pressed until Unit appears. ò Select menu items With help of , the individual menu items can be selected one after the other. ò ò and so on Change settings Confirm selected menu item with setting will be shown. and the current Change setting in selected menu item by pressing Example: . ò Confirm setting Back to weighing mode 21 Press to confirm required setting and the device will return to weighing mode.
8.2 Menu overview Menu item Available settings Unit kg* g oz lb FFA Kilogram Gram Pound Troy ounce Freely selectable factor rE Cr* Pr PC AU PC bA Pr AU Pr Data output via remote control commands Data output using the PRINT key Continuous data output Output on bar code printer Autom.
bL on* Display backlight Ch off Switch-on background illumination The backlight will turn itself off 10 minutes after reaching a stable weighing value.
Gram Pound Ounce Freely selectable factor *) Display indication Conversion factor 1g= g lb oz FFA 1. 0.0022046226 0.035273962 xx.xx In order to enter an own conversion factor, press the above until „FFA“ is displayed. Press the last digit begins to flash. Using the 1, with the button to reach to the selection. The button, the displayed value is increased by button it is reduced by 1. Use the to the left.
8.2.2 Automatic zero correction (zero tracking) The Auto-Zero function is used to tare small variations in weight automatically. If Zero-Tracking however is switched off, the weighing display becomes more busy. Turn on weighing scale by and wait for zero to be displayed. Press and keep it pressed until „Unit“ appears on the display. Press repeatedly until “tr” appears. Press , the last selected setting will be displayed. (example) Select desired setting by Acknowledge with 25 . .
8.2.3 Selection of adjustment weight The adjustment weight can be selected from the default nominal values in accordance with the max load for the weighing scale. In order to achieve high-quality weighing results in the sense of the measuring technology, it is recommended to select the nominal value as high as possible. The non delivered adjustment weights can be purchased from KERN as option. Turn on weighing scale by and wait for zero to be displayed.
8.2.4 Display background illumination To turn the display backlight function on or off go to the menu. Turn on weighing scale by and wait for zero to be displayed. Press and keep it pressed until „Unit“ appears on the display. Press repeatedly until “bl“ appears Acknowledge with . The last selected setting will be shown.
8.2.5 Animal weighing function The balance has an integrated animal weighing function (mean value calculation). With this function it is possible to weigh domestic or small animals exactly, although they do not stand quiet on the weighing plate. If they move too much, an exact weighing will not be possible. In the menu the animal weighing function can be switched on or off: Turn on weighing scale by and wait for zero to be displayed. Press and keep it pressed until „Unit“ appears on the display.
Operation: Turn on weighing scale by and wait for zero to be displayed. Put weighed load (animal) on weighing pan and press . The selected time will be displayed onscreen and countdown will start. (example) During this time the balance takes up several measuring values. The weighing value will be displayed after the time specified has passed. (example) Press once, the balance goes to weighing mode Press twice and the function will be restarted. 8.2.
8.2.7 Reset to factory setting This function resets all balance settings to factory setting. Turn on weighing scale by and wait for zero to be displayed. Press and keep it pressed until „Unit“ appears on the display. Press repeatedly until “rSt“ appears Acknowledge using Select desired setting by , the current setting is displayed. . Confirm you selection by pressing , the weighing scale will return to weighing mode.
8.3 Interface parameters Data output via interface RS 232 C General hints The previous condition for the data transfer between balance and a peripherical device (e.g. printer, PC ...) is that the appliances are set to the same interface parameters (e.g. baud rate, transfer mode ...). 8.3.1 Data transfer mode Turn on weighing scale by and wait for zero to be displayed. Press and keep it pressed until „Unit“ appears on the display.
8.3.2 Selection printed edition Using this function data are selected which are to be sent via the RS232C (not valid for data transfer mode BAPr ). Turn on weighing scale by and wait for zero to be displayed. Press and keep it pressed until „Unit“ appears on the display. Press repeatedly until “LAPr“ appears Acknowledge using , the current setting is displayed. (example) Select desired setting by . (example) Press to confirm setting and the current setting will be displayed.
8.3.3 Baud rate The baud rate defines the transfer speed vie the interface, 1 Baud = 1 Bit/second. Turn on weighing scale by and wait for zero to be displayed. Press and keep it pressed until „Unit“ appears on the display. Press repeatedly until “bAUd“ appears Acknowledge using , the current setting is displayed. (example) Press to change setting (example) Acknowledge with 33 . The balance returns to weighing mode.
9 Data output RS 232 C The RS 232C interface allows a bi-directional data exchange from the balance to external devices. This data exchange is asynchronous using ASCII - Code. The following conditions must be met to provide successful communication between the weighing system and the printer. Use a suitable cable to connect the display unit to the interface of the printer. Faultless operation requires an adequate KERN interface cable.
9.3 Explanation of the data transfer 9.3.1 Pr PC Press the PRINT key, at stable weight the format is transferred from LAPR. a. Format for stable values for weight/quantity/percentage 1 2 3 4 5 6 7 8 9 10 11 12 M S N1 N2 N3 N4 N5 N6 N7 N8 N9 7 B 8 B 9 B 10 B 11 B 13 14 15 16 17 18 N10 B U1 U2 U3 CR LF 12 E 14 r 15 o 16 r 17 18 CR LF b. Format in case of fault 1 B 2 B 3 B 4 B 5 B 6 B 13 r 9.3.
9.3.4 rE Cr The remote control commands s/w/t are sent from the remote control unit to the balance as ASCII code. After the balance having received the s/w/t commands, it will send the following data. Take into account that the following remote control commands must be sent without a subsequent CR LF.
Symbols M Blank or M S Space character or negative sign (-) N1 … N10 10 numeric ASCII codes for weight values including decimal places or blanks U1 … U3 3 ASCII codes for weighing unit pcs. / % / or blank B Blank E, o, r ASCII code or “E, o, r” CR Carriage Return LF (Line Feed) 9.4 Output on bar code printer The data transfer mode has to be set on „BA Pr“ (chapter 8.5.1). As bar code printer a Zebra printer model LP2824 is provided.
10 Servicing, maintenance, disposal 10.1 Cleaning Before cleaning, disconnect the appliance from the operating voltage. Please do not use aggressive cleaning agents (solvents or similar agents), but a cloth dampened with mild soap suds. Take care that the device is not penetrated by fluids and polish it with a dry soft cloth. Spilled weighing goods must be removed immediately. 10.2 Servicing, maintenance The appliance may only be opened by trained service technicians who are authorized by KERN.
11 Instant help In case of an error in the program process, briefly turn off the appliance and disconnect from power supply. The weighing process must then be restarted from the beginning. Fault The displayed weight does not glow. The displayed weight is permanently changing Possible cause The display unit is not switched on. Mains power supply interrupted (mains cable defective). Power supply interrupted. (Rechargeable) batteries are inserted incorrectly or empty No (rechargeable) batteries inserted.
12 Installing display unit / weighing bridge Installation / configuration of the weighing system must be carried out by a well acquainted specialist with the workings of weighing balances. 12.1 Technical data Supply voltage: 5 V/150mA Sensitivity 1-2 mV/V Resistance parameter 80 - 100 Ω, max 4 items per 350 Ω load cell 12.2 Weighing system design The display unit is suitable for connection to any analogue platform in compliance with the required specifications.
12.3 How to connect the platform Disconnect the display unit from the power supply. Weld the individual wires of the load cell cable to the printed circuit board. Pin assignment is shown on the diagram below.
12.4 Configuring display devices Navigation in the menu: Call up menu Weighing scale is turned off. Press and hold; Keep holding pressed down and also hold down at the same time until software version “P1.0x” is displayed. Release both keys. “SCL.tYP” will be displayed followed by “1rAnGE“ Select menu items With help of , the individual menu items can be selected one after the other.
Configuration menu overview: Menu block Main menu SCL.tYP Menu item sub menu Available settings / explanation Single-range balance Press to confirm, you can select the weighing unit. will be displayed where SCL.CAP Weighing balance capacity (max) freely selectable rESOLE Readability selectable, dependent on max load After configuration linearize the weighing system CAL Linearization (See chap. 6.7.1) Dual range balance Press to confirm, you can select the weighing unit.
12.5 Service menu Configure display unit: Single-range balance: Weighing scale is turned off Press and hold; Keep holding (example) pressed down and also hold down at the same time until software version “P1.0x” is displayed. Release both keys. “SCL.TYP”will appear briefly followed by “1.rAnGE“. Setting single range (“1.rAnGE“) – or dual range (“2.rAnGE“) weighing scale Press to change between “1.rAnGE”and “2.rAnGE”. Select „1.rAnGE“ and confirm by . „bASUnt“ is displayed.
“rESOLE”will appear briefly followed by a numeric value. Now set readability. You can select between default values that are dependent on the max load of the weighing scale. Press to change between values. Press to confirm the required value. Here is an example: 0.001 kg - 0.002 kg - 0.005 kg – 0.010 kg – 0.020 kg – 0.050 kg (example) “F” will appear briefly before the weighing scale changes to adjusting mode and “CAL” will be displayed. Linearize weighing scale (See chap.6.7.
„bASUnt“ is displayed. This is where you can set the required weighing unit. Press press to change between the individual units and to select the required unit (ex. here: „kg“). “SCL.CAP 1”will appear briefly. (example) Setting first range A numeric value appears and the digit on the right is flashing. Press to increase the numeric value or to decrease. Press to change to a different decimal place. Set weighing scale capacity (here is an example of 50 kg) (example) and press to confirm.