KERN & Sohn GmbH Ziegelei 1 D-72336 Balingen E-Mail: info@kern-sohn.com Phone: +49-[0]7433- 9933-0 Fax: +49-[0]7433-9933-149 Internet: www.kern-sohn.com Operating manual Electronic Crane Scales Logbook Regular maintenance and care KERN HFC Version 1.
GB KERN HFC Version 1.1 01/2015 Operating instructions / logbook Electronic Suspended balance Contents Technical data _________________________________________________ 4 1. 1.1 Dimensions __________________________________________________________ 6 2. General Safety Instructions ______________________________________ 9 2.1 Duties of the owner-operator ___________________________________________ 9 2.2 Organizational measures ______________________________________________ 9 2.
5. Operation ____________________________________________________ 21 5.1 Safety instructions ___________________________________________________ 21 5.2 Loading the suspended balance _______________________________________ 22 5.3 Turn on/off __________________________________________________________ 25 5.4 Set balance to zero __________________________________________________ 25 5.5 Taring ______________________________________________________________ 26 5.
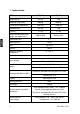
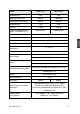
1. Technical data KERN HFC 1T-4 HFC 3T-3 0.5 kg 1 kg Weighing range (max) 1000 kg 3000 kg Taring range (subtractive) 999.5 kg 2999 kg Reproducibility 0.
KERN HFC 5T-3 HFC 10T-3 2 kg 5 kg Weighing range (max) 5000 kg 10000 kg Taring range (subtractive) 4998 kg 9995 kg 2 kg 5 kg ± 4 kg ± 10 kg 3000 kg (M3) 10000 kg (M3) Readability (d) Reproducibility Linearity Recommended adjustment weight, not added (class) Stabilization time 2s Warm-up time 10 min Units kg, lb, N Auto off 10 min Allowable ambient temperature 5…+35 °C Ambient humidity (max) 80 % Power supply unit 100 – 240 V, 50 / 60 Hz Input Voltage Device 9 V, 800 mA 3 x 1.
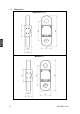
1.1 Dimensions Balance 0.
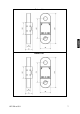
Balance 5 t Balance 10 t HFC-BA-e-1511 7
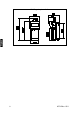
Holding strap terminal 8 HFC-BA-e-1511
2. General Safety Instructions 2.1 Duties of the owner-operator Follow national accident prevention regulations and all operator health and safety at work and operating regulations. Observe all safety regulations of the crane manufacturer. The balance may only be used for the proposed purpose. Any type of use which is not specified in these operating instructions, will be considered as improper use.
2.4 Pay attention to the instructions in the Operation Manual Carefully read this operation manual before setup and commissioning, even if you are already familiar with KERN balances. All language versions contain a non-binding translation. The original German is binding. 2.5 Proper use The balance you purchased is intended to determine the weighing value of material to be weighed. It is intended to be used as a “non-automatic“ balance, i.e.
2.8 Safe working Do not stand under swinging loads, see chap. 5.1. Position the crane in a way that the load is lifted vertically. When working with the crane and suspended balance wear personal safety equipment (helmet, safety shoes etc.). 2.9 Monitoring of Test Resources In the framework of quality assurance the measuring-related properties of the balance and, if applicable, the testing weight, must be checked regularly.
3. Appliance overview 1 2 3 4 Anchor eyelet ON/OFF switch Display Battery charge status 5 Keyboard 6 Antenna 7 Hand loop Lifting tackle not included in scope of delivery. Standardised attachment devices are to be used to attach loads.
3.
3.2 Keyboard overview Button Description of function • Turn on/off balance • Taring • Scroll up/down menu • For numeric entry increase value of digit • Zeroing • Confirm • Switch-over weighing unit • Exit menu / back to weighing mode. • Totalization • Select digits for numeric entry • Change-over button between gross and net weight • Delete total added memory • Delete on numeric entry • Fixing weight display see chap. 5.8 • Displaying peak load value see chap. 5.
3.3 Label Do not stand or go under suspended loads. Do not use on building site. Keep an eye on suspended loads. Do not exceed nominal rated load of balance. (example) The product conforms to the requirements of the German Equipment and Product Safety Act.
4. Commissioning + 4.1 Always observe chapter 2 „General Safety Instructions“! Unpacking Once delivered and unpacked, suspended balances will not be taken back. SAFETY INSTRUCTIONS for protection against The crane scales have been sealed by Messrs. KERN. Removal from packaging is also sealed. + Broken seal obliges to purchase. break Fig.: Seal Thanks for your comprehension. Your KERN Quality assurance team 4.
4.3 Checking the original dimensions Enter the original dimensions shown on the production data sheet in the grey boxes of checklist chap. 8.3. Check original dimension of suspended balance; for implementation see chap. 8.3 „Regular Maintenance“ Enter all data (date, tester, results) in the first line under „Inspection before first use“ in the checklist (see chapter 8.
Accu operation: When the rechargeable battery is empty, appears on the balance’s display. Turn off balance and connect power supply unit; battery is charged. Once the battery has been fully charged the display will show the symbol. Insert rechargeable battery: Unscrew battery compartment in arrow direction. Remove batteries including battery mount from the device.
Connect cable of balance to battery cable as shown on image. Insert battery in the centre. Ensure that the cables are not kinked. Relock battery compartment.
4.6 Suspending the balance Condition The crane needs a safety bracket (1) that the unloaded suspended balance cannot fall down. If the safety bracket is missing or damaged, please contact the crane manufacturer in order to receive a hook with this safety equipment. Suspend the suspended balance on the lower hook of a crane and close the safety bracket. The crane scale’s upper eyelet should rest in the saddle (2).
5. Operation 5.1 Safety instructions Risk of injury due to falling loads! DANGER Take great care when operating the crane and follow the general rules for crane operation. Check all parts (hook, carbines, rings, rope slings, cables, chains etc.) for excessive wear or damage If faults can be seen on the safety bracket of the crane hook or if it is missing completely, the scales must not be used. Work only with appropriate speed Always avoid vibrations and horizontal forces.
5.2 Loading the suspended balance For good weighing results observe the following, illustrations see next page: Only use load attachment devices which guarantee a one-spot suspension and where the scales can be suspended freely. Do not use too large load attachment devices which do not guarantee any onespot suspension. Do not use multiple suspensions. Do not pull or push the load or the loaded balance. Do not pull the hook horizontally. Loading the balance 1.
+ Always use suitable lifting tackles Only use attachment devices which guarantee a one-point suspension and where the balance can be suspended freely. Do not use too large attachment devices which cannot guarantee a one-point suspension.
Do not push or pull Do not pull the hook horizontally Do not use multiple suspensions 24 HFC-BA-e-1511
5.3 Turn on/off Start-up Press on the display unit; the unit will carry out a self-test. As soon as the weight display appears, the instrument will be ready to weigh. Press , too, on suspended balance. If „Err 10“ appears in the weight display no radio communication with the balance could be established. Either the suspended balance is not yet switched on or the rechargeable battery has not been sufficiently loaded. Use to turn on suspended balance or to load battery.
5.5 Taring Attach initial load. Press saved. , zero display appears. The weight of the container is now internally Weigh the material, the net weight will be indicated. After removing the preload weight appears as negative display. To delete the tare value, remove load from suspended balance and press 5.6 Weighing Load the suspended balance. The weight value will be displayed at once.
5.7 Switch-over weighing unit To switch over the weight value to the units enabled in the menu press the UNIT-key repeatedly (See chap. 6, “F2unt“). Example, when in the menu all units are set to “on”: Every time the UNIT-key is pressed, the next weighing unit will be displayed. kg lb N. The indicator above N shows weight in Newton. 5.8 Hold weighing value (Data-HOLD function) Once a stable weight value has been established, this can be fixed until deleted before the next weighing activity.
5.9 Peak value function This function displays the highest load value (peak value) of a weighing. Menu setting of “P4 HLdPEAK“, see chap. 6 Attention: Never exceed the maximum permitted load of the peak value on the balance (!!Danger of breaking!!). Suspend the material to be weighed To start the peak load measuring cycle, press , the heaviest load of the last weighing activity will be displayed. The indicator appears above HOLD.
Optical signal: The optical signals provide the following information: Load exceeds specified tolerance Load within specified tolerance Load below specified tolerance Setting audio signal / tolerance limits: 1. Switch-on balance and during the selftest press The first function „F0 oFF“ is displayed. 2. To confirm, press , “bk“ will be displayed. 3. Select setting for “beeP“ by 4. Confirm by . , the current settings of the audio signal will be displayed. 5.
10. Press , the display for entering the lower limit value „SETLo“ appears. 11. Confirm by 12. Use , the enabled digit flashes. and 13. Confirm input by to enter lower limit; see step 8. , “SETLo“ will be displayed. 14. Press repeatedly to exit menu. From here evaluation takes place whether the goods to be weighed are within the two tolerance limits. Start tolerance check: Tare when using a weighing container. Put on goods to be weighed, tolerance control is started.
5.11 Totalization With this function the individual weighing values are totalized into the sum memory by pressing . Start adding-up procedure: Hook-on the item to be weighed A. . Wait until the stability display “STABLE” appears, then press „n001“ followed by the weight value will be displayed. The weighing value is added into the summation memory. Remove the weighed good. More weighed goods can only be added when the display ≤ zero. Suspend the item to be weighed B.
Display total number “Total“: When zero is displayed, press and the number of added-up items, followed by the total weight will be displayed for 3 sec. Delete accumulative memory: When zero is displayed, press and the number of added-up items, followed by the total weight will be displayed for 3 sec. During this display press . The data in the summation memory are deleted, the indicator „M+“ extinguishes. 5.
5.13 Display background illumination Switch-on balance and during the selftest press Press . “F0 off“ will be displayed. , “bk“ will be displayed. Press again and the current setting for the background lighting of the display will be shown. Press to select the desired setting. bk on Continuous background lighting bk of Background illumination off bk Auto Automatic background illumination on when weighing pate is loaded or key pressed.
5.14 Automatic shutdown function The unit is automatically switched off within the preset time when the display unit or the weighing bridge are not operated. Switch-on balance and during the selftest press . “F0 off“ will be displayed. Press , “bk“ will be displayed. Press repeatedly until the automatic switch-off function shows “oFF“. Press , the current setting will be displayed. Press to select the desired setting.
6. Menu 6.1 Navigation in the menu: Call up menu Switch-on balance and during the selftest press . The first function „F0 off“ is displayed. Select menu item With help of Select setting Confirm selected menu item by pressing , the individual menu items can be selected one after the other. . The current setting will be displayed. Change settings Switch into the available settings using Confirm setting Press Exit menu / Return to weighing mode Press HFC-BA-e-1511 .
6.2 Overview: Function F0 oFF Available settings bk bk on bEEP oFF F1 H-L F2 Unt Description Background illumination on bk oF Background illumination off bk AU Background illumination switches on automatically when loaded or a button is pressed oFF ok Acoustic signal for weighing with tolerance range switched off Audio sound when load is within tolerance limits nG Audio sound when load is beyond tolerance limits 0 Autom. shutdown disabled 3/5/15/30 Autom.
AZn 0AUto 0rAnG P2 CAL SiGrA Single range scale dU rA Dual range scale off 0.5 d 2d 4d P0 P10 P20 P50 P100 P0 P2 P4 P10 P20 Automatic zero correction (auto-zero) on change of display, dESC Position of the decimal dot inC Readability (d) CAP Capacity (max) CAL Adjustment procedure see chap. 7 dESC Position of the decimal dot div 1 Readability [d] 1. Weighing range div2 Readability [d] 2. Weighing range cap 1 Balance capacity [max] 1. Weighing range cap 2 Balance capacity [max] 2.
7. Adjustment / linearization 7.1 Adjustment As the acceleration value due to gravity is not the same at every location on earth, each balance must be coordinated - in compliance with the underlying physical weighing principle - to the existing acceleration due to gravity at its place of location (only if the balance has not already been adjusted to the location in the factory).
Press to call up “P2 CAL“. Press and select the set balances type by SiGrA Single-range balance dU rA Dual range balance dU in Multi-interval balance Acknowledge by Press . . repeatedly until „CAL“ will be displayed.
How to carry out adjustment: Confirm adjustment function “Commo“ by . “ULoAd“ will be displayed. Make sure that no loads apart from the lifting tackle are attached to the hook. Wait for stability display, then press . Either use the displayed adjustment weight or change (example) by and flashing. , the currently enabled digit is To change the selected (flashing) digit, press repeatedly until the desired value is displayed. Then select further digits by and amend them by .
7.2 Linearization Linearity shows the greatest deviation of a weight display on the scale to the value of the respective test weight according to plus and minus over the entire weighing range. If linearity deviation is discovered during a monitoring of test resources, you can improve this by means of linearization. • Carrying out linearization is restricted to specialist staff possessing well acquainted with the workings of balances.
Wait for stability display „STABLE“, then press . As soon as “LoAd 3“ is displayed attach third adjustment weight (max). Wait for stability display, then press . After successful adjustment „Pass“ will be displayed. Afterwards the balance will carry out a self-test. “Err19“ will appear briefly (Ignore error message), then the balance will change automatically into weighing mode and the total weight will be displayed. Linearization has now been completed successfully.
8. Cleaning, Maintenance and Disposal Risk of injury and risk of material damage! The suspended balance is part of the lifting gear! For a safe operation please observe the following: Danger Have carried out a regular maintenance by trained specialized 8.1 staff Carry out regular maintenance and servicing, see chap. 8.3. Have the parts exchanged only by trained specialized staff. If there arose discrepancies with the safety checklist, the balance must not more be put into operation.
8.2 Regular maintenance and care The regular 3-month maintenance may only be carried out by an expert with competent knowledge of working with suspended balances. Thereby the national regulations for prevention of accidents as well as the working, operation and safety regulations of the owner-operator. To check the dimensions only use suitable test devices. The regular 12-month maintenance must only be carried out by trained specialized staff (KERN customer service).
8.3 Checklist „regular maintenance“, (see chapter 8.2) Original dimensions suspended balance (You can find these data in the documentation enclosed with the balance. Please keep this document always available. Serial no.
Clearance k Max.
9. Enclosure 9.1 Checklist „Enhanced maintenance“ (General revision) The enhanced maintenance has to be carried out by a service partner authorized by KERN. Model ……………………..……………….. Suspended balance Serial no. …………………….……………..