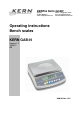
KERN & Sohn GmbH Ziegelei 1 D-72336 Balingen email: info@kern-sohn.com Phone: +49-[0]7433- 9933-0 Fax: +49-[0]7433-9933-149 Internet: www.kern-sohn.com Operating instructions Bench scales KERN GAB-N Version 1.
GB KERN GAB-N Version 1.5 10/2013 Operating Instructions Bench Scales Table of Contents 1 Technical Data ................................................................................................ 4 2 Basic Information (General) ........................................................................... 6 2.1 2.2 2.3 2.4 Proper use ................................................................................................................................... 6 Improper Use ..................
11 The menu ....................................................................................................... 32 11.1 Navigation in the menu: ............................................................................................................. 32 11.1.1 Non verifiable models ............................................................................................................ 32 11.1.2 Verifiable models ...................................................................................
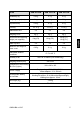
1 Technical Data KERN Readability (d) Weighing range (max) Reproducibility Linearity Stabilization time Verification value (e) Verification class Minimum weight (min) Weighing Units Recommended adjusting weight (not supplied) Warm-up time Minimum unit weight at piece count Admissible ambient conditions Humidity of air Weighing surface (mm) Dimensions of the housing (B x D x H) (mm) Electric Supply Rechargeable battery, not included Net weight (kg) interface 4 GAB 6K1DNM GAB 15K2DNM GAB 30K5DNM 1 g /2 g
KERN Readability (d) Weighing range (max) Reproducibility Linearity Stabilization time Weighing Units Recommended adjusting weight (not supplied) Warm-up time Minimum unit weight at piece count Admissible ambient conditions Humidity of air Weighing surface (mm) Dimensions of the housing (B x D x H) (mm) Electric Supply Rechargeable battery, not included Net weight (kg) interface GAB-N-BA-e-1315 GAB 6K0.05N GAB 12K0.1N GAB 30K0.2N 0.05 g 0.1 g 0.2 g 6 kg 12 kg 30 kg 0.05 g 0.1 g 0.2 g ± 0.
Dimensions: 2 Basic Information (General) 2.1 Proper use The balance you purchased is intended to determine the weighing value of material to be weighed. It is intended to be used as a “non-automatic“ balance, i.e. the material to be weighed is manually and carefully placed in the centre of the weighing plate. As soon as a stable weighing value is reached the weighing value can be read. 2.2 Improper Use Do not use balance for dynamic weighing.
2.3 Warranty Warranty claims shall be voided in case Our conditions in the operation manual are ignored The appliance is used outside the described uses The appliance is modified or opened Mechanical damage or damage by media, liquids, natural wear and tear The appliance is improperly set up or incorrectly electrically connected The measuring system is overloaded 2.
4 Transportation & Storage 4.1 Testing upon acceptance When receiving the appliance, please check packaging immediately, and the appliance itself when unpacking for possible visible damage. 4.2 Packaging / return transport Keep all parts of the original packaging for a possibly required return. Only use original packaging for returning. Prior to dispatch disconnect all cables and remove loose/mobile parts. Reattach transport securing devices. (see chapter 5.
Therefore, observe the following for the installation site: Place scales on a stable, even surface Avoid extreme heat as well as temperature fluctuation caused by installing next to a radiator or in the direct sunlight; Protect the balance against direct draughts due to open windows and doors; Avoid jarring during weighing; Protect the balance against high humidity, vapors and dust; Do not expose the device to extreme dampness for longer periods of time.
5.2 Unpacking/installation Carefully remove the balance from the packaging, remove plastic cover and setup balance at the intended workstation. Ensure that transport guard has been removed (only existing in 6 kg models) 1 To loosen the transport guard screw out transport screw [1] anticlockwise. For transportation screw down the transport screw till to the stop in clockwise direction.
Levelling Level balance with foot screws until the air bubble of the water balance is in the prescribed circle. 5.2.1 Scope of delivery / serial accessories Balance Mains power supply Operating instructions 5.3 Mains connection Power is supplied via the external mains adapter. The stated voltage value must be the same as the local voltage. Only use original KERN mains adapters. Using other makes requires consent by KERN.
5.4 Rechargeable battery operation (option) The internal battery is charged with the supplied mains cable. Before the first use, the rechargeable battery should be charged by connecting it to the mains power cable for at least 15 hours. The operating time of the battery is about. 70h. Charging time until complete recharging ca. 12h. To save battery life, the background light can be switched off in the menu (See chap.. 11 menu).
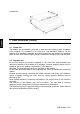
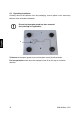
6 Appliance overview 1 2 3 4 5 6 1. Weighing plate / rechargeable battery compartment (under weighing plate) 2. Bubble level 3. RS 232 interface 4. Footscrews 5. ON/OFF switch 6.
7 Overview of displays 1 2 HI 6 OK LO GROSS NET ZERO 54 3 Display Designation Description 1 The battery capacity display Appears when the capacity of the battery is getting low 2 Stability display Scales are in a steady state Zeroing display Should the balance not display exactly zero 3 ZERO 0 despite empty scale pan, press the button. The balance will be set to zero after a short standby time.
8 Keyboard overview Button UNIT PRINT Designation Function UNIT-key Weighing units switch-over PRINT button PRINT Data transfer via interface Save value to memory if memory function “automatic“, is disabled ESC Return to weighing mode F Changes between weighing mode and quantity counting mode C Delete displayed value % Weight value displayed in % Move to the left by one decimal point Enter upper, lower or both limits Move to the right by one decimal point
9 Adjustment As the acceleration value due to gravity is not the same at every location on earth, each balance must be coordinated - in compliance with the underlying physical weighing principle - to the existing acceleration due to gravity at its place of location (only if the balance has not already been adjusted to the location in the factory). This adjustment process must be carried out for the first commissioning, after each change of location as well as in case of fluctuating environment temperature.
9.1 Verified models Switch on device via ON-OFF and press the adjustment switch at the same time. After that, during the balance’s selftest, press at the same time. „UnLoAd“ appears. Acknowledge by the weighing plate. TARE and % . Ensure that there are no objects on The currently set adjustment weight will be displayed. To change by using the navigation buttons (see operating instructions chap. 8) select the desired setting, the active digit is flashing. Acknowledge by .
9.2 Non-verifiable models: Switch on balance Whilst balance is carrying out self-test TARE % (counts down from 99… to 00…) and press at the same time. “UnLoad“ will be displayed, followed by flashing numeric value. (Example) Change by pressing the navigation keys (See manual chap. 8); select desired setting; currently enabled digit will be flashing. Confirm value by 0 (Example) , “Load“ will be displayed.
9.3 Verification General introduction: According to EU directive 90/384/EEC balances must be verified if they are used as follows (legally controlled area): a) For commercial transactions if the price of goods is determined by weighing. b) For the production of medicines in pharmacies as well as for analyses in the medical and pharmaceutical laboratory. c) For official purposes. d) For manufacturing final packages. In cases of doubt, please contact your local trade in standard.
Notes on verified balances Possible seals: B urgent, and A or C 4 C 3 1 A 1. 2. 3. 4.
9.4 Linearization (non-verified models only) Linearity shows the greatest deviation of a weight display on the scale to the value of the respective test weight according to plus and minus over the entire weighing range. If linearity deviation is discovered during a testing instrument control, you can improve this by means of linearization. Carrying out linearization is restricted to specialist staff possessing well acquainted with the workings of weighing scales.
Operation Display How to carry out linearization: Switch on the balance and during the selftest press the and the button at the same time. „LoAd 0“ followed by LoAd 1“ will be displayed. Place the second adjustment weight.
10 Operation 10.1 Weighing Turn on the scales by pressing the ON/OFF button underneath the scales on the right. The balance will carry out a self-test. The balance is ready for weighing when the weight display „0.0“ appears. GROSS ZERO When required, the scales can be reset to zero at any time using 0 . Printout example: N 0.500 kg 10.2 Weighing with tare Deposit weighing receptacles GROSS (Example) NET After successful stop check press the TARE button.
Printout example: Net weight: N 0.500 kg 10.3 Percent weighing Percent weighing allows to display weight in percent, in relation to a reference weight. Unload scales and set to zero GROSS ZERO Put a reference weight on the weighing plate, which corresponds to 100% GROSS (Example) Press % 100.00 % will appear on the display GROSS Remove the reference weight The display will return to 0.
10.4 Parts counting Before the balance can count parts, it must know the average part weight (i.e. reference). Proceed by putting on a certain number of the parts to be counted. The balance determines the total weight and divides it by the number of parts (the socalled reference quantity). Counting is then carried out on the basis of the calculated average piece weight. The higher the reference quantity the higher the counting exactness.
Printout example: Parts counting: G. 0.500 kg Reference weight 50 g/pcs Average parts weight 10 pcs Number of parts 10.5 Weighing with tolerance range You can set an upper or lower limit when weighing with tolerance range and thus ensure that the weighed load remains exactly within the set limits. Exceeding or dropping below the tolerance range is indicated by an audio sound or optical signal. Audio signal: The audio sound depends on the setting in menu block “BEEP“ (See chap. 11 menu).
Settings: Unload scales and set to zero GROSS ZERO HI GROSS TOL Press The left digit will be flashing and icon HI will be displayed ZERO HI GROSS ZERO Enter upper limit by pressing TOL TARE and . (Example) 0 GROSS LO ZERO Confirm upper limit by pressing . The weighing scales will change to the prompt for entering the lower limit. Enter lower limit by pressing (Example) TOL Confirm lower limit by pressing and 0 TARE . .
10.6 Manual totalizing This function is used to add the individual weighing values to the summation memory and, if a printer is connected to provide a printout when the stability display appear PRINT and the key pressed. (For details how to set this function see chap. 11 menu “ACC on”) ESC (Example) Place load A Wait until stability display Press ACC 1 followed by the weighing value will appear and the weighing value will be saved to the summation memory and possibly printed.
Display of the saved weighing data: PRINT With the weighing platform unloaded, press and the number of weighing processes, followed by the total weight will be displayed for 2 sec and afterwards printed. ESC Delete weighing data: PRINT With the weighing platform unloaded, press followed by The data in the summation memory are deleted. ESC F C . Printout example: 1st weighing: No. G C 1 0.200 kg 0.200 kg 2. Weighing No. G C 2 0.050 kg 0.250 kg 3. Weighing No. G C 3 2.000 kg 2.
10.7 Automatic adding-up This function is used to automatically add individual weighing values to the summation memory and to receive a printout from a possibly connected optional printer. For details on how to set this function see chap. 11 menu: „ACC on“) Place load A After stabilisation control has taken place, you will hear an audio sound. The weighing value will be saved to the summation memory.
Display of the saved weighing data: PRINT With the weighing platform unloaded, press and the number of weighing processes, followed by the total weight will be displayed for 2 sec and afterwards printed. ESC Delete weighing data: PRINT With the weighing platform unloaded, press followed by The data in the summation memory are deleted. ESC F C . Printout example: 1. Weighing : No. G C 1 0.200 kg 0.200 kg 2. Weighing No. G C 2 0.050 kg 0.250 kg 3. Weighing No. G C 3 2.000 kg 2.
11 The menu 11.1 Navigation in the menu: 11.1.1 Non verifiable models Call up menu F PRINT In weighing mode press C and at the same time The first menu item InC 5 will be displayed ESC Select menu block With help of , the individual menu items can be selected one after the other. Change settings Switch into the available settings using Acknowledge setting / exit the menu Either save by pressing Return to weighing mode Press TOL F C 0 TARE . or cancel by pressing PRINT ESC .
11.2 Overview: 11.2.1 Non verifiable models Menu block Main menu Menu item Submenu InC 5* InC5… InC 10… InC 20… Available settings / explanation not documented InC 50. EL Au….
bEEP1* Audio signal SPd 15* Display speed 0 1 2 No audio sound during tolerance weighing Audio sound when weight is within tolerance range Audio sound when weight is beyond tolerance range SPd 15 SPd 30 SPd 60 not documented oF 0* Auto off Auto off after 0, 3, 5, 15, or 30 minutes return* Return to weighing mode * default setting 34 GAB-N-BA-e-1315
11.2.
12 Data output 12.1 RS232 interface The RS 232 interface allows a bi-directional data exchange from the balance to external devices. This data exchange is asynchronous using ASCII - Code. 12.1.1 Technical data ASCII code 8 data bits Baud rate selectable at 600, 1200, 2400, 4800, 9600 bps Miniature plug-in necessary (9 pole D-Sub) No parity For operation with interface faultless operation is only ensured with the correct KERN – interface cable (max. 2m) 12.1.
12.1.3 Explanation of the data transfer Example: Header1 , Header2 Header 1 Header 2 space W1-W7 Unit Terminator , -/space W1 W2 W3 W4 W5 W6 W7 , unit terminator 2 byte, St or US, ST=weighing value stable, US=weighing value instable 2 byte, G or N, G=gross weight, N= net weight Blank Weight value with decimal position 2 byte, kg or lb (CR=Carriage return) (LF= Line Feed) 12.
13 Service, maintenance, disposal 13.1 Cleaning Before cleaning, disconnect the appliance from the operating voltage. Please do not use aggressive cleaning agents (solvents or similar agents), but a cloth dampened with mild soap suds. Take care that the device is not penetrated by fluids and polish it with a dry soft cloth. Loose residue sample/powder can be removed carefully with a brush or manual vacuum cleaner. Spilled weighing goods must be removed immediately. 13.
13.4 Error messages Error message Description Zeroing range exceeded due to switching-on balance or pressing 4% max) 0 (normally Possible causes Object on the weighing plate Overload when zeroing Improper adjustment Damaged weighing cell Damaged electronics Keyboard error Improper operation of the balance Value outside the A/D changer range Damaged weighing cell Damaged electronics Should other error messages occur, switch balance off and then on again.
14 Instant help In case of an error in the program process, briefly turn off the balance and disconnect from power supply. The weighing process must then be restarted from the beginning. Help: Fault Possible cause The displayed weight does not glow. The balance is not switched on. The displayed weight is permanently changing Draught/air movement Mains power supply interrupted (mains cable defective). Power supply interrupted.
15 Declaration of -Conformity KERN & Sohn GmbH D-72322 Balingen-Frommern Postfach 4052 E-Mail: info@kern-sohn.de Tel: 0049-[0]7433- 9933-0 Fax: 0049-[0]7433-9933-149 Internet: www.kern-sohn.