KERN & Sohn GmbH Ziegelei 1 D-72336 Balingen E-Mail: info@kern-sohn.com Tel: +49-[0]7433- 9933-0 Fax: +49-[0]7433-9933-149 Internet: www.kern-sohn.com Operating instruction Compact balance KERN FOB Version 1.
GB KERN FOB Version 1.8 01/2011 Operation instruction Compact balance Tabel of contents: 1 Technical data ................................................................................................ 4 1.1 1.2 Verifiable models...................................................................................................................... 4 Non verifiable models ..............................................................................................................
6 Operation...................................................................................................... 17 6.1 6.1.1 6.1.2 6.2 Overview of display................................................................................................................ 17 Verifiable models ...................................................................................................................... 17 Non-verifiable models............................................................................
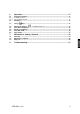
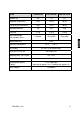
1 1.1 Technical data Verifiable models KERN FOB 1K1M FOB 2K2M FOB 5K5M Readout (d) 1g 2g 5g Weighing range 1kg 2 kg 5 kg Taring range (subtractive) 1kg 2 kg 5 kg 1000g (M1) 2000 g (M3) 5000 g (M3) Adjustmentweight (not included) (class) Stabilization time Operating temperature Air humidity Case (W x D x H) mm Weighing plate (W x D)mm Weight kg (net) Rechargeable battery (Option) Mains adapter 4 2 sec. 0° C .... + 40° C 25 - 95 % (non-condensing) 175 x 235 x 60 175 x 160 1,95 7.
KERN FOB 6K2LM FOB 15K5LM FOB 30K10LM Readout (d) 2g 1g 2g Weighing range (Max) 6 kg 15 kg 30 kg Taring range (subtractive) 6 kg 15 kg 30 kg Reproduzierbarkeit 2g 5g 10 g ±4g ± 10 g ± 20 g 5 kg (M3) 10 kg (M3) 20 kg (M3) Linearität Adjustmentweight (not included) (class) Stabilization time Operating temperature Air humidity Case (W x D x H) mm Weighing plate (W x D)mm Weight kg (net) Rechargeable battery (Option) Mains adapter FOB-BA-e-1118 2 sec. -10° C ....
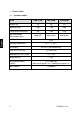
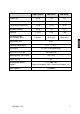
1.2 Non verifiable models KERN FOB 1.5K0.5 FOB 3K1 FOB 6K2 Readout (d) 0,5 g 1g 2g Weighing range 1,5 kg 3 kg 6 kg Taring range (subtractive) 1,5 kg 3 kg 6 kg Reproducibility 0,5 g 1g 2g Linearity ±1g ±2g ±4g 1000 g (M2) 2.000 g (M3) 5.000 g (M2) Adjustmentweight (not included) (class) Stabilization time Operating temperature Air humidity Case (W x D x H) mm Weighing plate (W x D)mm Weight kg (net) Rechargeable battery (Option) Mains adapter 6 2 sec. 0° C ....
KERN FOB 7.5K0.5L FOB 15K1L FOB 30K2L Readout (d) 0,5 g 1g 2g Weighing range 7,5 kg 15 kg 30 kg Taring range (subtractive) 7,5 kg 15 kg 30 kg Reproduzierbarkeit 0,5 g 1g 2g ± 1,5 g ±3g ±6g 5 kg (M1) 10 kg (M1) 20 kg (M1) Linearität Adjustmentweight (not included) (class) Stabilization time Operating temperature Air humidity Case (W x D x H) mm Weighing plate (W x D)mm Weight kg (net) Rechargeable battery (Option) Mains adapter FOB-BA-e-1118 2 sec. 0° C ....
2 2.1 Fundamental information (general) Intended use The balance you have acquired serves to determine the weighing value of the material to be weighed. It is intended to be used as a “non-automatic“ balance, i.e. the material to be weighed is manually and carefully placed in the centre of the weighing plate. The weighing value can be read off after a stable weighing value has been obtained. 2.2 Inappropriate use Do not use the balance for dynamic weighing.
2.4 Monitoring the test substances The metrology features of the balance and any possible available adjusting weight must be checked at regular intervals within the scope of quality assurance. For this purpose, the answerable user must define a suitable interval as well as the nature and scope of this check. Information is available on KERN’s home page (www.kernsohn.com) with regard to the monitoring of balance test substances and the test weights required for this.
5 Unpacking, installation and commissioning 5.1 Place of installation, place of use The balance is constructed in such a way that reliable weighing results can be achieved under normal application conditions. By selecting the correct location for your balance, you will be able to work quickly and precisely.
5.2 Installation Use the foot screws to level the balance until the air bubble in the bubble level is in the prescribed circle. Notice : With non-verifiable models the air bubble is below the weighing plate. 5.2.1 List of items supplied Standard accessories: - Balance Weighing pan Mains adapter (15V/500mA, inside negative, outside positive pol) Operating instructions 5.3 Mains supply Electric power supply is by means of the external mains supply circuit.
5.6 Adjustment As the acceleration value due to gravity is not the same at every location on earth, each balance must be coordinated – in compliance with the underlying physical weighing principle - to the existing acceleration due to gravity at its place of location ( only if the balance has not already been adjusted to the location in the factory). This adjustment process must be carried out during the initial start-up, after change in location and variation of surrounding temperature.
5.7.3 Non-verifiable Models FOB 1.5K0.5, FOB 3K1, FOB 6K2, FOB 7.5K0.5L, FOB 15K1L, FOB 30K2L Ö Turn balance off and hold erate the key, test procedure appears on the display, op- -key 3x times during this test procedure. Ö Now let go of both keys. In the display appears “CAL”. Press key play appears “Load”. in dis- Ö Place the tare weight (nominal value, see “Techn. Specifications“ chapter 1) in the centre of the weighing pan, then press the key . “CAL” will appear on the display for approx.
Overview of the possible software settings: (there may be small differences referring to the model): Navigation Menu NET GROSS Press TARE 3sec 0 SET Overload setting by hardware option A_OFF divS CAP GrAv trAn trAtE trAd End On 2400 md-1 On 1g 5g 1.0 180 0.005 0.5g 1g 0.002 3.0 5.0 120 md-2 1.5 2.0 10.0 19200 0.2g 1g 2g 0.01 9600 Off 0.5g 2g 4800 Off 6.0 15.0 240 300 Off If the TRAD setting is OFF, this must be set to ON before a verification.
5.7.5 Position adjust switch Adjust switch at the lower surface (depending on the model, on the right or the left side) 5.
5.8.1 Position of the „security marks“ The adjustment switch is inside the balance. After the verification process the balance is sealed on the marked positions. The verification of the balance is not valid without the security mark. Position of the „security marks“: Security marks (depending on the model) Balances that are subject to compulsory verification must be taken out of operation if: The weighing result of the balance is outside the error limit. Therefore, apply a known test weight (approx.
6 Operation 6.1 Overview of display 6.1.1 Verifiable models FOB 1K1M, FOB 2K2M, FOB 5K5M: FOB 6K2LM; FOB 15K5LM; FOB 30K10LM: 6.1.2 Non-verifiable models FOB 1.5K0.5, FOB 3K1, FOB 6K2: FOB 7.5K0.
6.2 Weighing Switch the balance on by pressing the key. The balance will show “88888“ for approx. 3 seconds and then change to “0“. Now it is ready for use. Important: If the display does not show “0“ press the (details in capture 7.2.2 or 7.2.3). or key Only now (!) place object on the weighing pan. Make sure that the weighing object does not stripe or touch the housing or base. Now the weight will be indicated.
6.5 Plus/minus weighings For example in order to check a single weight or for production control, etc. Switch the balance on using the key and wait until “0” appears on the display. Place the target weight on the weighing plate and tare to “0” using the key. Remove the target weight. Place the test samples on the weighing plate in succession. The respective target weight deviation is displayed as ”+“(*) and ”-“ . (A preceding sign does not appear in the case of a ”+“ reading).
7 Maintenance, upkeep, disposal 7.1 Cleaning Please disconnect the device from the operating voltage before cleaning. Only use a cloth dampened with mild suds and not aggressive cleaning agents (solvents or similar). Please ensure that fluids are not able to get into the device and rub off using a clean, soft cloth. Loose sample residue/powder can be removed carefully using a brush or hand vacuum cleaner. Remove any spilt material to be weighed immediately. 7.
8 Troubleshooting The balance should be switched off for a short time following an interruption in the programme sequence and disconnected from the mains supply. It is then necessary to repeat the weighing process from the beginning. Help: Interruption Possible cause Weight display is not illuminated. • The balance is not switched on. • The mains supply connection has been interrupted (mains cable not plugged in/faulty). • Power supply interrupted. • The recharchable battery pack is empty.