KERN & Sohn GmbH Ziegelei 1 D-72336 Balingen E-Mail: info@kern-sohn.com Tel: +49-[0]7433- 9933-0 Fax: +49-[0]7433-9933-149 Internet: www.kern-sohn.com Operating instructions Inventory balance KERN FKA Version 1.
GB KERN FKA Version 1.4 11/2014 Operating Instructions Inventory balance Table of contents 1 2 Technical Data ........................................................................................................... 4 Basic Information (General) ..................................................................................... 5 2.1 2.2 2.3 2.4 Proper use ..............................................................................................................................................
7 Data output RS 232 C.............................................................................................. 41 7.1 7.1.1 7.1.2 Interface RS 232C ................................................................................................................................ 41 There are 4 kinds of data output via RS 232C....................................................................................... 42 Explanation of the data transfer .......................................................
1 Technical Data KERN FKA 30K-4 FKA 60K-4 0,1 g 0,2 g Weighing range (max) 36.000 g 65.000 g Taring range (subtractive) 36.000 g 65.000 g Reproducibility 0,2 g 0,4 g Linearity ±0,5 g ±1 g Smallest piece weight 0,1 g 0,2 g 10 / 20 / 30 kg 20 / 50 / 60 kg 20 + 10 kg 50 kg Readability (d) Adjustment points Recommended adjusting weight F1 (not supplied) Humidity of air Stabilization time (typical) Allowable ambient temperature Warm-up time Housing (B x D x H) mm Vibration filter 3 sec.
2 Basic Information (General) It is absolutely necessary that you read and understand the operating instructions prior to installation and commissioning and follow the instructions during the process! 2.1 Proper use The balance you purchased is intended to determine the weighing value of material to be weighed. It is intended to be used as a “non-automatic“ balance, i.e. the material to be weighed is manually and carefully placed in the centre of the weighing plate.
3 Basic Safety Precautions 3.1 Pay attention to the instructions in the Operation Manual Carefully read this operation manual before setup and commissioning, even if you are already familiar with KERN balances. Versions in other languages are non-binding translations. The only binding version is the original document in German. 3.2 Personnel training The appliance may only be operated and maintained by trained personnel. 4 Transportation & Storage 4.
Therefore, observe the following for the installation site: Place the balance on a firm, level surface; Avoid extreme heat as well as temperature fluctuation caused by installing next to a radiator or in the direct sunlight; Protect the balance against direct draughts due to open windows and doors; Avoid jarring during weighing; Protect the balance against high humidity, vapors and dust; Do not expose the device to extreme dampness for longer periods of time.
5.5 Connection of peripheral devices Before connecting or disconnecting of additional devices (printer, PC) to the data interface, always disconnect the balance from the power supply. With your balance, only use accessories and peripheral devices by KERN, as they are ideally tuned to your balance. 5.6 Initial Commissioning A warming up time of 2 hours after switching on stabilizes the measuring values. The accuracy of the balance depends on the local acceleration of gravity.
6 Operation 6.1 Starting the scales and switching on the screen Starting balance by touch screen Welcome display: The welcome display appears after touching the touch display and the start up of the scales. The location and operator must be specified in order to start the stocktaking. Please press the inverted buttons.
6.
FKA-BA-e-1414 11
FKA-BA-e-1414
FKA-BA-e-1414 13
FKA-BA-e-1414
FKA-BA-e-1414 15
FKA-BA-e-1414
6.2.
Content of possible variables 18 FKA-BA-e-1414
Design of the print form FKA-BA-e-1414 19
6.3 Operator/location selection Select operator: Press the Operator button to access the selection fields for authorised operators. Select the current operator. If no operators are available, they must be re-entered via MENU / CONFIGURATION / MEMORY / OPERATOR / DESIGNATION (G9). In the second information line appears now the selected operator (see arrow). Now press the Location key. Select location: Press to select the correct stock-taking location from the selection fields displayed.
6.4 Starting the stock-tacking The selected storage location (see arrow) will now be displayed on the first information line. Please press the STRT/TAKE button to start the stock-taking. If any inventory data from the previous stock-taking is still available, it can be deleted or retained. Please select accordingly.
Press the start button to trigger this screen asking you to select an article. The article selection can be made via SEARCH-CODE SEARCH-NAME AUTO-LIST or SCAN function may be carried out 6.5 Article selection – Inventory calculation and saving Input via keyboard: If selected via „SRCH-NAME“, this keyboard input field will appear. Enter the article designation to enable direct selection via selection fields. Now press Return. If selected via „SRCH-CODE“, this keyboard input field will appear.
The screen with the selection fields will now be displayed. Now select the required article by clicking on the respective field. Confirm the article to internally accept the saved value for the tare allowance for the storage box and also the article reference value. The selected article will be displayed with number and designation. Now the storage box with the selected articles contained therein can be placed on the scales. The quantity of the articles in stock will now be displayed directly.
If the tare weight of the box on the scales differs from the tare weight of the archived value, the tare value can be corrected by pressing the “CHG./TARE” button. Press the “Set tare” button to accept the tare weight after placing the empty box on the scales. Press the “Manual Tare” input button to enter the actual tare value directly. The quantity will also correct itself as soon as the tare weight of the new box has been entered. Press the OK/TAKE button to accept and save the calculated quantity.
6.6 Inventory deletion / Article repeat / Inventory list If the last item of stocktaking shall be deleted or the same article of an other storage box shall be taken over, then press the „CLR/BACK“ button. Proceed as follows if an overview of the last article inventories is displayed Press the “Register/Delete” button to delete the last recorded article (top line) . Press the “Last article” button if another storage box with the same articles is to be placed on the scales. 6.
The first listed article will be displayed on the second information line (Article number + Article name). Press the BACK/ARTK button to go back one item, and use the NEXT/ARTK button to scroll forwards through the complete list. Now place the storage box with the selected articles on the scales and press the OK/TAKE button to accept the calculated quantity. Accepting the previous article inventory will cause the next article to be specified for stock-taking.
6.8 Scanner selection Press the Menu button to select the scanner from the basic screen (STOP/TAKE). Then press the “Communication” button Press the Scanner button to select the correct scanner type and confirm by pressing Enter.
Hand scanner Honeywell Desk scanner Datalogic Radio scanner Datalogic 28 FKA-BA-e-1414
6.9 Automatic registration activation: Press the “MENU” button to specify automatic registration on the basic screen. If the automatic registration shall be activated, press the „Configuration“ button. Now press the „Setting control mode“ button. Press the “REGISTER: MAN/AUTO” button and confirm by pressing Enter.
6.10 Operator and location input Operator input: Press the „MENU“ button from the basic screen (STOP/TAKE) Now press the „CONFIGURATION“ button. Now press the „Memory“ button.
The authorised users can be called up and changed using the user number. To enter a new operator, overwrite no longer required users or call up empty designation fields by pressing. Then activate the required user. Enter the name via the input keyboard field. Save the correct name via the Enter button.
Area input: Press the “Location” button to enter a new area. The areas can be called up and changed using the location numbers. To enter a new area, overwrite no longer required areas or call up empty designation fields by pressing. Name and enter the area via the input keyboard field. Press Enter to save the correct area.
6.11 Activation / Deactivation of zero passing Press the “MENU” button on the basic screen. After that press the „Weighing technology“ button. Now press the Zero passing button to make the selection. After that save with the enter button.
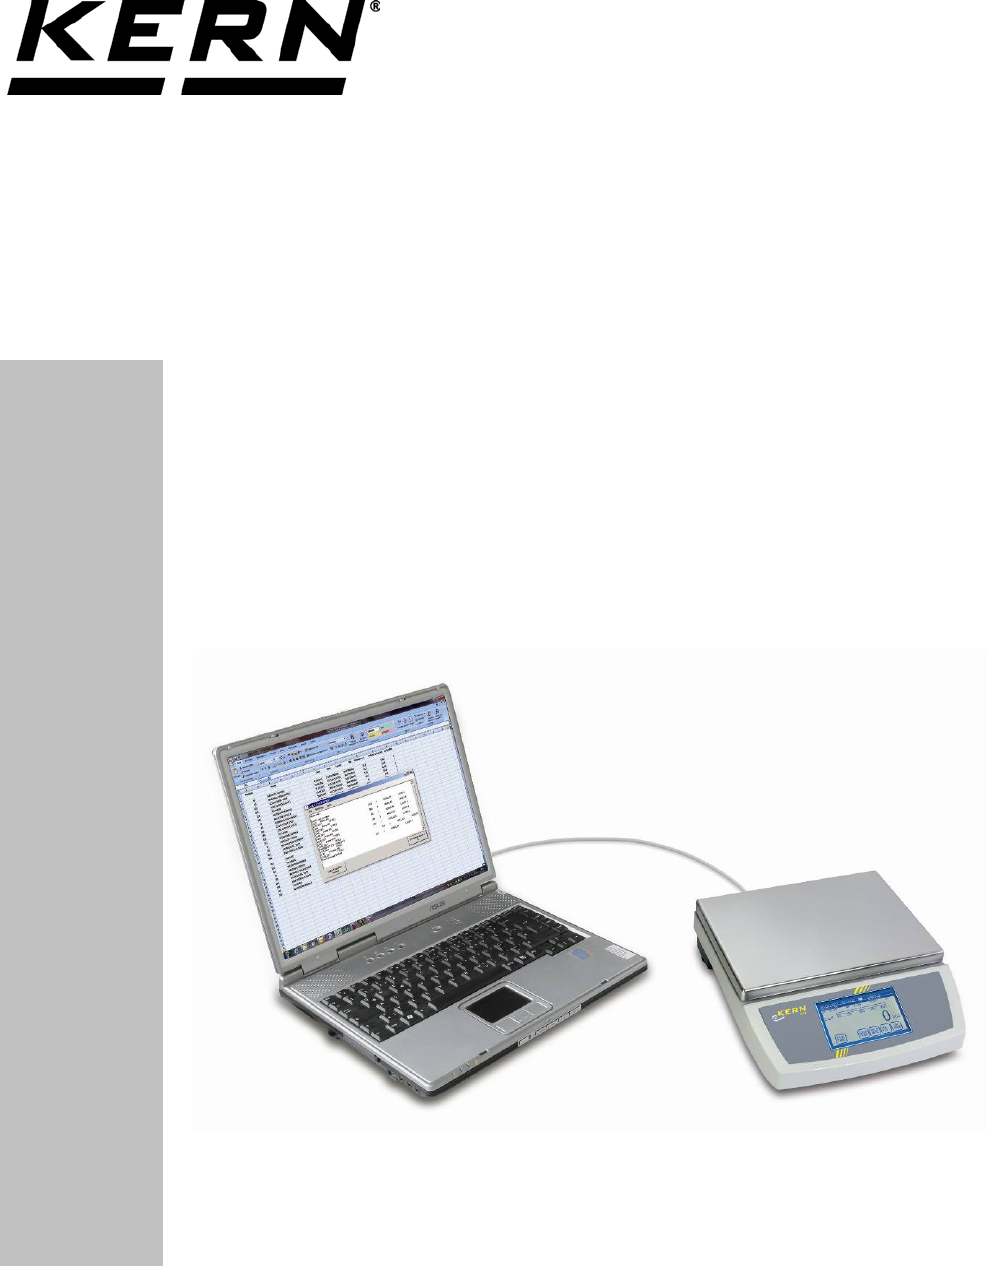
6.12 Data Transfer PC-FKA, FKA-PC at inventory / article counting: INSTALLATION Scales set-up Bring back balance into the basic screen (STOP/TAKE). Connect the PC to the balance via the RS 232 interface.
APPLICATION SET-UP Requirements: • Windows XP or higher • Microsoft Office 2003 or higher • .Net Framework 2.0 or higher 1. Select the menu item settings 2. Select the Com Port to which your scales are connected 3.
DATA UPLOAD 1. Ensure that the scales are in Weigh mode 2.
3. Press the “Upload from PC > balance” button to upload the file Information: The same file will always be uploaded when clicking on the button until a new file is selected.
DATA DOWNLOAD 1. Ensure that the scales are in Weigh mode 2. Press the “Download balance PC” button 3.
4.
6.
7 Data output RS 232 C Technical data: 8-bit ASCII Code 1 start bit, 8 data bits, 1 stop bit, no parity bit Baud rate selectable from 2400, 4800, 9600 Baud (factory setting) and 19200 Baud. Sub-D plug 9-channel required For operation with interface faultless operation is only ensured with the correct KERN – interface cable (max. 2m) Pin allocation of the balance output socket (front view) Sub-D jack 9-channel 5 1 9 6 Pin 2: Transmit data Pin 3: Receive data Pin 5: Signal ground 7.
7.1.1 There are 4 kinds of data output via RS 232C Data output using the PRINT key The printing process can be triggered by pressing the PRINT key. The settings AUTOPRINT and AUTOPRINT should be disabled for this process. AUTOPRINT (data output according to weight application) The setting AUTOPRINT is located on the PRINTER path where you can turn it on or off.
7.1.2 Explanation of the data transfer Each data transfer is structured as follows: Bit.Nr. 1 N 2 3 N N 4 N 5 N 6 B 7 B 8 B 9 10 11 12 13 14 15 16 17 18 19 20 B B B B B B B B 0 • 0 0 Bit.Nr. 21 22 23 24 25 26 E E E E CR LF N B*: . B, 0, , g: E CR: LF: = = = = = = Numerator Blank or for autotare on in zero range. Blank or weighing value giving unit according to loading of the balance Unit Carriage Return Line Feed 8 Service, maintenance, disposal 8.
9 Instant help In case of an error in the program process, briefly turn off the balance and disconnect from power supply. The weighing process must then be restarted from the beginning. Help: Fault Possible cause The displayed weight does not glow. • The balance is not switched on. • The mains supply connection has been interrupted (mains cable not plugged in/faulty). • Power supply interrupted.
10 Declaration of conformity KERN & Sohn GmbH D-72322 Balingen-Frommern Postfach 4052 E-Mail: info@kern-sohn.de Tel: 0049-[0]7433- 9933-0 Fax: 0049-[0]7433-9933-149 Internet: www.kern-sohn.