Kerio Operator Step-by-Step Kerio Technologies
2011 Kerio Technologies s.r.o. All rights reserved. This guide provides detailed description on Kerio Operator, version 1.0. All additional modifications and updates reserved. For current versions of the product and related manuals, check http://www.kerio.com/operator/download/. Information regarding registered trademarks and trademarks are provided in the appendix A.
Contents 1 Introduction . . . . . . . . . . . . . . . . . . . . . . . . . . . . . . . . . . . . . . . . . . . . . . . . . . . . . . . . . . . . . . . . . . . 4 1.1 Before we start . . . . . . . . . . . . . . . . . . . . . . . . . . . . . . . . . . . . . . . . . . . . . . . . . . . . . . . . . . . 5 2 Installation . . . . . . . . . . . . . . . . . . . . . . . . . . . . . . . . . . . . . . . . . . . . . . . . . . . . . . . . . . . . . . . . . . . . . 3 Server configuration . . . . . . . . . . . . . . .
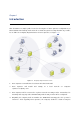
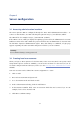
Chapter 1 Introduction This document is a simple guide focused on description of Kerio Operator configuration, its first installation and startup in the network. To make the guide as comprehensible as possible, let us define an exemplary implementation of Kerio Operator (see figure 1.1): Figure 1.1 Exemplary implementation scheme 1. Kerio Operator is installed in a local network behind a firewall. 2. Kerio Operator will install operator.company.com. 3.
1.1 Before we start range of numbers with one valid digit 555 0120 — 555 0129 from a different provider. The original number will not be canceled because the customers are accustomed to it. The dial plan can be created by mapping the original number 555 0100 to the operator (company receptionist) together with one of the numbers from the new range (for example 555 0120). The operator will transfer calls to the internal phone network manually.
Introduction • Your provider needs to give you an IP address or name and port (usually 5060) of a SIP server for Kerio Operator to connect to. • Get an authentication name and password for the SIP server from the provider. Many providers use a phone number as the authentication name. • Ask your provider whether Kerio Operator needs to register to a registrar or proxy server before the first connection to a SIP server. The registration is usually required for accounts with one number.
Chapter 2 Installation Kerio Operator is available as an ISO image of the installation disk. You can burn the installation disk and install it on a computer with the following minimum requirements: • CPU Celeron 1 GHz, • 512 MB RAM, • 8 GB free disk space, • Ethernet card. No operating system is required to be installed on the computer. Any existing operating system will be removed during the Kerio Operator installation.
Chapter 3 Server configuration 3.1 Accessing administration interface The Kerio Operator PBX is configured through the Kerio Web Administration interface. To connect to this interface, use URL following this pattern: https://IP.address/admin. The URL will be for example: https://192.168.10.1/admin. If the URL is correct, a dialog is displayed requiring a password for the administrator’s account (Admin account).
3.3 Setting hardware phone provisioning 3.3 Setting hardware phone provisioning New hardware phones, which Kerio Operator can configure automatically, were bought for the new phone network. Kerio Operator in its current version supports the following phones: • Cisco 7940 and 7960 with the SIP firmware in version 3 and higher, • Linksys SPA942, SPA962, SPA922, SPA901, PAP2T with firmware in version 5 and higher. • Snom 300, 360, 820, m3 and MeetingPoint.
Server configuration 4. Enter a prefix for outgoing calls. The prefix tells Kerio Operator to which interface the call should be directed. For example, set number 5 as the prefix. 5. In the next dialog window, enter the address and port of the branch server in the Hostname or IP address and Port fields. For detailed information on setting an interface between a head office and a branch, refer to the appropriate chapter in manual Kerio Operator, Administrator’s Guide.
3.4 Dial out setting We will configure the newly purchased SIP trunk with the following steps: 1. In the administration interface, stay in section Configuration → Call Routing and click on Add a SIP interface.... 2. In the Add SIP interface dialog, enter the name for the interface (for example provider2). The name cannot contain spaces, national and special characters and must be unique. 3. Select the New provider option and enter the range of numbers assigned by the provider.
Server configuration Rules for routing outgoing calls are also displayed in section Configuration → Call Routing. For detailed information on setting an interface for incoming and outgoing calls, refer to the appropriate chapter in manual Kerio Operator, Administrator’s Guide. Route backup Now we create a simple backup. If one of the providers is unavailable, the backup enables outgoing calls via the other provider. 1. In the administration interface, go to section Configuration → Call Routing. 2.
3.6 Creating conference call 3.6 Creating conference call Conference call (a concurrent call of more than two users) is created in section Configuration → Conferences: 1. Click on Add and enter a conference name in the dialog. 2. In the Conference extension field, enter an extension which is not used by any other user. 3. Limit the number of participants to 4 (we recommend to limit the conferences if the CPU utilization on your server is high). 4. Set a PIN number as a protection against tapping.
Server configuration Key Action Announcement 1 Dial extension number 11 2 Dial extension number 12 3 Dial extension number 13 4 Dial extension number 10 Table 3.2 Auto attendant script example For detailed guidelines for setting Kerio Operator, Administrator’s Guide.
Chapter 4 Client configuration 4.1 Connection to Kerio MyPhone Kerio MyPhone is a web interface which allows you to change settings of your phone account in Kerio Operator from any place using a web browser. You can control your voicemail and the Find me function. Login to Kerio MyPhone as follows: To access the HTTP service using a web browser, insert the IP address (or the name if it is contained in DNS) of the computer where Kerio MyPhone is running.
5. Enter the DNS name or IP address of Kerio Operator in the Domain or Registrator field. 6. If the configuration contains the Authentication name field, enter the username of the account in Kerio Operator. For detailed information on software phone configuration, refer to Kerio Operator, User’s Guide The manual contains specific examples of configuration of X-Lite, Ekiga and SJphone phones.
Appendix A Legal Notices Cisco and Linksys are registered trademarks of Cisco Systems, Inc. snom is registered trademark of snom technology AG.