
User`s guide


4
Chapter 1
Introduction
This document is a simple guide focused on description of Kerio Connect configuration applied
immediately upon its first installation and startup in the network. To make the guide as
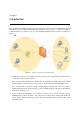
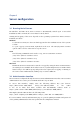
comprehensible as possible, let us see an exemplary implementation of Kerio Connect (see
figure 1.1):
Figure 1.1 Example of Kerio Connect implementation
1. Install Kerio Connect on a separate server (no other services will be run on it) and run it in
a local firewall-protected network.
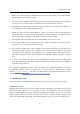
2. Kerio Connect will be connected to the Internet via a leased line. Email will be received and
sent vie SMTP. For this reason, it is necessary to enable antivirus and antispam control.
3. Kerio Connect will be used for a single domain called company.com. The server will be
installed and run in the local network, on a host with IP address 192.168.1.10 and DNS
name mail.company.com.
4. In the internal user database, there will be created only one local account used for
administration of Kerio Connect. Any other user accounts will be mapped from the Mi-
crosoft Active Directory directory service (the same method can be used for the Apple
Open Directory).