
Operator Manual User Manual
3-8 BIT 4886 120413
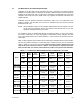
19.Set the BOP to maximum positive output current by sending CAL:CURR MAX. Measure the
voltage across the sense resistor using a Digital Voltmeter of at least 7 digits in accuracy.
Verify the DVM reads the voltage specified in Table 3-2 for MAIN CURRENT NOMINAL. The
voltage shown on the DVM should be positive; if not, reverse the leads to the DVM.
20.Decrease the voltage across the sense resistor by sending CAL:DPOT -1 commands until
the voltmeter reads less than the value specified in Table 3-2 for MAIN CURRENT NOMI-
NAL. Then send CAL:DPOT 1 and verify the voltage is slightly above the specified voltage.
21.Send the command CAL:DATA -10 to decrease the voltage across the sense resistor until
the voltage is less than the value specified in Table 3-2 for HIGH CURRENT ACCURACY
MAX. Send the command CAL:DATA 1 to increase the voltage or CAL:DATA -1 to
decrease the voltage until the DVM reads the voltage specified in Table 3-2 for HIGH CUR-
RENT ACCURACY MAX.
22.Set the BOP to maximum negative output by sending CAL:CURR MIN. Continue to measure
the voltage across the sense resistor.
23.If the voltage across the sense resistor is less negative than the value specified in Table 3-2
for HIGH CURRENT ACCURACY MIN, send CAL:DATA -100 and verify the output is now
more negative. If the value is not more negative than the value found in Table 3-2 for HIGH
CURRENT ACCURACY MIN, send CAL:DPOT -1 to change the course adjustment and
provide a more negative output.
Send the command CAL:DATA 10 to increase the voltage across the sense resistor. Con-
tinue to send CAL:DATA 10 until the voltage is less than the value specified in Table 3-2 for
HIGH CURRENT ACCURACY MIN. Send CAL:DATA -1 until the DVM reads the voltage
specified in Table 3-2 for HIGH CURRENT ACCURACY MIN.
If the CAL:DPOT command was used to adjust the negative output, send CAL:CURR MAX to
the unit and repeat step 21 before proceeding to step 24.
24.Set BOP to the maximum current at low range (1/4 Scale) by sending CAL:LCURR MAX. Ver-
ify the DVM reads the voltage specified in Table 3-2 for LOW CURRENT NOMINAL.
25.Decrease the voltage across the sense resistor by sending CAL:DPOT -1 commands until
the voltmeter reads less than the value specified in Table 3-2 for LOW CURRENT NOMI-
NAL. Then send CAL:DPOT 1 and verify the voltage is slightly above this value.
26.Send the command CAL:DATA -10 to decrease the voltage across the sense resistor until
the voltage is less than the value specified in Table 3-2 for LOW RANGE ACCURACY MAX.
If necessary, send the command CAL:DATA 1 to increase the voltage across the sense
resistor or CAL:DATA -1 to decrease the voltage across the sense resistor until the DVM
reads the voltage specified in Table 3-2 for LOW RANGE ACCURACY MAX.
27.Set the BOP to maximum negative 1/4 scale range output current by sending CAL:LCURR
MIN. Continue to measure the voltage across the sense resistor.
28.If the voltage across the sense resistor is less negative than the value specified in Table 3-2
for LOW RANGE ACCURACY MIN, send CAL:DATA -100 and verify the output is now
more negative. If the value is not more negative, Send CAL:DPOT -1 to change the course
adjustment and provide a more negative output.
Send the command CAL:DATA 10 to increase the voltage across the sense resistor. Con-
tinue to send CAL:DATA 10 until the voltage is less than the value specified in Table 3-2 for
LOW RANGE ACCURACY MIN. Send CAL:DATA -1 until the reading is within the limits
specified in Table 3-2 for LOW RANGE ACCURACY MIN.