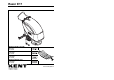
Razor E17 INSTRUCTIONS FOR USE KENT model: 908 7113 020 INSTRUCTIONS D’UTILISATION Modèle KENT: 908 7113 020 INSTRUCCIONES DE USO Modelo KENT: 908 7113 020 INSTRUÇÕES DE USO Modelo KENT: 908 7113 020 909 6311 000(1)2006-01
B D 1 3 2 S311244 S311246 C E 2 6 4 3 19 26 1 25 2 17 6 3 21 5 16 9 12 1 7 27 18 6 1 5a 5b 24 S311226 22 F 12 23 10 9 4 8 7 15 20 7 11 13 14 15 9 10 13 23a 14 23b S311245 909 6311 000(1)2006-01 S311227
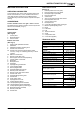
INSTRUCTIONS FOR USE INTRODUCTION ................................................................................................................................... 2 MANUAL PURPOSE AND CONTENTS ........................................................................................................... 2 TARGET ........................................................................................................................................................... 2 HOW TO KEEP THIS MANUAL .................
INSTRUCTIONS FOR USE INTRODUCTION OTHER REFERENCE MANUALS MANUAL PURPOSE AND CONTENTS – – The purpose of this Manual is to provide the customer with all necessary information to use the machine properly in a safe an autonomous way. It contains information about technical data, operation, machine inactivity, maintenance, spare parts and safety conditions. Before carrying out any procedure on the machine, the operators and qualified technicians must read this Manual carefully.
INSTRUCTIONS FOR USE SAFETY The following symbols indicate potentially dangerous situations. Always read this information carefully and take all necessary precautions to safeguard people and property. The operator's cooperation is essential in order to prevent injury. No accident prevention program is effective without the total cooperation of the person responsible for the machine operation.
INSTRUCTIONS FOR USE – – – – – – – – – – – – – – – – – – 4 Do not use the machine in particularly dusty areas. While using this machine, take care not to cause damage to people. Do not put any can containing fluids on the machine. The storage temperature must be between +32°F and +104°F (0°C and +40°C). The machine operating temperature must be between +32°F and +104°F (0°C and +40°C). The humidity must be between 30% and 95%.
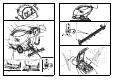
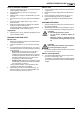
INSTRUCTIONS FOR USE MACHINE DESCRIPTION Under-tank front view (See Fig. I) OPERATION CAPABILITIES 1. 2. 3. 4. 5. 6. 7. 8. 9. 10. 11. 12. 13. 14. 15. 16. 17. 18. This scrubber-dryer is used to clean (scrubbing and drying) smooth and solid floors, in civil or industrial environment, under safe operation conditions by a qualified operator. The scrubber-dryer cannot be used for moquette and carpet cleaning.
INSTRUCTIONS FOR USE Wiring diagram (See Fig.
INSTRUCTIONS FOR USE Brush or pad-holder installation Machine stop 3. 5. 4. 5. 6. 7. 8. Insert the positioning pin (24, Fig. C) and deactivate the transport/parking device (23b). Lift the brush/pad cover (10, Fig. C) by prying the handlebar (2). Place the brush (12, Fig. I) or the pad-holder (13) under the cover. Lower the cover (10, Fig. C) by means of the handlebar (2). Connect the power supply cable (21, Fig. C) to the electrical mains.
INSTRUCTIONS FOR USE MACHINE TRANSPORT/PARKING AFTER USING THE MACHINE To transport/park the machine, proceed as follows. 1. Turn the brush/pad switch and the vacuum switch (2 and 3, Fig. B) to “0”. 2. Disconnect the power supply cable (21, Fig. C) from the electrical mains, then wind it round its support. 3. Lift the squeegee by means of the lever (19, Fig. C). 4. Grasp the handlebar (2, Fig. C) and slightly lower it until the rear wheel (7, Fig. C) comes into contact with the floor (Fig. D).
INSTRUCTIONS FOR USE MAINTENANCE The lifespan of the machine and its maximum operating safety are ensured by correct and regular maintenance. The following chart provides the scheduled maintenance. The intervals shown may vary according to particular working conditions, which are to be defined by the person in charge of the maintenance. WARNING! Maintenance operations must be carried out with the machine switched off and the power supply cable disconnected from the electrical mains.
INSTRUCTIONS FOR USE SQUEEGEE BLADE CHECK AND REPLACEMENT 1. 2. Clean the squeegee (according to the procedure shown in the previous paragraph). Check that the edges of the front (5, Fig. E) and rear blades (12) lay down on the same level, along all their length; otherwise adjust their height according to the following procedure: – Remove the fixing springs (6) and adjust the front blade (3) and the rear blade (4). – Reinstall the fixing springs on the properly adjusted front and rear blades. 3.
INSTRUCTIONS FOR USE SOLUTION FILTER CLEANING 1. 2. 3. 4. Empty the solution tank (5, Fig. I) according to the procedure shown in the relevant paragraph. Drive the machine on a level ground. Make sure that the power supply cable (21, Fig. C) is disconnected from the electrical mains. Remove the transparent cover (1, Fig. G) and the filter strainer (2); clean and reinstall them on the support (3). NOTE Properly install the filter strainer (2, Fig. G) in the housing (4) of the support (3).
INSTRUCTIONS FOR USE SCRAPPING Have the machine scrapped by a qualified scrapper. Before scrapping the machine, remove the following components: – Brushes – Plastic hoses and components – Electrical and electronic components CAUTION! Removed components must be disposed of according to the law in force.
INSTRUCTIONS D'UTILISATION INTRODUCTION ................................................................................................................................... 2 BUT ET CONTENU DU MANUEL .................................................................................................................... 2 DESTINATAIRES ............................................................................................................................................. 2 CONSERVATION DU MANUEL .............
INSTRUCTIONS D'UTILISATION INTRODUCTION BUT ET CONTENU DU MANUEL AUTRES MANUELS DE REFERENCE – Catalogue des pièces de rechange (livré avec la machine). Manuel d’entretien (consultable auprès des Services après-vente KENT). Ce manuel se propose de fournir au client toutes les informations nécessaires afin qu’il puisse utiliser la machine correctement et la gérer de la manière la plus autonome et sûre.
INSTRUCTIONS D'UTILISATION SECURITE On utilise la symbologie suivante pour signaler les conditions de danger potentielles. Lire attentivement ces informations et prendre les précautions nécessaires pour protéger les personnes et les choses. Pour éviter tout accident la collaboration de l'opérateur est essentielle. Aucun programme de prévention des accidents du travail ne peut résulter efficace sans la totale collaboration de la personne directement responsable du fonctionnement de la machine.
INSTRUCTIONS D'UTILISATION – – – – – – – – – – – – – – – – – – 4 Ne pas utiliser la machine dans des endroits très poussiéreux. Pendant l'utilisation de cette machine, faire attention à sauvegarder l'intégrité des autres personnes. Ne pas poser de conteneurs de liquides sur la machine. La température de stockage doit être comprise entre +32°F et +104°F (0°C et +40°C). La température de travail de la machine doit être comprise entre 32°F et 104°F (0°C et +40°C).
INSTRUCTIONS D'UTILISATION DESCRIPTION DE LA MACHINE Vue avant sous le réservoir (Voir Fig. I) CAPACITES OPERATIONNELLES 1. 2. L'autolaveuse est conçue et fabriquée pour le nettoyage (lavage et séchage) de sols lisses et solides, en milieux civils et industriels, en conditions de complète sécurité, par un opérateur qualifié. L'autolaveuse n'est pas adapte pour le lavage de tapis ou moquettes.
INSTRUCTIONS D'UTILISATION Schéma électrique (Voir Fig.
INSTRUCTIONS D'UTILISATION Installation de la brosse ou du plateau Arrêt de la machine 3. 5. 4. 5. 6. 7. 8. Désactiver (23b, Fig. C) le dispositif de transport/stationnement de la machine après avoir reposé la goupille de positionnement (24). Soulever la couverture de la brosse/disque (10, Fig. C) en faisant levier sur le guidon (2). Positionner la brosse (12, Fig. I) ou le plateau (13) sous la couverture. Baisser la couverture (10, Fig. C) au moyen du guidon (2).
INSTRUCTIONS D'UTILISATION TRANSPORT/STATIONNEMENT DE LA MACHINE Pour le transport/stationnement de la machine, procéder comme suit. 1. Positionner les boutons-poussoirs de brosse/disque et d'aspiration (2 et 3, Fig. B) sur “0”. 2. Débrancher le câble d'alimentation (21, Fig. C) du réseau électrique, et puis l'enrouler autour du support correspondant. 3. Soulever l'embouchure au moyen du levier (19, Fig. C). 4. Saisir le guidon (2, Fig. C) et le baisser légèrement jusqu'à ce que la roue arrière (7, Fig.
INSTRUCTIONS D'UTILISATION ENTRETIEN La durée de vie de la machine et sa sécurité de fonctionnement sont garanties par un entretien soigné et régulier. Veuillez trouver ci-dessous le plan récapitulatif d'entretien programmé. Les périodicités indiquées peuvent subir des variations en fonction de conditions de travail particulières, à définir par le responsable de l'entretien.
INSTRUCTIONS D'UTILISATION CONTROLE ET REMPLACEMENT DES LAMELLES EN CAOUTCHOUC DE L'EMBOUCHURE 1. 2. Nettoyer l'embouchure comme décrit au paragraphe précédent. Contrôler que les bords de la lamelle en caoutchouc avant (5, Fig.
INSTRUCTIONS D'UTILISATION NETTOYAGE DU FILTRE DE SOLUTION 1. 2. 3. 4. Vider le réservoir de solution (5, Fig. I), comme indiqué au paragraphe spécifique. Porter la machine sur un sol plat. Vérifier que le câble d'alimentation (21, Fig. C) est branché au réseau électrique. Dévisser le couvercle transparent (1, Fig. G) et déposer le filet filtrant (2) ; les nettoyer et les reposer sur le support (3). REMARQUE Positionner correctement le filet filtrant (2, Fig. G) dans le logement (4) du support (3).
INSTRUCTIONS D'UTILISATION MISE EN DECHARGE Effectuer la mise en décharge de la machine auprès d'un démolisseur qualifié. Avant la mise en décharge de la machine, il est nécessaire de déposer les éléments suivants: – brosses – tuyaux et pièces en matériel plastique – parties électriques et électroniques AVERTISSEMENT ! Les éléments déposés doivent être envoyés aux collectes sélectives, conformément aux normes d'hygiène de l'environnement en vigueur.
INSTRUCCIONES DE USO INTRODUCCIÓN ................................................................................................................................... 2 FINALIDAD Y OBJETO DE ESTE MANUAL .................................................................................................... 2 DESTINATARIOS ............................................................................................................................................. 2 CONSERVACIÓN DEL MANUAL .........................
INSTRUCCIONES DE USO INTRODUCCIÓN FINALIDAD Y OBJETO DE ESTE MANUAL OTROS MANUALES DE REFERENCIA – Catálogo piezas de repuestos (en dotación a la máquina). Manual de asistencia (que se puede consultar en los Centros de asistencia KENT). Este manual contiene todas las informaciones necesarias para que el cliente utilice la máquina de forma adecuada, autónoma y segura.
INSTRUCCIONES DE USO SEGURIDAD La siguiente simbología sirve para señalar situaciones de peligro potencial. Leer siempre cuidadosamente estas informaciones y tomar las precauciones necesarias para proteger personas y cosas. Para evitar desgracias, la cooperación del operador es fundamental. Ningún programa de prevención de accidentes resulta eficaz sin la total cooperación de la persona directamente responsable del funcionamiento de la máquina.
INSTRUCCIONES DE USO – – – – – – – – – – – – – – – – – – 4 No utilizar la máquina en ambientes demasiado polvorientos. Cuando se utiliza esta máquina, tener cuidado de salvaguardar la incolumidad de las personas. No apoyar contenedores de líquidos sobre la máquina. La temperatura de almacenamiento debe estar entre los +32°F y los +104°F (entre los 0°C y los +40°C). La temperatura de la máquina en trabajo debe estar entre los +32°F y los +104°F (entre los 0°C y los +40°C).
INSTRUCCIONES DE USO DESCRIPCIÓN DE LA MÁQUINA Vista delantera bajo del depósito (Véase Fig. I) CARACTERÍSTICAS DE FUNCIONAMIENTO 1. 2. La fregadora/secadora es adecuada para limpiar (lavar y secar) suelos lisos y sólidos, en ambiente privado o industrial, en condiciones de seguridad, por parte de un operador calificado. La fregadora/secadora no es adecuada para limpiar alfombras o moqueta.
INSTRUCCIONES DE USO Esquema eléctrico (Véase Fig.
INSTRUCCIONES DE USO Instalación del cepillo o del portafieltro Parada de la máquina 3. 5. 4. 5. 6. 7. 8. Desactivar el dispositivo de transporte/estacionamiento (23b, Fig. C) de la máquina después de haber activado la clavija de posicionamiento (24). Levantar la cobertura del cepillo/fieltro (10, Fig. C) presionando sobre el manillar (2). Colocar el cepillo (12, Fig. I) o el portafieltro (13) bajo de la cobertura. Bajar la cobertura (10, Fig. C) mediante el manillar (2).
INSTRUCCIONES DE USO TRANSPORTE/ESTACIONAMIENTO DE LA MÁQUINA DESPUÉS DE LA UTILIZACIÓN DE LA MÁQUINA Para el transporte/estacionamiento de la máquina, efectuar los procedimientos siguientes. 1. Llevar los interruptores del cepillo/fieltro y de la aspiración (2 y 3, Fig. B) en posición “0”. 2. Conectar el cable de alimentación (21, Fig. C) a la red eléctrica, luego envolverlo alrededor del soporte relacionado. 3. Levantar la boquilla mediante la palanca (19, Fig. C). 4. Empuñar el manillar (2, Fig.
INSTRUCCIONES DE USO MANTENIMIENTO Un mantenimiento cuidadoso y continuo garantiza la vida útil y la seguridad de funcionamiento de la máquina. El esquema siguiente resume el mantenimiento programado. Los períodos indicados pueden variar según las condiciones de trabajos, que el encargado del mantenimiento debe establecer. ¡ATENCIÓN! Las operaciones de mantenimiento deben efectuarse con la máquina apagada y el cable de alimentación desconectado de la red eléctrica.
INSTRUCCIONES DE USO CONTROL Y SUSTITUCIÓN DE LOS CAUCHOS DE LA BOQUILLA LIMPIEZA DE LOS DEPÓSITOS Y REJILLA DE ASPIRACIÓN 1. 1. 2. 2. Limpiar la boquilla (como indicado en el párrafo antecedente). Controlar que los bordes (5, Fig.
INSTRUCCIONES DE USO LIMPIEZA DEL FILTRO DEL DETERGENTE 1. 2. 3. 4. Vaciar el depósito del detergente (5, Fig. I) como indicado en el párrafo antecedente. Llevar la máquina sobre un suelo llano. Controlar que el cable de alimentación (21, Fig. C) esté desconectado de la red eléctrica. Desenroscar la tapa transparente (1, Fig. G) y quitar la rejilla filtrante (2); limpiarlos y remontarlos en el soporte (3). NOTA Posicionar correctamente la rejilla filtrante (2, Fig. G) en el alojamiento (4) del soporte (3).
INSTRUCCIONES DE USO ELIMINACIÓN Eliminar la máquina en un demolidor calificado. Antes de eliminar la máquina, quitar los siguientes componentes: – cepillos – tuberías y componentes de plástico – componentes eléctricos y electrónicos ¡ADVERTENCIA! Eliminar los componentes quitados según las normas actuales.
INSTRUÇÕES DE USO INTRODUÇÃO ....................................................................................................................................... 2 ESCOPO E CONTEÚDO DO MANUAL ........................................................................................................... 2 DESTINATÁRIOS ............................................................................................................................................. 2 CONSERVAÇÃO DO MANUAL ...........................
INSTRUÇÕES DE USO INTRODUÇÃO ESCOPO E CONTEÚDO DO MANUAL OUTROS MANUAIS DE REFERÊNCIA – Catálogo das peças de substituição (fornecido com a máquina). Manual de assistência (pode ser consultado nos Centros de assistência da KENT). Este manual tem o escopo de fornecer ao cliente todas as informações necessárias de modo que este esteja preparado para utilizar a máquina da maneira mais adequada, autónoma e segura possível.
INSTRUÇÕES DE USO SEGURANÇA Utiliza-se os símbolos abaixo para sinalizar potenciais situações de perigo. Leia sempre estas informações com atenção e tome as devidas precauções para proteger as pessoas e os objectos. A colaboração do operador é essencial para evitar acidentes. Nenhum programa de prevenção de acidentes pode ser eficaz sem a total colaboração da pessoa directamente responsável pelo funcionamento da máquina.
INSTRUÇÕES DE USO – – – – – – – – – – – – – – – – – – 4 Não utilize a máquina em ambientes particularmente poeirentos. Durante o uso desta máquina preste atenção para salvaguardar a segurança das outras pessoas. Não pose recipientes com líquidos na máquina. A temperatura de armazenamento deve estar compreendida entre +32°F e +104°F (0°C e +40°C). A temperatura de utilização da máquina deve estar compreendida entre +32°F e +104°F (0°C e +40°C). A humidade deve estar compreendida entre 30% e 95%.
INSTRUÇÕES DE USO DESCRIÇÃO DA MÁQUINA Vista dianteira sob o reservatório (Ver Fig. I) CAPACIDADE DE OPERAÇÃO 1. 2. A máquina de lavar e secar foi concebida e fabricada para a limpeza (lavagem e secagem) de pisos lisos e sólidos, em espaços públicos e industriais, em condições de comprovada segurança, por parte de um operador qualificado. A máquina de lavar e secar não é adequada para a lavagem de tapetes ou carpetes.
INSTRUÇÕES DE USO Esquema eléctrico (Ver Fig.
INSTRUÇÕES DE USO Instalação da escova ou do porta-feltro Paragem da máquina 3. 5. 4. 5. 6. 7. 8. Desengate (23b, Fig. C) o dispositivo de transporte/estacionamento da máquina depois de ter accionado a engate de posicionamento (24). Levante a tampa da escova/feltro (10, Fig. C) através da alavanca do guiador (2). Coloque a escova (12, Fig. I) ou o porta-feltro (13) sob a tampa. Abaixe a tampa (10, Fig. C) por meio do guiador (2). Ligue o cabo de alimentação eléctrica (21, Fig. C) à rede eléctrica.
INSTRUÇÕES DE USO TRANSPORTE/ESTACIONAMENTO DA MÁQUINA Para o transporte/estacionamento da máquina, siga as seguintes indicações. 1. Coloque os interruptores da escova/feltro e da aspiração (2 e 3, Fig. B) na posição “0”. 2. Desligue o cabo de alimentação (21, Fig. C) da tomada eléctrica, depois enrole à volte do respectivo suporte. 3. Levante o limpador através da alavanca (19, Fig. C). 4. Com as mãos segure o guiador (2, Fig. C) e baixe-o ligeiramente até que a roda traseira (7, Fig.
INSTRUÇÕES DE USO MANUTENÇÃO O tempo de vida da máquina e sua segurança de funcionamento são garantidos por uma manutenção cuidadosa e regular. Encontra-se indicado a seguir uma síntese do plano de manutenção programada. As periodicidades indicadas podem sofrer variações em função de condições especiais de trabalho, a serem definidas por parte do responsável da manutenção.
INSTRUÇÕES DE USO CONTROLO E SUBSTITUIÇÃO DAS BORRACHAS DO LIMPADOR LIMPEZA DOS RESERVATÓRIOS E DA GRELHA DE ASPIRAÇÃO 1. 2. 1. 2. Limpe o limpador (como descrito no parágrafo anterior). Controle que as bordas da borracha dianteira (5, Fig.
INSTRUÇÕES DE USO LIMPEZA DO FILTRO DA SOLUÇÃO DETERGENTE 1. 2. 3. 4. Esvazie o reservatório da solução detergente (5, Fig. I) operando como indicado no paragrafo específico. Coloque a máquina num terreno plano. Controle que o cabo de alimentação (21, Fig. C) esteja desligado da rede eléctrica. Aparafuse a tampa transparente (1, Fig. G) e retire a rede filtrante (2); limpe-a e volte a montá-la no suporte (3). NOTA Posicione correctamente a rede filtrante (2, Fig. G) na sede (4) do suporte (3).
INSTRUÇÕES DE USO FIM DE VIDA Proceda ao depósito da máquina junto a um demolidor autorizado. Antes de se desfazer da máquina, remova os seguintes componentes: – escovas – tubos e peças em material plástico – partes eléctricas e electrónicas ADVERTÊNCIA! Os componentes removidos devem ser descartados conforme a legislação vigente.
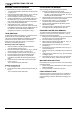
G I 1 2 18 6 4 17 5 3 7 2 1 S311247 H 15 3 2 10 3 1 8 5 11 12 13 14 4 J 16 9 S311229 909 6311 000(1)2006-01 S311248
K SW2 BN M2 BU PL SW1 BN YE-GN BU BN YE-GN BU M1 H1 EV1 BN YE-GN BU YE-GN FR S310245 909 6311 000(1)2006-01 14600 21st Avenue North Plymouth, MN, 55447-3408 www.kenteuroclean.