
Owner's Manual (Espanol)


76
7
D
E
2
B
3
4
5
6
2
C
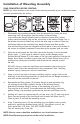
Installation of Mounting Assembly
READ COMPLETELY BEFORE STARTING
NOTE: Pay close attention to the order of the mounting assembly parts, as they have been
correctly assembled by the factory.
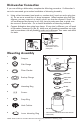
1. Disassemble the mounting assembly from the disposer by turning the lower
mount ring until it disengages from the ramps on the mounting
ULQJDQGWKHVLQNÁDQJHDVVHPEO\FDQEHUHPRYHG/RRVHQWKHPRXQW
VFUHZVXQWLOWKHPRXQWLQJULQJFDQEHPRYHGXSWRWKHEDFNXSÁDQJH8VHD
ÁDWEODGHVFUHZGULYHUXQGHURQHHQGRIWKHVQDSULQJWRUHPRYHLWIURPWKH
VLQNÁDQJH5HPRYHWKHPRXQWLQJULQJEDFNXSÁDQJHDQGÀEHUJDVNHW
IURPWKHVLQNÁDQJH1RWHWKHVHTXHQFHRIWKHVHSDUWVDVWKH\DUHVWDFNHGLQ
the correct re-assembly sequence. Keep these parts together and set aside.
2. Clean the area around the sink drain where the disposer is to be mounted.
(YHQO\DSSO\óµWKLFNURSHRISOXPEHU·VSXWW\DURXQGÁDQJHVHH$
3RVLWLRQWKHVLQNÁDQJHLQWKHFHQWHURIWKHVLQNGUDLQRSHQLQJ3XVKWKHVLQN
ÁDQJHGRZQÀUPO\WRPDNHDJRRGVHDOVHH%1RWH([FHVVSXWW\ZLOOEH
squeezed out during the installation and should not be cleaned up until
the end
'2127PRYHRUURWDWHWKHVLQNÁDQJHRQFHVHDWHGRUWKHVHDOPD\EH
broken. Note: Some sink manufacturers may recommend “Non- Staining”
plumber’s putty; check your sink care instructions.
3. Using a towel in the sink to prevent scratching, place a weight (such as the
GLVSRVHURQWKHVLQNÁDQJHWRKROGLWLQSODFHXQWLOWKHVLQNÁDQJHDVVHPEO\LV
secured from the underside of the sink.
5HDVVHPEOHWKHÀEHUJDVNHWEDFNXSÁDQJHDQGPRXQWLQJULQJ
PDNLQJVXUHWKHÀEHUJDVNHWLVRQWRSRIWKHEDFNXSÁDQJH
DQGWKDWWKHEDFNXSÁDQJHLVRQWRSRIWKHPRXQWLQJULQJVHH&
7KH\PXVWEHLQWKLVRUGHU)URPXQGHUQHDWKWKHVLQNÁDQJHSODFHWKH
JDVNHWÁDQJHULQJDVVHPEO\JDVNHWRQWRSRQWRWKHVLQNÁDQJHVHH'
5. Holding all 3 parts up against the sink, pull the snap ring (7) open and press
ÀUPO\LQWRWKHJURRYHRQWKHVLQNÁDQJHXQWLOLWVQDSVLQWRSODFHVHH'
Once in place, it will hold the mounting ring up.
6. Insert 3 mounting screws (5) into mounting ring and tighten screws evenly
DQGÀUPO\DJDLQVWWKHEDFNXSÁDQJHVHH(8VHVKRUWHUVFUHZVLIWKH
sink is more than 3/8” thick. DO NOT OVERTIGHTEN!
7ULPRIIH[FHVVSXWW\LQWKHVLQN
127(6KRUWHUVFUHZVVKRXOGEHDYDLODEOHDW\RXUORFDOKDUGZDUHVWRUH
NOTE: Read Operating Instructions at the end of installation.
2
A