
Instruction Manual

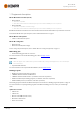
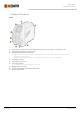
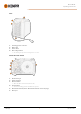
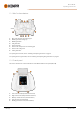

Table Of Contents
- 1. General
- 2. Installation
- 2.1 Installing power source mains plug
- 2.2 Installing cooling unit (optional)
- 2.3 Installing equipment on cart (optional)
- 2.4 Connecting welding gun
- 2.5 Installing earth return cable
- 2.6 Installing remote control (optional)
- 2.7 Installing and replacing feed rolls
- 2.8 Installing and replacing wire guide tubes
- 2.9 Installing and changing wire
- 2.10 Installing gas bottle and testing gas flow
- 2.11 How to get welding programs
- 3. Operation
- 3.1 Preparing welding system for use
- 3.2 Calibrating welding cable
- 3.3 Using control panel
- 3.3.1 Control panel: Home view
- 3.3.2 Control panel: Weld Assist
- 3.3.3 Control panel: Channels
- 3.3.4 Control panel: WPS view
- 3.3.5 Control panel: Welding parameters
- 3.3.6 Control panel: Weld history
- 3.3.7 Control panel: Info view
- 3.3.8 Control panel: Device settings
- 3.3.9 Control panel: Applying welding programs
- 3.3.10 Control panel: Weld data view
- 3.4 Additional guidance to functions and features
- 3.5 Pulse welding
- 3.6 Wireless connection (WLAN)
- 3.7 Using remote control
- 3.8 Changing welding polarity
- 3.9 Lifting equipment
- 4. Maintenance
- 5. Technical data

Master M 358
Operating manual - EN
1.2 Master M 358 device
Front
1. Transportation handle (also for mechanical lifting when the device is not installed on a cooling unit or cart)
2. Control panel (and hinged control panel cover)
3. Work lights with light switch in the middle
>> Light switch:First press turns the lights on (full brightness), second press dims the lights (medium brightness),
third press turns the lights off
>> Includes a built-in battery (the battery is charged when the equipment is connected to mains)
4. Control cable connector
5. Earth return cable connector
6. Front locking interface
>> For locking on top of the cooling unit or on the cart
7. Welding cable euro connector
8. Connector for subfeeder synchronization kit (optional)
9. Wire feed cabinet hatch.
© Kemppi
7
1921980 / 2242